Showing posts with label Tomatoes. Show all posts

Tuesday, 16 August 2016

Ara’yes- Crispy Mutton mince stuffed Pita


I have been sharing so many posts on desserts and cakes that I have actually started feeling guilty for doing so. It makes me feel so unhealthy especially because I am very particular about our daily eating habits, trying to make it as healthy as possible. I exercise daily and adopt portion control to satiate my sweet desires. In fact even the desserts I make are just for 2 portions, my daughter Vaanya and my husband Vishal. 
Since Baking is my prime love, I cannot help but keep experimenting some form of it in my tiny kitchen. This time I decided to try some Savoury baking. With Kolkata Food Bloggers ongoing event 'Bake Mania', I decided to experiment with an interesting recipe I came across while going through a book called 'The middle Eastern kitchen' by Rukmini Iyer. 
As I learnt from the book, Ara’yes is a simple and traditional Levantine recipe which has a crispy meat stuffed Pita bread. The traditional recipes call for the raw mince meat to be mixed with spices and then stuffing it in the Pita bread to be baked, grilled or toasted. The book, however, suggested to cook the mince meat first and then stuffing it. I followed the idea in the book of cooking the meat first. The basic recipe of the mince meat is the one that I keep making at home, a basic and homely mutton keema recipe. I made the Pita breads at home and kept them a little thin than usual because I wanted a more crispy Ara’yes. 
Vaanya, my daughter loved it more than anyone else. In fact, while I was taking pics I thought that she will not be interested in it but when she saw me taking a bite of it, she got inquisitive and after the first bite she demanded more of it. That obviously made me super happy and we ended up making a dinner meal out of it. I paired my Ara’yes with a hung curd dip to which I added chopped onions, tomatoes and fresh coriander leaves. 
Make it more spicier to suit your taste buds and enjoy this crispy meat filled sandwich. 


Recipe Source : Adapted from Rukmini Iyer's book 'The Middle Eastern Kitchen'
Meat filling

Ingredients :

  • 300 gms Mutton mince
  • 1 medium sized onion, chopped
  • 1/2 tbsp ginger garlic paste
  • 1 tomato, grated
  • salt to taste
  • 1/4 tsp turmeric powder
  • 1 tsp garam masala powder
  • 1 tbsp refined oil

Whole Garam masala (Khada masala)

  • 1" cinnamon stick
  • 2 whole green cardamoms, slightly crushed
  • 1 whole black cardamom
  • 2 bay leaves
  • 4 cloves
  • 1-2 dry red chilli (de-seeded)
  • 4 whole black peppercorns
  • 1 tsp cumin seeds

Procedure : 
Wash the mutton mince and strain it to let the water drain out completely.
Heat oil in a pressure cooker and add the whole Garam masala (Khada masala). 
Now add the onions and cook on medium heat till they are brown in colour and nicely caramelized. 
Add the ginger garlic paste and cook till it leaves oil. 
Now add the mutton mince and stir it in well. 
It will leave some water. Keep cooking it on medium heat till the water evaporates. 
Cook till the mutton mince leaves oil. Now add the grated tomatoes and salt, turmeric powder and garam masala powder and cook for 5 more minutes. 
Add 1/2 cup water and close the lid of the pressure cooker. Cook for 2 whistles and then reduce the flame to low and cook for 15 minutes. 
Let steam escape naturally and if there is water in the mutton mince, reduce it on medium flame. 

Whole wheat Pita

Ingredients : Yields 4-5 pita breads
  • 1 cup whole wheat flour
  • 1 tsp instant yeast
  • 1 tbsp olive oil
  • 1 tsp salt
  • a pinch of sugar
  • warm water for kneading (about 1/2 cup)
Procedure : 
Take flour, instant yeast, salt, sugar and olive oil in a bowl. Mix well.
Add warm water little by little and knead it to a dough using water as required. 
Take a greased bowl and put the dough in it. Cover it with a damp piece of muslin cloth and allow to rise for an hour or more or till it doubles in size. 
Heat a griddle or tawa.
Make 5-6" round pita bread from the dough and put on the griddle on low heat. Cook both sides and allow it to puff up by placing it on the heat. 
Alternately, bake the pita bread in a preheated oven (at 200 degree Celsius) for 10 minutes or till it puffs up. 
Cut them in halves. 

Ara’yes assembly : 

Preheat oven to 180 degree Celsius.
Grease an oven tray.
Take halved pita breads and stuff them with the mutton mince mixture.
Brush with butter or olive oil and sprinkle some salt on it. 
Place these on the baking tray and bake for 15-20 minutes or till they become crispy. 

Serve with a dip made with hung curd, chopped onions, chopped tomatoes and chopped coriander leaves. 

This recipe is part of Kolkata Food Bloggers ongoing event called Bake Mania where our member Urmi Ghosh who blogs from Ume's Kitchen is the featured blogger of the week. 


Happy Savoury Baking
Amrita

Saturday, 7 May 2016

Dal Chawal Chokha - Mummy's recipe


There are recipes that you feel only one particular person can make it that good. For me, there are many such that I associate perfection of that recipe only if its made by that person. The Rajma recipe I shared few posts back is one such. 
When I think of my mom and wonder which recipe of hers I love the best, I actually feel lost. For a child, his/her mother is always the best cook because that's the food we grow up with, that's the food we associate love and care with, that's the food we find comfort in. When I was away at hostel for 4 years, I missed mom's simplest of dishes. I would crave for a bowl of dal with a roti and a piece of mango pickle, just like how I would enjoy at home.
My mum's dal has been famous with my Bitty Mama too who would insist on this lavish meal of dal chawal chokha whenever we would visit them in Punjab. I remember how coyly we would all be seated with our plates relishing the simplest of meals with loads of lemon juice on top. Such simple lovely days. 
I first attempted making Mom like dal after marriage and it was a complete disaster. It was awful and terrible, the dal was overcooked, the tadka wasn't cooked well and I tried cooking in very very less oil. Many attempts later I still do not make it as well as she does and love to relish that simple bowl of mum made dal with my roti and pickle and on some days with the chawal and chokha. I am blessed to be living in the same city as my parents do and often find myself getting pampered with food and love. 
This Mother's day, I want to say a simple I love you to my mom who has always been by my side and, who has loved me for everything that I have done, who has been my partner in a whole lot of maniac things I keep doing. Love you Mummy. 


Ingredients : For 2 servings

Dhuli Moong Masoor dal :
  • 1/4 cup dhuli moong dal (Split Skinned Green Gram)
  • 1/4 cup dhuli masoor dal (Split red lentils)
  • 1 1/2 cups water
  • 1 large onion, chopped
  • 2 tomatoes, grated
  • 5-6 cloves garlic, chopped
  • 1/2 " ginger, chopped
  • 1-2 green chillies, chopped
  • 2 tbsp ghee
  • 1/2 tsp jeera (cumin seeds) 
  • salt to taste
  • 1/4 tsp turmeric powder
  • coriander leaves for garnishing
Aloo Chokha : 
  • 4-5 medium sized potatoes, boiled and mashed
  • 1 onion, chopped
  • salt to taste
  • 1/2 tsp amchur powder
  • 2 tbsp refined oil
  • lemon juice
  • coriander leaves for garnishing
Procedure : 

Dal : 
Wash and drain the dals.
Take a pressure cooker and add water. Add the dals.
Add salt and close the lid. Allow to cook for 2 whistles. 
Take ghee in a pan and add jeera, garlic, onions,  green chillies and ginger one by one. Cook till the onions brown well.
Then add grated tomatoes and cook till the masala leaves oil.
Add haldi powder and cook for a minute.
Now add the boiled dal and stir. 
Adjust salt and garnish with chopped coriander leaves. 

Aloo Chokha :
Take oil in a pan and add onions. Cook till the onions brown well.
Add the boiled and mashed potatoes and stir well. 
Add salt to taste and amchur powder. 
Sprinkle lemon juice and adjust according to your taste. 
Garnish with chopped coriander leaves.

Serve with boiled rice and lots of fresh lemon juice sprinkled on top. 


This recipe is part of Kolkata Food Bloggers ongoing event Comfort Food where Sayantani Mahapatra of A Homemaker's diary is the featured blogger.


Happy Mum's recipe relishing
Amrita

Tuesday, 5 April 2016

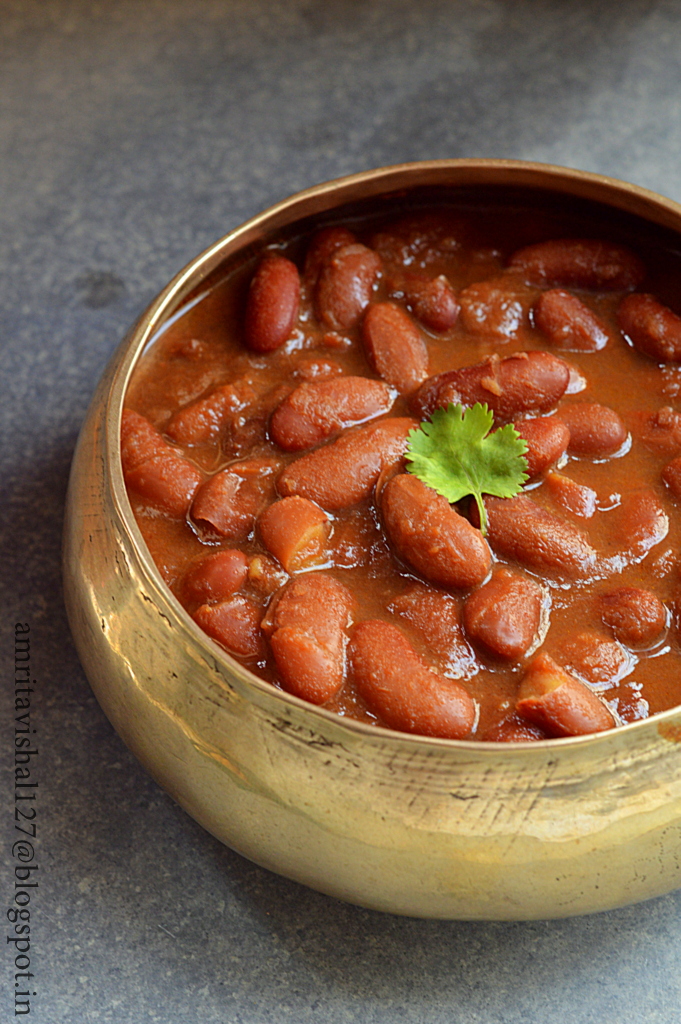
Rajma 'Massi wale'


Memories of my childhood are flooded with those sleeper class train journey's to Kotkapura, Punjab and the non stop fun I had with my cousins. We were together from morning to night playing, fighting, irritating each other and making the most of those few days of togetherness. It repeated every single year for a long part of my childhood and then we all grew up and went different directions. 
I have lovely memories of meal times as getting together for the family meant some special indulgence. My mamaji would always insist on dal-chawal-chokha (Dal, rice and mashed potatoes) made by my mother which was a real treat for all of us. Surprisingly, even though we are Sikh's, I remember both sides of my families relishing more on everyday vegetarian meals. No wonder I still love a simple vegetarian meal than a non-veg one. 
One such must dish during the holidays used to be my Massi's Rajma. My mom grew up with 2 sisters and 2 brothers and my Jinder Massi was the eldest of all. Jinder Massi, as I remember her from my childhood was always full of patience, love and understanding. She is such a warm hearted person who is full of understanding and love. I remember, she would deal with crisis with such composure. She as my cousin would call is Ma jaisi and therefore our Massi. 
This particular recipe is a little unconventional as she likes to use a little turmeric which is otherwise not used in Rajma recipes. The masala is also cooked in a different way where you will not require a grinder. Unlike some traditional recipes where Rajma is cooked and then added to the masala, here the Rajma is cooked in the masala so that it seeps into the beans. 
I simply love to pair my bowl of Rajma with boiled rice and the sweet tomato chutney from Bengal.


Recipe courtsey : My adorable Jinder Massi

Ingredients : For 2-3 servings
  • 1 cup rajma (red kidney beans), preferably Jammu variety (soaked overnight) 
  • 1 onion, roughly chopped
  • 5-6  whole cloves of garlic
  • 1/2 " ginger, grated
  • 2 tomatoes, grated
  • 2 tbsp refined oil
  • salt as required
  • 1 tsp garam masala 
  • 1/4 tsp turmeric powder
Procedure : 
Take a pressure cooker and put chopped onions, garlic cloves and grated ginger with a splash of little water. Close the lid and let it cook for 3-4 whistles.
Let the steam escape naturally. 
Open and mash them up with the back of a ladle.
Put it back on flame and let the water evaporate completely. 
Put oil in the pressure cooker and now cook the mixture till it separates oil (for about 8-10 minutes) on medium flame. 
Add grated tomatoes and let it cook for 5 more minutes. 
Add turmeric powder and salt and cook for 2 minutes.
Now add the drained Rajma and cook it for another 5 minutes. Stir in garam masala. 
Add 3 cups of water and close the lid. 
Let it cook on high flame for 2 whistles and then reduce the flame to low and cook for another 20-25 minutes. 
Let steam escape naturally. 
Remove the lid and adjust salt.
If gravy is too thin, put it back on flame and reduce to your requirement. 
Garnish with coriander leaves. 
Pair it with roti/parantha or rice.


Happy Rajma relishing
Amrita

Monday, 10 March 2014

Matar ke Chilke ki Subzi aur Pakode-Grandma recipe

Matar ke chilke ki subzi
Matar ke chilke ke pakode
I have beautiful memories of my Grandmother, who we fondly called 'Beji', warming herself in the winter sun while her fingers working non-stop on one thing or the other. Either it was peeling loads of carrot to make her lipsmacking Gajar ka halwa or my favourite Gajar ki kheer, or peeling loads of peas which were used with all sorts of vegetables. She had some amazing recipes under her sleeves which she would love to rustle up for her family. And her mantra was no wastage. Almost everything that could be cooked was put to use. She would walk herself to the market and get vegetables and fruits picking the best with her experienced eyes. Every month, I remember, she would hand wash the wheat grains, cleaning them to be ground to flour for everyday use. I remember she would keep telling us, spend as much as you want when the thing is really important and save as much as you can when that thing is not very significant. Penny by penny, she saved to run her family and tend to it very lovingly. 
It has been about 10 years she left us for her heavenly abode but I still miss her. Miss her warmth, her love, her wise words, her sweet chatter and her amazing recipes. Time heals the pain of losing her but I think of her every now and then and wish I could have spent more time with her. She lives today through her recipes that I keep attempting which are far from mimicking that same flavour and taste. I am sure it was that extra dollop of love that went in each dish which made it so special.
Today I am sharing my Beji's special Matar ke chilke which she would use to make a subji and even make Pakode out of it every winter. 

How to peel the chilke:


Take out the peas from the pods and open it. Break a little tip from the top and pull it down. You will see a thin peel coming off. Try and bring it all the way down. If it breaks in the middle, try peeling from the other end. Throw the thin peels and save the chilke for use.

Chilke ki subzi 

Ingredients : For 2 servings
  • 20 pieces of peas chilka
  • 1 large potato, peeled and cut in bite size
  • 1 medium sized onion, chopped
  • 2-3 garlic pods, chopped
  • 1 mediom sized tomato, chopped
  • 1 green chilly, chopped
  • salt to taste
  • 1/8 tsp turmeric powder
  • 2 tbsp vegetable oil
Procedure
Wash and pat dry matar ke chilke.
Chop them roughly in 1" pieces.


Heat vegetable oil in a deep pan/kadai and add the chopped onions. As they start changing colour add the chopped garlic and green chilly and cook for a minute.
Add chopped tomatoes and cook for 2 minutes. 
As you see the oil separating from the masala, add turmeric powder and salt and stir well.
Add the potatoes and cook for 2-3 minutes.
Add a little water for the potatoes to cook. Cover and cook for another 2 minutes. 
When the potatoes are half done, add the chopped matar ke chilke. 
Cook for about 5 minutes or till well cooked.
Serve with roti or rice and dal.

Chilke ke Pakode

Ingredients : For 2 servings
  • 10-15 Matar ke chilke
  • 1 tbsp besan/chickpea flour
  • 1 tbsp chawal ka atta/rice flour
  • salt to taste
  • 1/4 tsp red chilli powder
  • a pinch of turmeric powder
  • oil for frying
Procedure
Wash and pat dry matar ke chilke.
Cut them in 1 1/2" pieces.
Take besan and chawal ka atta in a bowl. Add salt, turmeric powder and red chilli powder. Mix well.
Add water, little by little to get a dropping consistency of the batter. It should not be too thick or thin. 
Heat oil in a deep pan/kadai.
Drop the batter laden chilke in the hot oil. 
Cook till they get a light brown colour and drain on an absorbent paper.
Serve these crispy yummies with imli/tamarind chutney.

Matar chilka chaat
I experimented with the crispy pakodas and added them to my chaat along with chopped onions, chopped coriander, imli/tamarind chutney, dollops of curd and bhujia sprinkled on top. It was truly amazing.

Happy Chilka experimenting
Amrita

Thursday, 30 January 2014

Foccacia Caprese


We at 'We Knead to Bake' have completed a year of baking amazing yeasted goodies together and have now entered another year where we are joined by some more members. I have missed on two bakes and plan to catch up on them very soon. 
The bake for this month was chosen by popular demand and after baking and devouring it, has become one of my favourite ones. I plan to make this again and also experiment with the toppings. 
Foccacia Caprese is basically a flatbread where the toppings are Caprese style where fresh tomatoes, basil and fresh buffalo mozzarella is used. 
Since buffalo mozzarella is not easy to get here, we have substituted it with the one we get readily in the markets. 
The Foccacia came out super soft and yummy and was over in no time. I had baked this for tea time and had to hide 2 slices for Vishal as me and Vaanya were all over it. 
The best compliment was from Vaanya when she in her toddler pronunciation exclaimed that the thing was 'Nummy Nummy' and 'So Taesty'. 
Here is Vaanya enjoying the Foccacia with her winsome facial expressions.

This is a super easy recipe where all you need to do is put all the ingredients in a bowl and mix them and then top with the easily and readily available toppings.
It resembles a pizza in appearance but the dough is pretty thick giving it a bready texture. 
Eaten best as it is, this Foccacia can be also paired with soup or salad. 


Recipe source : Kitchen Whisperer and adapted by Aparna

Ingredients : I reduced the recipe to 1/4 to get a 6 1/2"x4 1/2" oval Foccacia which serves 2 

Dough:
  • 1/2 tsp instant yeast
  • 1/2 tbsp sugar
  • 3/4 cup all purpose flour
  • 1/4 tsp salt
  • 1 tbsp olive oil
  • 1/4 cup warm water 
Topping:
  • 4 slices of a tomato
  • Mozarella cheese in 1/4" slices
  • 4-5 basil leaves, chopped
Herb Oil:
  • 1 tbsp olive oil
  • 1/4 tsp dried oregano
  • 1/4 tsp dries basil
  • a pinch of red chilli flakes
  • 2 garlic pods, finely chopped
  • salt to taste

Procedure :
Herb Oil
Mix all in a small bowl and keep aside.

Dough
Take a large bowl and put flour, salt, sugar, yeast and oil. Mix well. 
Add warm water, little by little, and knead till you get a smooth dough.
Shape into a ball and place in a well oiled bowl, turning to coat all sides. 
Cover with a damp muslin cloth and allow to double in size in a warm place for an hour. 
(I place in my microwave oven and keep the light on)
Spread the dough to fit the lined oval baking tray.
Instead you may make a rough oval/round shape and place on a lined baking tray.
Allow to rise for 20 mins.
Lightly oil your fingers and make dimples on the dough.
Brush generously with olive oil.
Preheat oven to 210 degree Celsius.
Bake the bread for 18-20 mins.
Take the bread out and increase heat of the oven to 230 degree Celsius.
Drizzle half of the herb oil on the bread and arrange slices of mozzarella cheese on it. Top with tomato slices and sprinkle chopped basil leaves.
Drizzle the remaining herb oil.
Bake for 5-8 mins or till the cheese just melts.
Remove and garnish with fresh basil leaves.


Notes :
  • If you want to make it little healthy, try substituting the quantity of flour with half whole wheat and half all purpose flour. 
  • You may try other toppings but then it will no longer be a Caprese. 
This recipe is being sent to the amazing ongoing event called 'Yeasty Feasty' by Kolkata Food Bloggers where all the members are going to present their droolworthy yeasty bread creations. To make this event more exciting, food bloggers all over are invited to send in their yeasty bakes. Please read the rules and other details here to participate. 

Happy Foccacia enjoying
Amrita

Tuesday, 19 November 2013

Bada Memsaheb ka Vegetable Seekh Kebab

Pic courtsey Kamalika Chakrabarty

Kolkata, or Calcutta as we all fondly still call, is a city that has been a host to various religions and nationalities like British, Chinese, Jews, Sikhs, Gujratis, Biharis etc. All these settlers with time have brought in some unique changes to the cuisine of Kolkata. One such famous and irrefutable change in the local cuisine was brought in by The British rule. Usage of local ingredients, restrained use of spices and western techniques gave birth to a unique cuisine which lived especially on a variety of 'Finger food' popularized in the clubs of Kolkata.
We are proud to announce that Kolkata Food Bloggers are working as co-organizers of the annual event Nutrifest, 2013 organized by KPC School of Nutrition and Food, Kolkata. Extensive research has been done by the KPC team to dig out recipes and history from places like Rajbari's to restaurants and clubs. The theme for this year is "Laatsaheb er Bangali Khanshama" which means the influence of British rule on Bengali cuisine. The search was for food which originated in the British era and can still be found in some prestigious clubs of Kolkata. 
The recipe that is shared here today is one of the by-forgotten ones and is uniquely named Burra Memsaheb-er vegetable Seekh Kebab (Bada Memsaheb ka Vegetable Seekh kebab) Along with its unique name, the kebab is supposed to be constructed of three elements each of which gave a Sweet, Spicy and Tangy flavour to it.
I have tried to recreate this famous dish by incorporating all the three flavours into the kebab. For the sweet flavour I have used Raisins and sweet corns, for the spicy flavour I have added green chillies and red chilli powder and for the tangy flavour, I have used chaat masala and lemon juice. 
Kolkata Food Bloggers got together to make a video shoot of this recipe along with some others. The video link shall be uploaded to this blog post as soon as it is released. 

Ingredients : For 5-6 seekhs(as in the picture with 2 kebabs in each)
  • 2 large potatoes, boiled
  • 1/4 cup green peas, boiled
  • 1/4 cup sweet corn, boiled
  • 1 carrot, chopped and boiled
  • 10 french beans, chopped and boiled
  • 1/4 cup cabbage, chopped
  • 2 tbsp roasted gram flour/besan
  • 1 tbsp cashewnut powder
  • 5-6 pieces of raisin/kishmish, chopped
  • 1 tbsp ginger-garlic paste
  • 1 green chilly, chopped (optional)
  • salt to taste
  • 1 tsp red chilli powder
  • 1 1/2 tsp chaat masala
  • 1 tsp roasted cumin/jeera powder
  • Green bell pepper, tomato and onion squares for garnishing

Procedure :
Take 1/2  tbsp oil in a pan and saute the ginger-garlic paste and the chopped green chilly for 2 minutes. Add the chopped cabbage and saute for a minute.  Remove from heat and keep aside.
Take a big bowl and add potatoes. Mash them. 
Add the boiled vegetables like green peas, sweet corn, carrots and french beans and mash them well. 
Now mix in the ginger-garlic, green chilly and cabbage mixture.
Add in salt, red chilli powder, chaat masala and roasted jeera powder.
Now add the cashewnut powder(made by simply grinding 5-6 cashewnuts), roasted gram flour/besan (made by dry roasting gram flour/besan) and chopped raisins. Mix well. 
Soak some wooden skewers in water for 1/2 hour. 
Take a little portion of the vegetable mixture and press it around the wooden skewer shaping it as a cylinder. Make two such shaped cylinders on one skewer.
Preheat oven to 180 degree Celsius. 
Line a baking tray with an aluminium foil and lightly grease it with oil.
Place the skewers on it and bake for 15-20 minutes or till golden brown from all sides. You will require to turn sides in between for uniform browning. 
Take 1/2 tbsp oil in a pan and saute the green bell pepper, tomato and onion squares.
Insert the sauteed garnishing in the skewers and serve with a yogurt-mayonnaise dip where you add equal quantity of hung curd and mayonnaise and adjust seasonings.
Add a dash of lemon juice on top of the kebabs before serving.

Notes
  • You may reduce the spiciness to suit your taste buds by not adding the green chilly.
  • In case, you cannot shape the kebabs on the wooden skewer, shape them into cylinders and bake them and later thread them through the skewers. 
  • In case the vegetables feel hard while mashing, roughly grind them in a mixer and then add to the other ingredients.
A special and heartfelt note of thanks to Kamalika Chakrabarty for providing me these lovely pictures which were taken during the video shoot. 
Check some more interesting recipes from the British era like Deemer devil and Country Captain Chicken on these links. 

Disclaimer : The entire history and recipe has been provided by KPC team. I have just tried recreating the original version with my little changes.
 
Happy By-gone era kebab relishing
Amrita

Sunday, 10 November 2013

Mummy ke Sauce Wale Chhole


Know your Kolkata Food Blogger's event comes to an end with a big bang as I proudly present a very learned and experienced blogger Indrani Dhar who blogs from Recipe Junction. I got the oppurtunity to meet her quite later and have known her as a busy Mother of three beautiful children who balances her real life and blog life with elan. Her blog is a reflection of the loving and caring person that she is with recipes that are tried, tested and approved by her family. 
I had the most difficult time trying to choose one single recipe as her blog is enriched with several interesting and yummy recipes. I finally chose to recreate her Punjabi Chhole recipe which can be viewed here
Coming from a Sikh family, Chhole has been staple to our diet along with Bhaturas and sliced onions. But today I wanted to share my mother's no fuss and very yum recipe which we lovingly call Sauce wale Chole. After the initial boiling of the chole/chickpeas, they are tempered with very simple ingredients and then are mixed with some tomato ketchup which gives the unique yummy flavor. 
I love to have them with hot puris and some tamarind chutney. That is my absolute favourite Savoury side!


Ingredients: Serves 2-3
  • 300 gms Kabuli chana/White Chickpeas
  • 1 Tej patta/Bay leaf
  • 1" dalchini/cinnamon stick
  • 2 laung/cloves
  • 1 badi elaichi/black cardamom
  • Salt to taste
Tempering :
  • 1 tsp jeera/cumin seeds
  • 1 medium sized onion, chopped
  • 2 medium sized tomatoes, chopped
  • 1/2 tsp red chilli powder
  • 1/4 tsp garam masala powder
  • a pinch of turmeric powder
  • 2 tbsp tomato ketchup
Garnish:
  • Ginger julienne
  • chopped Coriander leaves

Procedure :
Soak kabuli chana/chickpeas in water overnight.
Boil the kabuli chana in a pressure cooker with salt, bay leaf, cinnamon stick, black cardamom and cloves with water that should be 1" above the ingredients. 
After 1 whistle, reduce the flame to low and cook for 25 minutes.
Take oil in a pan for tempering and add cumin seeds. As they start browning, add the chopped onions. Cook till they turn brown and then add the chopped tomatoes. Cook for 2 minutes till the oil starts separating. 
Add turmeric powder,red chilli powder and garam masala powder.
Now add the boiled chickpeas and stir well. 
Cook on high flame to dry the water. 
Add tomato ketchup and stir well.
Adjust seasoning. 
Garnish with ginger julienne and chopped coriander and serve with hot puris, tamarind chutney and sliced onions
 

Happy Sauce Wale Chhole enjoying
Amrita

LinkWithin

Related Posts Plugin for WordPress, Blogger...