Saturday 29 December 2012

Rum Balls-Perfect seasonal Indulgence


Indulgence is the act of indulging or gratifying a desire

Indulgence!
Winter is the season of Indulgence. I am sure all of you have been digging into your favorite comfort food this season, promising yourself with each bite that this one will definitely be the last! As much as I am a believer in eat and live healthy, I guess its time of the year to leave behind your whims and worries and enjoy everything. The best way to do that is by limiting your intake, very strictly. And that is the reason I make very little portions, like how I made lesser than 1/4 of the recipe from my favorite site Joy of Baking
This recipe is so versatile that there is a substitute given for almost each ingredient and as described by Stephanie Jaworski(Joy of Baking) these rum balls are the perfect adult indulgence!
It took me less than half an hour to make these yummy delights and it took hardly a minute for them to disappear!! Loved by all with the slight hint of rum and chocolate topping, these rum balls were an instant hit. Vaanya, my baby, eyed them and wondered why we were not sharing it with her. So, she got a chunk of the chocolate topping to satisfy her choco-lover genes!!


 Ingredients: For 5-6 rum balls

  • 1/4 cup cake crumbs(I used my leftover cupcakes)You may use wafers, digestive biscuits or cookies
  • 1/4 cup toasted and ground almonds(you may substitute with hazlenuts, pecans or walnuts)
  • 2 tbsp powdered sugar(If you are using digestive biscuits, wafers or cookies with less sugar then increase sugar to 4 tbsp or adjust to your liking)
  • 1 tbsp cocoa powder(I did not use as my cupcakes were already very chocolatey)
  • 1/2 tbsp liquid glucose(you may substitute with honey)-used to bind the ingredients together
  • 2 tbsp rum (You may adjust to your liking)You may replace with orange or apple juice if you do not want alcohol.
For topping:
  • Melted dark chocolate (about 3 tbsp)for coating the rum balls
  • Melted white chocolate(about 1 tbsp) for drawing lines on the rum balls

Procedure:
To toast nuts - Preheat oven to 180 degree Celsius and toast nuts on a baking sheet for 8-10 mins or until lightly browned.Alternatively you may toast nuts in a pan on the gas stove. Cool completely and pulse them finely in your food processor.

Take a bowl and crumble the cupcakes finely.(If using cookies or wafers pulse them finely in the food processor)
Add the toasted and ground almonds.
Add powdered sugar, cocoa powder(I did not use this as said earlier) and mix well.
Now add liquid glucose or honey and rum. Mix very well. 
If you get a sticky mixture(I did not), refrigerate the mixture for half an hour before shaping them.
Shape the mixture into 1" balls. I got 5 such.
Melt dark chocolate on a double boiler or microwave for 1 min (watch every 20 secs) Add 1/2 tbsp of butter and mix well. Dip the rum balls in chocolate, take out and keep aside on a plate to set.
Meanwhile melt white chocolate on a double boiler or microwave for 1 min, watching every 20 secs. Put the chocolate in a ziplock bag or any plastic and snip off the end. Pipe lines on the rum balls.(Mine came out very roughly as you can see). Let it set.
Alternately you may roll the rum balls in icing sugar(or powdered sugar), cocoa powder, sprinkle or even finely chopped nuts.
Can be stored in an air-tight container for several weeks, if made in bulk.


Sending this recipe to Favorite Recipes- ChristmasLets cook edible gifts for christmas and 16 Christmas treats

Happy Indulgence and a Happy New Year!
Amrita

Monday 24 December 2012

Chocolatey Shortbread-The long and the short of...chocolate!!


'The long and the short of' - said when you want to explain the general situation without giving details
Shortbread - Shortbread is a type of biscuit having originated in Scotland.The 'short' refers to the short texture, meaning  sandy and break-apart as opposed to chewy or flaky

Chocolate!
The mere mention of this word brings the widest grin on any face and is universally loved by all. A bar of your favorite chocolate can brighten any gloomy day and is the perfect excuse to indulge and satisfy your sweet tooth. It is usually described as Rich, Creamy, Decadent, Smooth, Addictive, Delicious, Sinful, Devil's food!! 
I might be sounding like a Choco-maniac who loves to grab her favorite chocolate and not share with anyone! The fact is, how much ever I LOVE chocolate, I do not like to indulge in chocolate bars. I love chocolate as in a flavour in all my deserts, be it ice creams or yummy chocolate loaded pastries and tarts!! (I am so drooling!!)
Last month when my brother gifted me a pack of mini Toblerones and Skittles, I ended up using both of them in some yummy sweet indulgence. You will remember my Sticky toffee chocolate blondies using Skittles. As soon as my brother gave me the toblerones, I was reminded of this amazing shortbread I saw on Divya Kudua's blog Easycooking.
This recipe is very quick and easy to make and is very yummy. The reason I share this recipe is because above us all Vaanya, my baby, loved it! She turns 19 months today, on the eve of Christmas(does time fly fast or what). She is growing prettier, sweeter and naughtier by the day. She call me 'Mummy' in her most sweetest voice which I tell you is much more lovelier than any chocolate ever made. Some things in life are better than chocolate!!This recipe is made especially to celebrate our most sweetest day, the day she was born! 


Ingredients: I halved the recipe
  • 1/4 cup or 4 tbsp unsalted butter(room temperature)
  • 1/6 cup or 2 tbsp+2 tsp sugar(powdered)
  • 1/2 cup or 8 tbsp all purpose flour
  • a pinch of salt
  • Toblerone candy bars-I used 8 mini ones. You can use half of the big bar.(Substitute with any other sweet/dark chocolate, as you like it)


Procedure:
Preheat oven to 160 degree Celsius. Grease lightly a 6 " round tin(You may use a square tin)
Roughly chop the chocolates to small pieces and keep aside.
Take butter and sugar in a bowl and beat till creamy. Mix in the flour.
Mix it well and pat the dough in the prepared tin. Level the mixture with the back of a spoon or use your fingers.
Bake for 30 mins.
Take it out of the oven and sprinkle the chopped chocolate. Leave it for some time and then with a spoon spread it well. In the beginning the chocolate might not spread well and stick to your spoon but keep doing it till it smoothens.
Leave to set for a couple of mins and then cut in any desired shape. I chose a triangular shape. You may cut in squares.
Remember to cut it soon as otherwise the shortbread will harden and will be brittle while cutting. I did that mistake and you can see the uneven edges of my triangles.


Verdict: Do I have to say it. Vaanya's pictures say it all. I wasn't sure if she can eat it as I thought the base may be too hard for her(She has only 4 teeth up and 4 teeth down, she does not have her chewing set of teeth yet) But once I gave her she chomped on it so well, loving the chocolate and the soft base. She actually came asking for more!! Mothers delight, for sure! Easy peasy and a yummy desert. Baker's delight too!

The digged in piece

Sending this recipe to Quick and easy recipesBake Fest#14Kid's delight-deserts at Veena's veg nation and Srivalli's Spice your life

Happy Chocolate Indulgence and a Merry Christmas to you all
Amrita

Friday 21 December 2012

Twin Treat-Cute Reindeer Cupcakes and Devil's Food Cupcakes


Plans !
At the beginning of this month, I made a plan with the list of recipes to be made and shared on the blog. I planned to make Truffles and Rum balls, Christmas fruit cakes and all sorts of Christmas Bakes!! Another thing on my plan was to participate in the event 'Cook like a star-Martha Stewart' which my dear friend Yen of Eat your heart out is co-hosting with Zoe of Bake for Happy kids and Jocelyn of Riceball Eats for this month. One thing led to the other and the entire month breezed by and here I am barely 3 days left to Christmas, still with the plan!
Well, I made another plan!! To kill two birds with the same stone! I decided to make a Martha Stewart cupcake and do a christmassy icing. I eyed these cute little adorable reindeers on Pinterest and have been wanting to replicate them for the longest time. Every time I see them, my heart strums Vaanya's favorite Christmas carol
Rudolph, the red-nosed reindeer 
had a very shiny nose. 
And if you ever saw him, 
you would even say it glows. 


I eyed these chocolicious cupcakes here and wanted to try them badly so I planned(yet again) to make half as the recipe goes and the other half with the reindeers. 
Our Christmas tree is finally put up and all the decorations are out so I made the most of it!! Everyone loved the aptly named Devil's food cupcakes  and adored the cute reindeers. The cupcakes are soft dark chocolatey and very yummy.

Ingredients: I quartered the recipe to yield 7 cupcakes

  • 3 tbsp cocoa powder
  • 3 tbsp hot water
  • 3/4 cup all purpose flour
  • 1/4 tsp baking powder
  • 1/4 tsp baking soda
  • pinch of salt
  • 1/4 cup butter
  • 1/2 cup + 2 tbsp sugar (powdered)
  • 1 egg
  • 1/4 cup sour cream(I used yogurt)
  • 1-2 drops vanilla essence

Procedure:
Preheat oven to 180 degree Celsius.
Line standard muffin tins with liners.
Whisk together cocoa and hot water until smooth.
In another bowl sift flour, baking powder, baking soda and salt.
Melt butter and sugar in a saucepan over medium heat, stirring well to combine. Remove from heat and pour in a mixing bowl. Beat with an electric mixer till mixture is cooled, 4-5 mins.
Add egg and mix well.
Add vanilla essence and the cocoa mixture and beat till combined well.
Add flour mixture in two batches, alternating with yogurt and beat until just combined.
Pour batter in prepared tins filling each till 3/4.
Bake for 20 mins or till a toothpick inserted in the middle comes out clean.
Cool them well before icing.
Assembly:
I used my leftover Chocolate honey frosting from Chocolate Almond cake. Spread them well on the cupcakes and sprinkle some chocolate shavings for Devil's Food cupcakes.
For the reindeer cupcakes, I spread the same frosting as base. Made eyes out of blobs of white butter and mouth with some white butter mixed with chocolate sauce to get the brownish tinge. Melt some dark chocolate and put in a ziplock bag or a plastic and snip of the end. Draw pairs of eyes and reindeer antlers on a butter/parchment paper. Draw extra pieces as they are brittle and may break. Let it cool completely and carefully peel off. Put the eyes on the white butter blobs and antlers on the head. For the noses I used Skittles (remember my Skittles experiment) You can use Gems or any other small round candy with brown/dark purple and red colour.


Sending this recipe to Yen for cook like a starMerry Christmas celebrationsCook Joy Bake fest#14Favorite recipes Christmaslets cook edible gifts for christmasfoodomania's christmas-cook-off-contest60 days to christmas16 Christmas treats and celebrate christmas

Merry Christmas
Amrita

Monday 17 December 2012

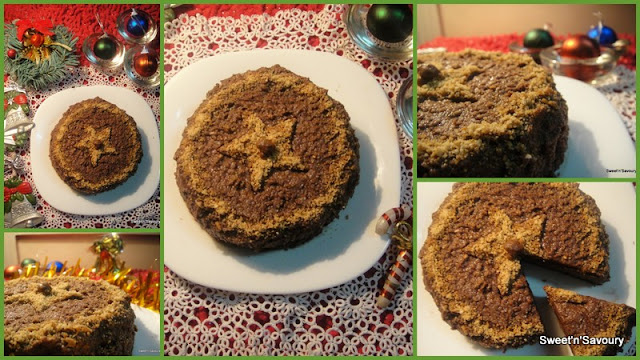
Chocolate Almond cake for Christmas


Another Baking Partners Challenge and we were given three cake recipes to celebrate the colourful season of Christmas. I loved all three and had a very hard time zeroing on to one of them. Being a complete Choc-o-holic, I had no choice but give in to the chocolate cake recipe!! Interestingly this recipe calls for Brazil nuts, and I (probably like most of you) had no idea about these nuts lest find them here. So it was decided to substitute with almonds though I wanted to try walnuts so badly as chocolate and walnuts have such a unique unseparable combination. Anyways almonds it was decided!

The cake rose like a dream filling my new make shift kitchen with the most inviting aroma. I was literally waiting and drooling for it to get baked soon. The rich chocolate smell was just way too mesmerising. Together with the chocolate honey frosting it was one of the most soft, moist and delicious chocolate cakes. Definitely a keeper recipe.

Thankfully because of this cake, Vishal finally brought out the christmas tree and all the decorations as I wanted some for my pics. Now we all await to put up the tree very soon. Christmas is certainly very near!!


Ingredients:I have halved the original recipe

For the cake:
  • 1/2 cup almond meal or almonds soaked overnight and peeled
  • 1/3 cup semisweet chocolate, chopped
  • 6 tbsp sugar(powdered)
  • 3 tbsp all purpose flour
  • 1/4 tsp baking powder
  • 6 tbsp unsalted butter, at room temperature
  • 3 eggs separated, room temperature
  • a pinch of cream of tartar
For the chocolate honey frosting:
  • 1/2 cup whipping cream
  • 1/4 cup dark chocolate, finely chopped
  • 3 tbsp butter, softened
  • 2 tbsp honey

Procedure:

Cake:

Preheat oven to 175 degree Celsius.
Take almonds and toast them for 5 -10 mins in the oven or till they dry up. Let them cool and grind them with 1 tbsp of sugar to a fine powder. (It is important to see that they dry completely before grinding otherwise you will get a paste of almonds)
Melt chocolate on a double boiler or microwave for 1 min(take care as the chocolate may burn, safest way is to microwave for 30 secs, stir and see how much is it left to be melted)
Grease and line your baking tin. I used a 6x2'' round tin.
In a bowl, sift flour and baking powder and mix the almond meal/powder.
Cream butter with 4 tbsp of sugar till fluffy and smooth. Add one egg yolk at a time and mix till all 3 egg yolks are blended well. Stir in the melted chocolate.
In another clean bowl, whip 3 egg whites with a pinch of cream of tartar till it forms soft peaks. Add the remaining 1 tbsp of sugar and beat till egg whites are stiff and shiny.
Gently fold in 1/3 of the egg white mixture in the chocolate flour mixture. Repeat till all of it is blended well.
Pout the batter in prepared baking tin and bake for 35-40 mins or till a toothpick inserted in the middle comes out clean.
Let it cool and remove from the tin.


Chocolate honey frosting:

Take cream in a saucepan and bring it to a boil. Add chopped chocolate and stir well till smooth. Mix the butter and honey. 
Let it cool to room temperature and refrigerate for 30 mins.
Whip the chocolate cream on an ice bath.
Spread frosting evenly on the sides and top of the cake. 
Garnish the cake by sprinkling some almond meal/powder on top of the cake. I chose a star pattern to celebrate the spirit of Christmas!


Sending this recipe to Merry Christmas Celebrations, Cooks Joy Bake Fest#14, Favorite recipes Christmas, Cook.eat.delicious-deserts, Lets cook edible gifts for christmas,  Food-o-mania's Christmas cook off contest, 60 days to christmas, Celebrate Christmas 

Happy Celebrating Christmas
Amrita

Friday 14 December 2012

Sticky Toffee Chocolate Blondies-A Blooper Creation


Experiments
They either fail miserably teaching us how to improve next time or they succeed and rise from the ashes like a phoenix and make us want to repeat it again exactly the same way!!
I am sure all of you have had such victories and failures in your respective kitchens. 
Just few days back when Vishal made those awesome Chicken Cheese and Fish Tikka Kebabs, I took charge of the dips to go with it. After making the conventional coriander chutney, I decided to experiment. Having literally no idea in my head I took a bowl and randomly started adding ingredients like sesame seed oil, vinegar, soy sauce, curd...(lick) ...added mayonnaise, chopped coriander and parsley...(lick)... added a few more things like sugar and lemon to adjust the weird taste my experiment had...I finally gave up with whatever it was thinking that anyways it will definitely end in the drain. And would you believe me if I said that it was literally licked off that same bowl !! To top it all I was asked the recipe of THAT dip..I mean what was I supposed to say..I definitely had no recipe. 
Experiments, I tell you, can sometimes be a winner!!


Well I am certainly not sharing the recipe of that hit dip. What I am sharing today is yet another experiment that shone like a bright star. My dear brother who works in the Merchant Navy and is gone away from home for months together, was back a few weeks back. He came to our new place and very sweetly got us all pretty gifts. He gave me a pack of mini Toblerones and a pack of Skittles. Now if you are someone like me who knows her Toblerone but is unaware of skittles, let me tell you these are bite sized different flavoured chewy candies. The look of it made me think they are similar to our very own Gems or the M&M's. The Baker part of my brain instantly asked me to experiment with them both.(The Toblerone recipe will be coming soon). So I decided to put these candies on top of a cupcake thinking they will look pretty with colourful tops. But lo and behold, as soon as I put them in the oven they started sinking in...disaster!! I waited for them to be baked halfway and then topped with another set of these colourful candies. Some of them still sank. 
Alas! My experiment died an untimely death. 
My experiment did not look the way I wanted but once I braved to taste them, they were really very different and had a sticky, chewy and yummy base. The chocolate blondies in itself are very soft moist and tasty. 
So if you do not want the chewy part, do not add the candies and go ahead to savour these blondies(a cousin of the famous brownies, named so as they are made of white chocolate)


Ingredients: For 6 blondies

  • 1/4 cup grated white chocolate
  • 1/4 cup unsalted butter(at room temperature)
  • 4 tbsp sugar(powdered)
  • 1 egg
  • 1/2 cup all purpose flour
  • 1/4 tsp vanilla essence
  • 1/2 tsp baking powder
  • A packet of Skittles


Procedure:
Preheat oven to 180 degree Celsius.
Grease and line 6 muffin cups or lightly grease silicone muffin moulds.
Melt chocolate on a double boiler or microwave till melted(try 30 second pulse. I managed to burn mine as I had put on 1 min)
Beat butter and sugar till fluffy and creamy.
Add egg, flour, baking powder and vanilla essence.
Add melted chocolate and mix well.
Divide and pour the batter in the prepared muffin cups.
Arrange different coloured skittles on top (omit this step if you do not want to add the candies) and bake for 25-30 mins or till a toothpick inserted in the middle comes out clean.


I later tried the same recipe with Gems trying to time them once the batter is half baked, but did not succeed and to top it all the gems became more hard.

A perfect recipe to celebrate the colourful happy spirit of Christmas. Enjoy!

Merry Chritmas Celebrations

Happy Crazy Experimenting!
Amrita

Wednesday 5 December 2012

Gajar di kheer/Carrot milk pudding


Come winter and out comes a list of recipes that I have been wanting and waiting to make. My head is full of so many recipes to make and share that it gets difficult to decide where to start from and where to end. Should I try recipes with the lovely sweet peas or should I jump onto healthy fresh spinach recipes... how I have waited for the pretty carrots to put them in sweet as well as savoury dishes. My mind is truly very fuzzy.

Me and my mom(like any) are dependent on each other when it comes to certain things, and one such big thing is deciding on a menu. She asks me what to make today and I ask her what do we have today! And together we love to try, make and serve yummy dishes. So one such day, I reminded her of this wonderful 'Gajar ki kheer' which is one of my Grandmother's Ultra Delicious Original recipes. She had a way with food ..I mean she would tirelessly spend the entire day making something or the other in her little kitchen. And she would cook with so much love and affection that every dish would turn out to be a yummy delight. 

This recipe is a very quick one and is a healthier cousin of the famous rich 'Gajar ka halwa'. A wonderful way to enjoy the season of sweet slender carrots!!


Ingredients:
  • 2 medium size carrots/gajar
  • 500 ml milk
  • 2 tbsp sugar (or less depending on your taste)
  • 1 tbsp vanilla custard powder
  • 1 tbsp ghee/clarified butter (you can use oil too)

Procedure:
Wash and peel carrots and grate them.
Take oil in a deep pan/kadhai and add the grated carrots. Stir them and cook for a minute or two.
Add milk and cook on medium heat, stirring continuously  for 5-10 mins till the milk reduces slightly.
Now add sugar. Stir well. Adjust sugar to your taste.
Dissolve custard powder in little water/milk and add it to the hot carrot-milk mixture. Stir well and cook for another minute till the mixture thickens and combines.
(Add more custard powder if you want a thicker consistency)

Note:Custard powder helps the mixture to bind together as otherwise carrots will float in milk.


Happy Enjoying the seasonal produce
Amrita


Saturday 1 December 2012

Favorite Rice Dishes Event Roundup-A big Thank you to all

The month of November came to an end and it also brought an end to the event Favorite Rice Dishes that I have been Guest hosting for Swathi of Zesty South Indian Kitchen. Though very frankly I haven't been able to do much justice to her wonderful event. I even made a silly typing mistake in giving my email ID which was realized and corrected only by the 20th. Have to thank Nandita of Nan's Yum-Yum's for letting me know of the typing mistake..sorry Nandita should have listened  to you earlier!! 
So dear friends if your sent recipe is not in the list below, please forgive me and inform me at amritavishal127@gmail.com so that I can do the needful and add to enrich the list further.


The early bird and the last contributor coincidently were the same- Roha Khan who blogs from an amazing site called Hyderabadi Cuisine. Her site is an insight to the rich and famous world of hyderabadi food.
Her first entry was Hyderabadi Gosht ki Tehri
and her last entry to the event was the yummy  Chawal ki kheer aur Puri

Sherin Jos Payyappilly blogs from Kuk's Kitchen
Sherin is a Doctor by profession who loves to cook and serve and has an amazing collection of food from different cuisines.
Her entry was truly a treat for the soul-Keralan Chicken Biryani


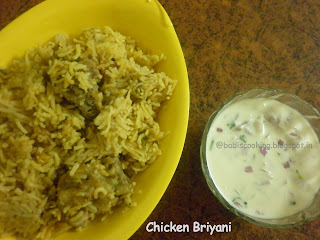
Babitha Costa blogging from Babi's Recipes who loves to cook different dishes for her two lovely children sent us two very simple and elegant recipes.
vegatable pulao
and a very easy to cook Chicken Biryani
Chicken briyani

Sushama Pinjala who blogs from My Kitchen to Yours loves sharing simple and amazing recipes sent us my personal Favorite Chickpea Pulao

My dear Malaysian friend Yen who is a passionate foodie and photographer blogs from Eat Your Heart Out- Goodyfoodies. She sent me two amazing recipes, one of which is the Malaysian National dish called Nasi Lemak.She wonderfully paired them with Sambal prawns.
Her other entry, a treat to the eyes, was the very beautiful looking Thai Pineapple Fried Rice

Swathi Iyer, the brainchild of this series of event, who blogs from the very famous site called Zesty South Indian Kitchen sent her very amazing and traditional Coconut Rice.Her awesome collection of recipes and food photography can make anyone hungry.

Pallavi Purani, a full of life person who in her own words is an IT someone waiting to quit and fulfill her culinary dreams, blogs from Cook-Eat-Burrrp. She sent us a very healthy recipe with soya nuggets called Mexican Rice

Nandita Pai Shirali, a very sweet person who is a Technical writer and is passionate about writing, loves to create her own version of dishes. She blogs from a very picturesque site Nan's Yum Yum's!
She sent us very creative, colourful and healthy Broccoli Stir-Fry Rice that she paired with a capsicum bhurji

and a very interesting one pot meal in Chana pulao/Chickpea pilaf


Ramya Kumar who blogs from ramyaskitchen sent us a very appetizing Soya Kesar Pulao where she used soya milk to cook rice.

Sireesha Puppala, a passionate foodie and photographer, loves to give a step by step description of her dishes. She blogs from Siri's Food Flavours and sent us her very beautiful and interesting twist to leftover rice Onion Ghee Masala Rice/Onion Rice
 

Suja Manoj, a husband wife duo who share their love for food, love to cook, plate and take pictures together. They blog from Kitchen Corner-Try it and sent us a lovely Fried Chicken Biryani

Farah Saleem Azeez who blogs from My Cookbook loves to experiment with different dishes and comes out with a variety of recipes to suit your taste buds. She sent us a very healthy and yummy recipe Broccoli and cucumber rice

Sowmya who blogs from a strictly vegetarian recipe site Nivedhanams , shared a very traditional and famous recipe from South India Idli  
IMG_5211

Anjana Chaturvedi, a mother who very sweetly started blogging to help her newly wed daughter with recipes and tips to cook, shares only amazing vegetarian satvik food at Maayeka. She sent us a very wholesome Aloo matar Tehri/Matar vadi wale chawal


Ruchi Indu who blogs from a site named Ende Kushini sent us a Beef Biryani which is loved by her family


Rajani who loves cooking, writing and taking really amazing photographs blogs from My Kitchen Trials. She sent us yet another beautiful version of Chana Pulao


and a very healthy and appetizing Vegetable Khichdi

Lastly, I list the entries by your's truly. I have tried to share recipes which incorporate rice in different ways including in a sweet dish. 
I shared a biryani Mutton Biryani-Amma's recipe

khichdi from Karnataka Bisi Bele Bhath

traditional recipe from Bengal Mishti Pulao with spicy Aloo dum

tried and tested Mummy style Fried Rice loaded with cashewnuts


and ending on a sweet note with a traditional Bengali recipe Nolen Gur-er Payesh/Kheer

I thank each and everyone to be a part of my first event and enriching it with all your amazing out-of-the-world recipes. Please feel free to leave your suggestions and comments to help me grow better.

Happy Cooking and Sharing
Amrita

LinkWithin

Related Posts Plugin for WordPress, Blogger...