Showing posts with label Brown sugar. Show all posts

Saturday, 25 June 2016

Lychee pannacotta with Ginger biscuit crumb and Coconut lemon curd


I am back to crazy 'Masterchef Australia' watching days. With the current season going on at number 8, I realized that I have missed many seasons in between my first tryst with the series. It all started with series 2 and I remember those days when Dinner was finished by 9 PM so that I could indulge in some non-stop gastronomic ride. My baby, Vaanya was then just few months old and needed attention all the time. Vishal and me would take turns to look after her while we eagerly watched each episode very religiously. 
This season my interest got rejuvenated and I have been ogling and drooling at all the artistic desserts that have been put up. Plating is the key in making even a simple dish shine and stand out in front of complex ones. With all this in my mind, I decided to try my hands in a simple dessert with different elements and a pretty plating technique. Firstly, I decided to hero the fruit-Lychee and pondered on all the other components which can go along with it. In terms of flavours, I decided to pair my lychee with ginger and coconut. So, the idea of ginger biscuits crumb and a coconut lemon curd came into my mind which sounded like a perfect harmony to my lychee pannacotta. 
I used some thickened grape juice to brush the plate and then very patiently decorated all the components on it. My over excitement led me to try 2 different platings with the same dessert. I am super mighty happy with the outcome. Do share your thoughts on the dessert. Will mean a lot to me. 


Components : 
  • Lychee Pannacotta
  • Ginger biscuit crumb
  • Coconut and lemon curd
  • Reduced grape juice
  • Fresh lychees
  • Mint leaves
Ingredients and Procedure

Lychee Pannacotta : 
  • 1 cup cream (I used Amul)
  • 9-10 lychees, peeled and deseeded
  • 2 tbsp sugar, powdered
  • 1 1/2 tsp gelatin powder
Blend the lychees in a mixer and strain.
Bloom gelatin in 1 tbsp cold water and allow it to get spongy for about 5 minutes.  
Heat cream and sugar on medium heat and add the pureed and strained lychee mixture. Do not let this mixture boil. 
When the mixture is warm enough to touch, add the bloomed gelatin and mix well. 
Pour in moulds of your choice. I chose my small spherical moulds and some silicon cupcake moulds. 
Refrigerate for 4 hours.

Ginger Biscuit : 
  • 1/2 cup all purpose flour
  • 4 tbsp brown sugar, powdered
  • 25 gms butter, room temperature
  • 1/4 tsp baking powder
  • 1/4 tsp baking soda
  • a pinch of salt
  • 2 tsp dry ginger powder
Beat butter and sugar till light and fluffy.
Add baking powder, baking soda, dry ginger powder, salt to all purpose flour. 
Add flour mixture to butter-sugar mixture and mix well.
Knead the mixture to a dough and cling wrap it. 
Refrigerate for 1 hr.
Preheat the oven to 180 degree Celsius.
Roll the dough and cut round shapes from it.
Place on a baking paper lined baking pan and bake for 15-20 minutes. 


Coconut and lemon curd : 
  • 1 egg yolk
  • 2 tbsp powdered sugar
  • 25 gms butter, cut in cubes
  • 1/4 cup coconut milk
  • 1 tbsp lemon juice
Take egg yolk and sugar in a bowl and put on a double boiler on low heat. 
Keep stirring the mixture.
Add butter cubes and mix well.
Add coconut milk and stir till it thickens for about 3-4 minutes.
Finish with adding lemon juice and mix well.
Allow to cool and then transfer to a piping bag. 

Plating : 
Brush your plate with the reduced grape juice which is made by simply putting grape juice in a pan and heating it till it thickens. 
Crumble the ginger biscuits and put them on the plate in a round shape, a little bigger than the pannacotta size.
Demould the Pannacotta and gently put on top of the ginger biscuit crumb. 
Add some fresh peeled and deseeded lychees.
Pipe the coconut lemon curd in intervals and finish with arranging fresh mint leaves. 


Happy Masterchef Inspirations
Amrita

Wednesday, 27 August 2014

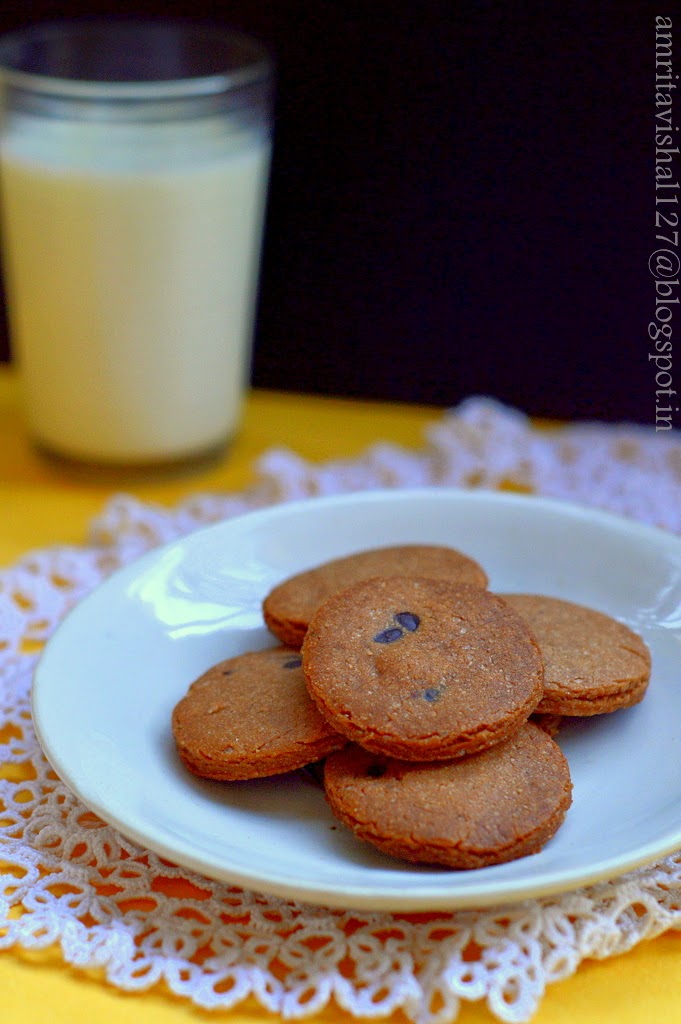
Cookie glass & some choco-chip cookies


Every now and then I am on a break from our blog. I guess with everything that you are passionate about there comes a time when you want to take a break.. relax..take a backseat and just wait for the right moment to get back on your feet and start again....that is if you are still passionate about it. 
Thankfully my passion to cook and click is still alive and hence here I am sharing a little overdued 'Sweet day' post. 
Choco chip cookies is not something new to the world of baking. In fact they were invented accidentally by Ruth Graves Wakefield of Toll House Inn who replaced baker's chocolate with chopped pieces of semisweet chocolate bar from Nestle which did not melt and only softened giving birth to the famous Chocochip cookies.
As famous as the chocochip cookies itself is its pairing with a glass of milk. There is certainly something about dunking your cookie in a glass of milk and eating it which is loved by all. 
Recently I chanced upon the Cronut Guru Dominique Ansel's newest invention-The Cookie shots where he has given a new dimension to the timeless pairing of cookies and milk. He made cookies shaped in glasses which can hold the milk and therefore you can drink your milk and eat your cookie at the same time. The cookie shots are lined with a layer of melted chocolate to avoid the milk seeping in the cookie and breaking it. 
I decided to try them at home but struggled with any pan of that shape. Found on the net about using stainless steel for baking and chose some glasses for my experiment which turned out pretty good. Stainless steel can get very very hot and hence you need to be very very careful while dealing with it for baking. Another important thing is greasing the glasses really really well. I regretted not trying one batch by lining the glass with butter paper/parchment paper. I overbaked one batch and had the toughest time of my life trying to get the cookie out from the glass. Well, it finally crumbled and came out a mess. Thankfully one cookie glass came out good enough for my experiment and I loved pouring my milk into it and enjoyed the experience of having my milk in a cookie glass! 
This sweet recipe definitely had to be on my Sweet day recipe list. Vaanya, my daughter enjoyed the cookies more than the cookie glass. I guess the traditional did beat the modern here. 


Recipe : Adapted from here 

Ingredients : Yields about 15 small cookies (2" round) and 2 cookie glasses (3" height)
  • 1/2 cup butter, room temperature
  • 3 tbsp sugar, powdered
  • 4 tbsp brown sugar, powdered
  • 1/4 tsp baking powder
  • 1 1/4 cup all purpose flour
  • 1 tbsp cocoa powder
  • 1/4 tsp salt
  • 1/4 cup choco-chips
  • 1/4 cup melted dark chocolate


Procedure : 
Take butter and both sugars in a bowl and whisk till light and fluffy.
Add all purpose flour, cocoa powder, baking powder and salt and knead to a smooth dough.
Knead in the choco chips. 
Refrigerate the dough wrapped in cling film for 30 minutes. 
Preheat the oven to 180 degree Celsius.
Take Stainless steel glasses and brush inside with butter liberally. Take little portions of the dough and press against the steel glass and smoothen it. 
Refrigerate the glass for 15 minutes for the dough to set.


Roll the leftover dough to 1/4 " thickness and cut out round shapes with a cutter. 
Place them on an aluminium lined baking tray. 


Bake the cookies for 10 minutes and allow them to cool.
Put the steel glasses in the oven and bake for 15-17 minutes.
Allow to cool completely as the steel glass will be very hot.
When completely cool tap the cookie glass out of the stainless steel glass. 
Coat the inside with melted chocolate and let it dry.


Pour milk in the cookie glasses and serve. 
Enjoy a sip from the cookie glass and take a bite from the cookie glass or just enjoy the choco chip cookies classic style by dunking them in a glass of milk.


Notes:
  • You can use deep muffin pans to make the cookie glasses instead of the stainless steel glass
  • Melted white chocolate can also be used to coat the inside of the cookie glass
  • You may omit the cocoa powder in the dough for the more classic Choco-chip cookies

Happy Chocochip cookies devouring
Amrita

Saturday, 19 October 2013

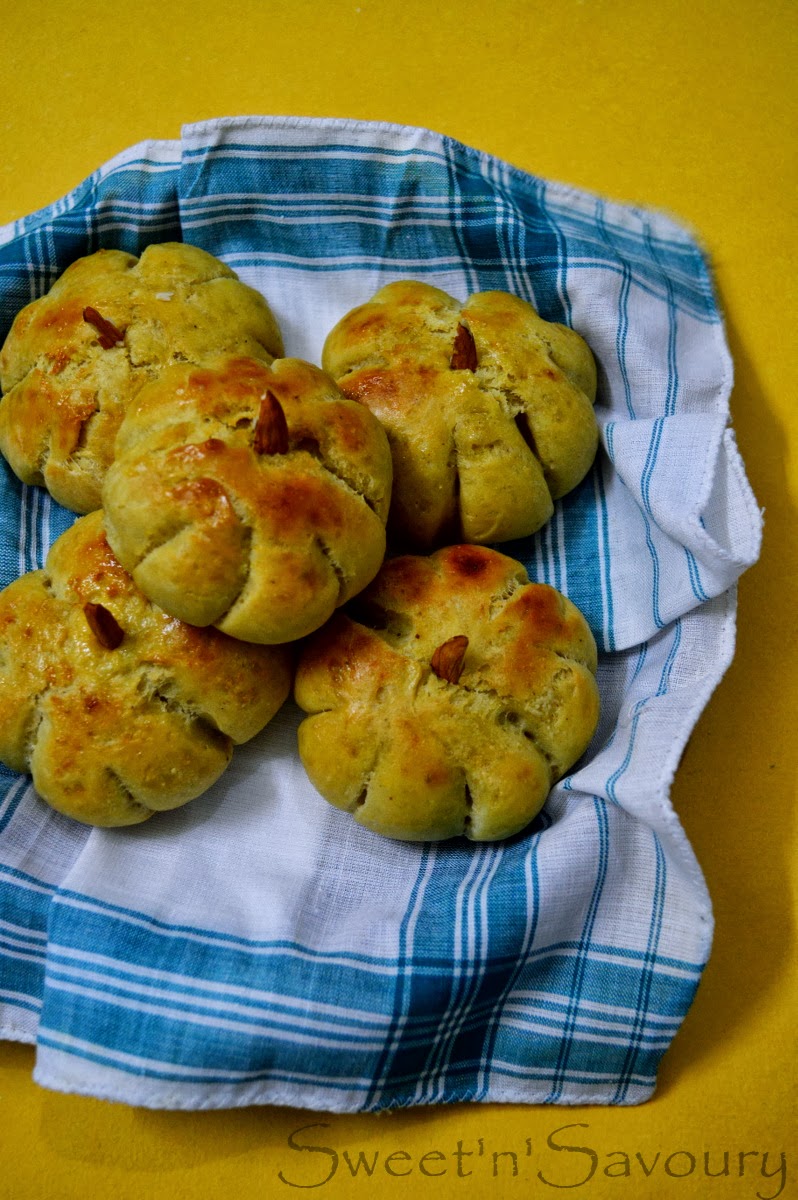
Pumpkin shaped dinner rolls


Baking Partner's challenge for this month was bread bake with pumpkin puree to celebrate the month of Halloween which falls on the 31st of October. 
A famous festival, primarily of the western world, Halloween is synonymous with the use of Pumpkin and is a day dedicated to remembering the dead, including saints (hallows), martyrs, and all the faithful departed believers.
Last year we baked a batch of very yummy Pumpkin choco-chip muffins which to my surprise turned out a complete winner. I was very apprehensive to use puree of the pumpkin we get here in India but to my delight the muffins were soft and delicious.
Therefore, this year, I was very sure to go ahead and use homemade Pumpkin puree which is simply boiling some pieces and then making a paste of it in the grinder. I decided to make little dinner rolls out of it and keeping the spirit of Halloween in my mind, I shaped them as tiny pumpkins. 

Recipe suggested by Tamy of 3 sides Crazy from King Arthur flour
 
Ingredients: I reduced the recipe by 1/4 to get 7 dinner rolls
  • 2 tbsp warm water
  • 1 tbsp warm milk
  • 1/2 tbsp yeast (I used Instant yeast)
  • 1/2 egg, beaten lightly
  • 1/4 cup+2 tbsp pumpkin puree (Boil pumpkin pieces in the pressure cooker with 2-3 whistles and allow to cool. Squeeze out excess water and puree in the grinder)
  • 1/2 tbsp vegetable oil
  • 1 1/2 cup+2 tbsp all purpose flour
  • 2 tbsp brown sugar
  • 1/2 tsp salt
Procedure :
In a large bowl, stir in 1 cup all purpose flour, yeast, salt, brown sugar, pumpkin puree, vegetable oil, egg, milk and water and mix well.
If using active dried yeast, stir in yeast into water and  allow to get rest for 10 mins or till it gets foamy.
Gradually add the remaining flour, a little at a time. Turn the dough on a floured surface and knead till you get a smooth and elastic dough for about 5 minutes. 
Transfer the dough to a well oiled bowl and turn it in the bowl to coat all sides. Allow to double in volume for about 1 hour in a warm place. I usually cover the bowl with a damp muslin cloth and put the bowl in the microwave to allow to rise.
Divide dough into 7 equal portions and roll each to a round.
With a knife make 8 little cuts, not all the way through.
Shape with your hand to plump them up like a pumpkin.
Make an indentation in the middle with your little finger.
Place on an aluminium foil lined baking tray.
Cover with a damp muslin cloth and allow to rise for 20 mins.
Brush the tops with a milk-cream mixture. 
Meanwhile, preheat the oven to 180 degree Celsius. 
Bake for 20 minutes or till the tops brown well.
Apply some butter on top as soon as they are out of the oven.
To complete the pumpkin look, place a slice of almond on top.


Happy Pumkpin shaped dinner roll eating
Amrita

LinkWithin

Related Posts Plugin for WordPress, Blogger...