Showing posts with label chicken. Show all posts

Sunday, 16 February 2014

Chicken Valentine

 
Each one of us have a story to tell
And there is one that I have too
Of our tales through numerous spell
Each season marked with different hue
'Midst turn and bends, highs and lows 
Our discretion of life clearer grows.

One of the mediums through which I tried to impress my wife during our courtship was poetry. Today much of poetry has turned into passion for cooking and food that we commonly share. This Valentine week friends from Kolkata Food Bloggers decided to celebrate it through the theme 'Love on the Plate-Dinner for Two' where we were supposed to make dinner for two (two of us ofcourse). Coincidentally Valentine Day also happens to be our marriage anniversary so the idea of 'dinner for two' particularly intrigued me. 
Its been four amazing years with my wonderful wife and certainly I do not need a Valentine Day to remind me how fortunate I have been to have her in my life. She complements and completes, encourages and appreciates, ignores my shortcomings, bears my complacency, forgives my inadequacies and loves unconditionally. 
Like cooking, sometime life begins to sing in a monotonic song.  Some of my cooking style, like the chicken roast, became very monotonic and predictable to Amrita in the sense that she more or less knew what group of ingredients and spices I would be use in the process. Therefore I mustered up enough courage to try something different this time. I had conceptualized this myself and hoped it to be edible. Thankfully it did impress her. I, naturally, could think of no better name for it but 'Chicken Valentine'.

Ingredients : 

Roast Chicken:
  • Chicken breast boneless 2 pieces about 500 gm
  • Balsamic Vinegar- 2 tbsp
  • Worcestershire Sauce- 1 tbsp
  • Red wine (I used a homemade one)- 100 ml
  • Vegetable Oil- 2 tbsp
  • Salt to Taste
Sautéed Vegetables:
  • Broccoli- 25gm
  • Baby Corn- 3 sticks
  • Green Capsicum- 1/2 Capsicum
  • Garlic- 2 Cloves
  • Olive Oil-1 tbsp
  • Salt to Taste
  • Freshly crackled black pepper
  • Cherry Tomatoes- 6 Pcs

Procedure:

Wash and clean chicken.
Marinate it in Balsamic Vinegar and Worcestershire Sauce and salt for 1/2 hr.
Chop Capsicum, Baby Corn and Broccoli very finely. Crush and chop garlic.
In a pan warm olive oil and put garlic. Cook for few second till it releases the aroma.
Place the finely chopped veggies and whole cherry tomatoes. Sauté slightly, not overcooking it and at the same time maintaining the crispness of the veggies. Season with salt and freshly crackled pepper. Set aside.
In another pan heat oil and pan roast the marinated chicken. Cook for about 6 minutes each side or till done. Set aside.
Deglaze the fond in the pan with wine and reduce to a medium consistency.
To deglaze a pan means adding liquid such as stock or wine to a pan to loosen and dissolve food particles (called fond) that are stuck to the bottom. The flavorful mixture produced by deglazing can then be used to make a sauce. (Source:About.com)

Plating
Place the  sauté vegetables on one side and place the chicken breast slightly on the inner side towards the center. Drizzle with wine sauce.
Serve with toasted garlic bread and choice of wine.


Happy Valentine

Vishal

Friday, 6 December 2013

Honeycomb Buns (Khaliat Nahal)

a


Sometimes we come across recipes that become such favourites simply because they work like a charm every single time. These stuffed buns is one of the recipes that I have made 5-6 times since the first attempt and have always yielded amazing results. This recipe is part of the monthly challenges that we make at 'We Knead to Bake', an amazing group where we have a great learning experience. Very sheepishly, I have to admit that this recipe was part of our October month challenge and I have since then forgotten to post it. 
Khaliat al Nahal (also known as Khaliat Nahal) translates as Bee’s Hive in Arabic. This is because the buns are baked close to each other in a round pan where they form a honeycomb like pattern. They’re traditionally made sweet with a cream cheese filling and glazed with honey flavoured syrup, though savoury versions are also made. These can also be baked in individual muffin tins, but will lose their characteristic Honeycomb pattern. 
The choice of filling entirely depends on you. I have personally tried a variety from  chicken mince to mashed potatoes. All that needs to be seen is that the filling should be dry. 


Recipe Source : Aparna
Ingredients : I halved the recipe to get 6 stuffed buns
  • 1/2 cup lukewarm milk
  • 3/4 tsp Instant yeast
  • 1 1/4 cup All purpose flour
  • 1/2 tsp sugar
  • 1/2 tsp salt
  • 20 gm butter, melted
  • 1 tbsp milk for brushing
Stuffing : 
  • 200 gm Chicken mince 
  • 100 gm Broccoli, grated
  • 1 medium sized onion, chopped
  • 1 medium sized tomato, chopped
  • 2 tbsp oil
  • 1/4 tsp turmeric powder
  • salt to taste
Procedure :
Take flour, salt, sugar, yeast and melted butter in a bowl and mix well. Add milk, little by little, and knead to get a smooth and elastic dough consistency. Shape it into a ball and place in a well oiled bowl covered with a damp muslin cloth for an hour or till double in size. Remember to keep it in a warm place. I usually choose to put mine in the microwave.
Meanwhile make the filling by taking oil in a pan. Add chopped onion and cook for 2 minutes. Add chopped tomato and cook for another 2 minutes. Add salt and turmeric powder and the chicken mince. Let it cook for 5 minutes and then add the grated broccoli. Cook for 2 minutes and remove aside to cool.


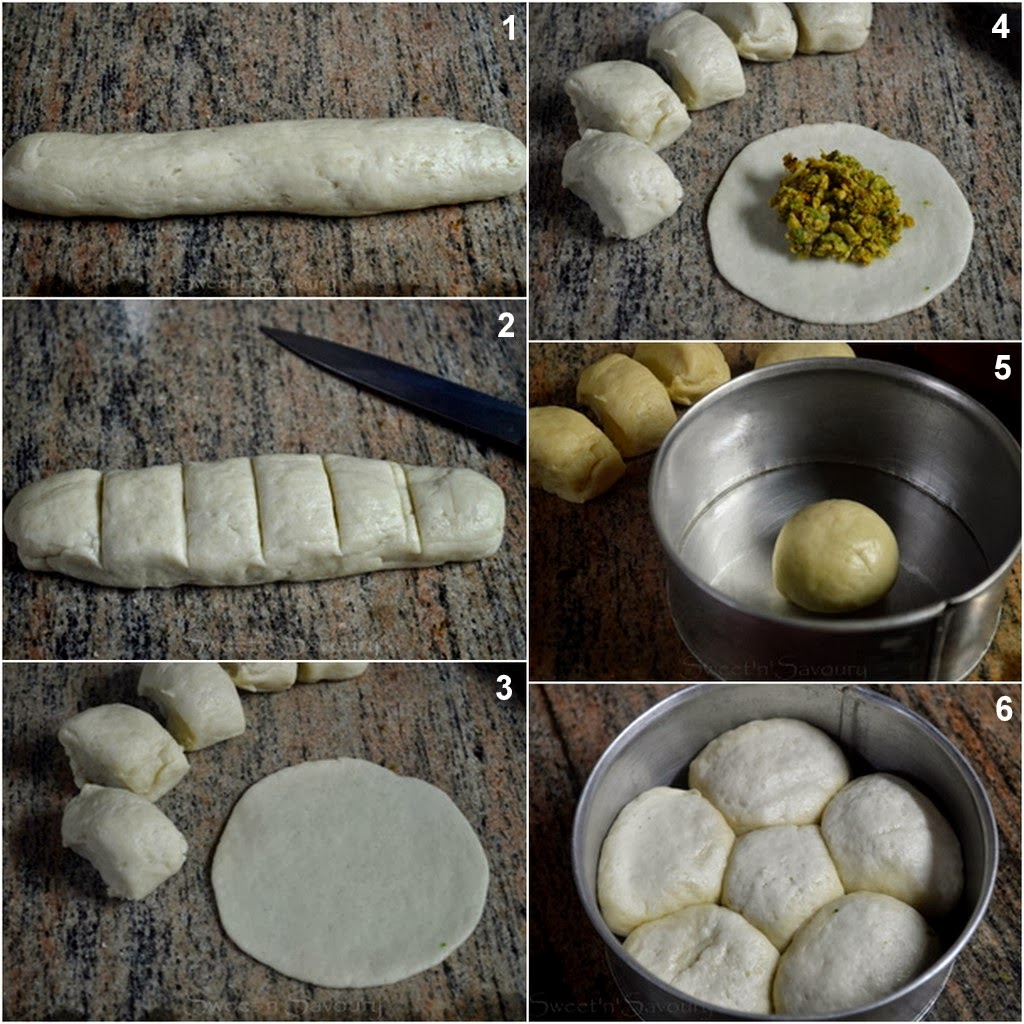
Roll the dough into a 9" long rope and cut in 1" pieces. Take each piece and roll it in a circle. Place a tbsp of the stuffing and pinch the ends to shape into a ball. Repeat the same for the others.
Place all the stuffed balls in a well greased round tin. Cover with a damp muslin cloth and allow to rise for an hour in a warm place. 
Preheat the oven to 180 degree Celsius.
Brush tops with milk and bake for 20-25 mins or till they brown well. 
Allow to cool and serve.

This recipe yields tried and tested super soft bread and the filling has infinite variations from savoury to sweet.


Happy Honeycomb buns eating
Amrita

Thursday, 22 August 2013

Badami Murgh/Almond Chicken


F.R.I.E.N.D.S. Fight for you. Respect you. Include you. Encourage you. Need you. Deserve you. Stand by you.

We all need friends. Friends whom we can fall upon when we are in need, friends who we want to share our sorrow and happiness with, friends who can guide us, friends who can understand us...
Kolkata Food Bloggers (KFB) are my newest bunch of friends. And it gives me so much pleasure and joy to have found such extremely sweet and wonderful people. It is amazing to have found like-minded and very grounded food bloggers in my city. The best part about them all is the humility with which they keep blogging about  food. Humility to me is one of the most important virtues of a human being. And having found that along with the simplicity in their hearts gives me immense pleasure to be called their friends.
A get-together is therefore, always very eagerly awaited and we try and catch with each other as and when possible. Our recent meet was on Eid where we all got some scrumptious food for the Potluck party. I made this Badami Murgh and a Brownie Tart for all my dear friends. Needless to mention it was a very special meet with lip smacking food from all. 
This recipe is specially dedicated to all the lovely members of KFB.


Ingredients : 
  • 500 gms Chicken pieces, washed
First Marination
  • 2 tbsp ginger-garlic-green chilli paste
  • juice of 1 lime
  • salt and black pepper to taste
Second Marination
  • 2 tbsp oil
  • 3 tbsp Besan(gram flour)
  • 15 Badam(almonds), soaked in water
  • 3 tbsp hung curd
  • 1/4 tsp haldi/turmeric powder
  • salt to taste
1 onion, sliced


Procedure :

First Marination
Prepare the ginger-garlic-green chilli paste by grounding together  1 1/2" ginger, 6-7 cloves of garlic and 3-4 green chillies. 
Marinate the chicken pieces in this paste along with lime juice and salt & black pepper to taste for at least 1/2 hour.

Second Marination 
Take oil in a pan and add besan. Let it cook on medium flame till the besan gets cooked. Be careful as to not burn it. Remove from heat and transfer to a bowl.
Peel the almond skin and ground to a fine paste.
Add the almond paste to the bowl containing roasted besan.
Add hung curd and salt to taste. Add 1/4 tsp of turmeric powder and add the first marinated chicken pieces.
Let the chicken marinate for another 25-30 mins.

Preheat oven to 180 degree Celsius.
Line a baking tray with aluminium foil and grease it with some oil.
Place the chicken pieces on the baking tray and bake for 25-30 mins or till the chicken turns lightly brown on top and is done. 
Reserve the leftover marinade.

Take oil in a pan and add the sliced onions. As they turn brown add the reserved marinade and mix well.
Add the chicken pieces and gently fold them in.


Notes:
  • If you do not want to bake the chicken, you may cook them in a pan with little oil over the gas flame. 
This recipe is part of the KFB Blogging Marathon. Find what my other dear friends are making in the following links :
A Homemaker's Diary
Silence Sings
My Food My Life
Recipe Junction


Happy Badami Murgh Eating
Amrita
 

Friday, 15 March 2013

Cheesy Chicken Stuffed Braided Bread

Constraints are a secret weapon that we can use to give ourselves a little creative boost when we need to take things to the next level.

Constraints!!
Out of adversity comes creativity and the courage to try things that we otherwise would never even dream to. It helps us to stretch our boundaries and learn about our capabilities.
Since I have been out from home, all my challenges in the blog world were naturally on a hold. I missed on some absolutely amazing bakes with most of them being in my 'Must try' list for some time.
Baking Partner's challenge for this month, is Bread baking using Tangzhong or Scalded flour method. Unheard words...it was the same for me!! Had to read the drafts over and over again to understand these new techniques. I chose on trying my hands on the scalded flour method of Bread baking. I reduced the recipe to one-third, being apprehensive of the result. Since I am not a big fan of plain breads, I decided to try my hands on a stuffed braided bread. 
This is when the constraints leapt at me, all at once!! Firstly, being the time constraint. The entire process in itself is not difficult at all. The time and patience consumed is in the wait. There is a 3 hour wait before we get to bake the bread with simple steps in between. With power failure, a daily routine in Allahabad, I had to start the process at 4 in the morning so that I can bake my bread before the electricty goes.
The second constraint was the availability of ingredients. I had to change the bread flour to all purpose and the Instant yeast to Active dried yeast.
Having figured all this and prepared to kickstart, the last constraint crept in! My kitchen weighing scale refused to work, and since all measurements were in gms, I was left with nothing to start. I was almost ready to give up when the thought and will to convert the measurement into cups came in. I used my mobile to google and convert.
With all this going around, I was naturally very apprehensive of the end result. The bread was made and most importantly the pictures were taken before anyone was allowed to eat! Amma(mother-in-law) helped me take the pics by getting some very pretty flowers from her garden. Finally the first bite was taken and praised for the softness and yumminess. Being a very harsh critic of my own bakes, I loved the amazing softness of the bread and the extra huge chicken filling!!


Ingredients: I have used 1/3 of the original recipe 
and adapted to my requirements
Scalded Flour:
  • 1/4 cup all purpose flour
  • 1/4 cup boiling water
Main Dough:
  • 1 cup all purpose flour
  • 2 tsp milk powder
  • 2 tbsp powdered sugar
  • a pinch of salt
  • 1 1/4 tsp active dried yeast/ 1 tsp Instant yeast
  • 1/4 cup lukewarm water
  • 1 tbsp butter, at room temperature
Cheesy Chicken Filling:
  • 1 cup boiled boneless chicken, shredded
  • 1 tbsp butter
  • 1 tbsp all purpose flour
  • 1 cup lukewarm milk
  • 1/4 cup grated processed cheese 
  • salt and pepper to taste


 Procedure:

Cheesy Chicken Filling:
Melt butter in a pan on medium heat and add flour while stirring well. As soon as the flour gets a brownish hue, add warm milk and stir well to remove any lumps. Let it cook and thicken. As the sauce thickens, add salt and pepper to taste. Add grated cheese and stir well till incorporated. Now add the shredded boiled chicken. Mix well.

Scalded flour:
Take flour in a bowl and pour boiling water, all at once. Stir quickly with a fork. It will be a doughy lumpy mixture. Set the dough aside for 5 mins to fully absorb the heat and moisture. Cover with a cling film or plastic and allow to cool for 1 hour.

Main dough:
Take 1/4 cup warm water, add a tsp of sugar and sprinkle the active dried yeast. Allow to bloom for 5-10 mins till it becomes foamy. If using Instant yeast, skip this step.
Sift flour, milk powder, sugar and salt on your working surface. 
Make a well and add the yeast mixture/Instant yeast. 
Add the scalded flour mixture and gradually add enough lukewarm water to make a sticky dough. (If using Instant yeast, water required may be little more)
KNEAD FOR 10 MINS until smooth and elastic(use a watch/clock, if necessary)
During kneading the dough needs to be thrown on the working surface every few mins to improve its strength. You may feel the dough sticky throughout and may feel super tempted to add more flour, but have PATIENCE. If you keep kneading, the dough will become smooth. Remember 10 mins of hardwork will result in the most softest bread baked at home!
Knead in butter till incorporated.
Form dough in a round ball and keep covered with a moist muslin cloth in a bowl. Allow to double in size which will take an hour.
To test if dough has risen well, poke a flour coated finger in the middle of dough and take out. If hole remains, dough is ready and if it springs back, the dough needs more proving.
Punch down the dough and roll in an oval shape. Place the filling in the center. Now with the help of a knife or pizza cutter, make cuts all along the sides. Make sure the cuts are even numbered.
Fold the top and bottom part of dough and starting from one end, start braiding each pair of strip (overlapping)till you reach the end.
Place the bread, very carefully on an aluminum foil covered baking tray. Cover with damp muslin cloth and allow to rise for another hour.
Preheat oven to 180 degree Celsius and bake the bread for 30-35 mins or till top gets browned well.

Check this video link for braiding bread. 
I have also updated the blog with some braiding steps.


Notes :
  • You may add any other filling of your choice and make it vegetarian too.
  • I have used boiled chicken but you can use roast, tandoori or shreds from any prepared chicken dish too.
  • You need to ensure that the filling is relatively dry to avoid excess moisture tearing the bread dough. 
  • You may brush the braided dough with some milk to get that rich brown colour. For better results use half cream and half milk.
  • As soon as the bread is out of the oven after getting baked, brush it with some butter to get that lovely shine and soft texture. 


Sending this recipe to Bake Fest#17 brainchild of Vardhini
 and Yeastspotting

This recipe is being sent to the amazing ongoing event called 'Yeasty Feasty' by Kolkata Food Bloggers where all the members are going to present their droolworthy yeasty bread creations. To make this event more exciting, food bloggers all over are invited to send in their yeasty bakes. Please read the rules and other details here to participate.  
 

Happy Bread Baking
Amrita

Wednesday, 28 November 2012

Chicken Cheese & Fish Tikka Kebabs(Guest Post by Vishal !!)


Fellow wonderful bloggers, so far you have read recipes made and written by me, Amrita, and I believe you have known that this blog is a foodie journey started by me and my better half Vishal. He has been cooking for family and has been creating such amazing dishes that I have been begging him to post about them but his busy schedule always got the better of him. These Kebabs were made by Vishal for our daughter Vaanya's 18 month birthday party. Without any bias, I must admit they were loved and licked off to the last pieces!! On great insistence, I am so glad, I made him finally write on our blog. Please welcome him with your big heart. Over to hubby...(oh and sorry for the not so great pics as they weren't really clicked for the blog)

It is such a pleasure for me to see the blog that we as husband-wife duo created to where it stands now. It gives us more excitement to only fathom where it could go from here. All of the credit in the blog goes to my wonderful wife who has been so dedicated and enthusiastic to share our culinary experience and yes, behind the scene, she has made a lot of effort that has been more or less an out of the way sequel rather than a comfortable routine to put all of this together. So a big cheers to her.

This was a special occasion for me to cook as Amrita's wonderful parents, her brother and his wife were scheduled to come over for dinner. Everyone loved the kebabs so I reckoned to share it on the blog. They were very quick and very easy.My mother in Allahabad surprised us by gifting us a wonderful electric tandoor. So we made the most of it.


Chicken Cheese Kebabs (Amma's Recipe)

Ingredients:

  • 300 gms boneless Chicken cut in bite size pieces
  • 1 egg
  • 1 tbsp garlic-ginger-green chilli paste
  • 2 tbsp hung curd
  • 1/4 cup grated cheese
  • 1 tbsp fresh cream
  • 1/2 tsp black pepper powder
  • 1/4 tsp turmeric/haldi powder
  • salt to taste

Procedure:
Wash chicken pieces and take in a bowl. 
Add all the ingredients and mix well.
Leave to marinade for 2 hours(preferably)
Soak some wooden skewers in water for half an hour or so. 
Preheat oven/tandoor to more than 200 degrees Celsius.
Gently push each chicken piece into the wooden skewers.
Put them in a foil lined tray in the oven/tandoor.
Baste the chicken in oil/ ghee after two minutes or so in the oven and put it back again.
Cook for 4-6 mins or till chicken gets cooked well with a nice brown tinge.


Fish Tikka Kebabs

Although the Calcutta Bhetki is best suited for this, you can try this on any other fish.

Ingredients:
  • 500gms Bhetki fillet cut into bite size cubes
  • 2 tbsp fresh garlic paste
  • juice of 1/2 lemon
  • 2 tsp turmeric powder
  • 2 tsp red chili powder
  • 2 tsp Black Pepper Powder
  • salt to taste
  • Green Capsicum Cut into cubes
  • Lettuce leaves, Onion slices, Lime wedges (to garnish)
Procedure:
Clean and cut the fish fillet into bite size cubes.
Mix all the ingredients together except the ones to garnish.
Leave it to marinade for two hours (preferably).
Soak some wooden skewers in water for half an hour or so. 
Preheat oven/tandoor to more than 200 degrees Celsius.
Gently push each fish cube into the wooden skewers, alternating them with green capsicum pieces. 
Put them in a foil lined tray in the oven/tandoor.
Baste the fish in oil/ ghee after two minutes or so in the oven and put it back again.
Fish cooks very fast so give it around 3-4 minutes to cook.


Rest the kebab for a couple of minutes before serving them garnished with onion slices, lemon and fresh lettuce leaves.

Sending this recipe to 60 days to Christmas

Happy Kebab eating
Vishal

LinkWithin

Related Posts Plugin for WordPress, Blogger...