Showing posts with label cornflour. Show all posts

Saturday, 4 March 2017

Sweet and sour Vegetables-Vaanya's favourite


They say you can never understand the heart of a mother till you become one. Truly so, your world just flips over the moment you become a mother and it automatically starts revolving around the little one. Your likes, your dislikes, your things...everything takes a second seat and your child takes the center stage of your life. 
I have been thoroughly enjoying all the phases and stages of bringing up Vaanya. Most of the times, I realize I am doing things wrong and in the pursuit to mend things I learn it all over again. Life is a constant channel of learning new things, new skills, new emotions every single day. Life would have been such a drab if we think and believe that we know it all. 
Parenthood is not really a subject that you learn in college. It is an ongoing study of finding the best possible way of imparting knowledge, skills and emotions. The best way is to be an example to your children. I realized that I was doing so many things wrong till I wanted Vaanya to do them right and in that whole process I had to re-learn so many things.
One of the most common issue with parents is their child's eating issue. I have gone through different phases of this anxiety where Vaanya's not eating would freak me out to no end. With time I have understood that its okay for her to not eat or drink properly on certain days. As long as your child is healthy, it is silly to get anxious with little things. 
Every child has favourites in food and I feel very satisfied to see Vaanya enjoy her vegetables thoroughly. The sweet and sour vegetables was a very lame attempt from my side to try and make her eat all her favourite vegetables. It is the most easiest and simple recipe and one that I have made over and over again. Whenever I make it for Vaanya, I am assured that she will finish her food in no time and relish all the healthy vegetables in it.


Ingredients : For 2 servings
  • 1 carrot
  • handful of french beans
  • 4-5 mushrooms
  • 4-5 babycorn
  • handful sweet corn
  • few florets of broccoli
  • 5-6 cloves of garlic
  • half of an onion
  • 1 tomato
  • 2-3 tbsp Tomato ketchup
  • 2 tsp cornflour
  • salt to taste
  • 1 tsp sugar
  • Red chilli powder, optional
Procedure :
Peel and trim the vegetables as required
Cut them in bite size and keep aside.
Chop garlic finely.
Tear onion in rough pieces.
Chop tomato and keep aside.
Take 1 tbsp of refined oil in a pan and add garlic to it. Add carrot and french beans. Let them cook for 2-3 minutes.
Add broccoli and baby corn. Cook for 2 minutes and then put the mushroom, sweetcorn, onion and tomatoes. Add salt, sugar and tomato ketchup.
Cook for a minute and then add 2-3 cups of water.
Turn the flame to high and let the mixture come to a boil.
Dissolve cornflour in little water and add to the boiling mixture in a stream. Keep stirring till the mixture thickens. 
Check for consistency and adjust to your liking.
Serve with boiled rice.

Note : 
  • You may add or subtract vegetables to your liking
  • Add cooked chicken or fish pieces to it for a non veg version. 


Happy Parenthood
Amrita

Monday, 16 February 2015

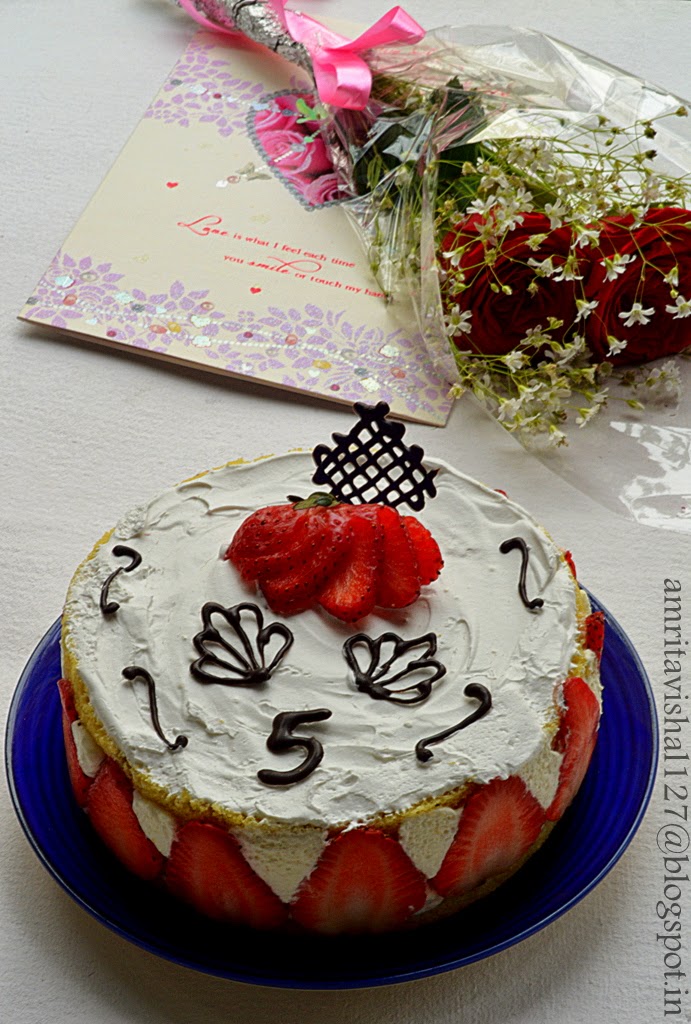
Fraisier-French Strawberry Gâteau


This Valentine's day completed 5 blissful years of my marriage with my best friend, my soulmate Vishal. Time has certainly flown by and it seems like just yesterday that we had limited time to spend with each other. We kept our distant relationship alive on letters and stuck by each others choice even with family's disapproval. It is really amazing to think back of those days and imagine at the conviction we had in each other. I guess that is the reason we were united with our family's blessings. And what better day for that!
Valentine's day is also my in-laws anniversary and therefore the choice of date for our marriage. My parents had no objection to it but since we had a Gurudwara wedding, it was important that it should be a Sunday. Sikh weddings rituals take place in the morning and Sunday being a holiday for all is naturally the most convenient day to invite people. Believe it or not 14 Feb 2010 was a Sunday!
With such a mushy story, I needed a mushy cake for the grand 5 year celebration. This particular cake caught my fancy as it more of the technique in assembly than the bake in itself. A fairly simple method with lovely results, is exactly what I wanted for the anniversary celebrations. Fraisier is a gâteau which has structure made up of strawberries and pastry cream supported by thin layers of sponge. The fraisier gets its name from the french word “fraise” which means strawberry. Traditionally this cake has a marzipan top. The elements can be made few days in advance which makes it easier to just assemble it a day before required. 
My maiden attempt, thankfully, went off well and once the gateau was out on a plate to be photographed, my daughter Vaanya kept pulling me asking for the chocolate decorations. With some hurried pictures, the gateau was all hers. There is no joy comparable to the one you get when you see your tiny one enjoy what you have made. Vaanya was all over the cake licking off the cream, pinching off the chocolate decorations and pulling the strawberry slices from its place. 


Ingredients : For a 6" round gâteau

Genoise cake:
  • 2 eggs
  • 25 gms butter, at room temperature
  • zest of half a lemon
  • 1/2 cup powdered sugar
  • 1/2 cup self raising flour (substitute with 1/2 cup all purpose flour+3/4 tsp baking powder+1/8 tsp salt)
Pastry Cream filling:
  • 1/2 cup milk
  • 1/4 tsp vanilla essence
  • pinch of salt
  • 1 tbsp cornflour
  • 2 tbsp powdered sugar
  • 1/2 egg (beat one egg in a bowl and use half the quantity)
  • 1 tbsp butter
  • 1/2 tsp gelatin
  • 1/2 tbsp water
  • 1/2 cup whipped cream
Sugar syrup :
  • 1/4 cup sugar
  • 1/4 cup water
You will also require:
  • 9-10 strawberries
  • Chocolate decorations
Procedure : 

Genoise : 
Preheat oven to 180 degree Celsius.
Grease and line a 6" round baking tin.
Place sugar, eggs and lemon zest in a bowl and place it over a pan of simmering water as a double boiler. Take care that the water should not touch the bowl of eggs. 
Whisk the mixture over medium heat till it doubles in volume. You will know the right stage once the mixture forms a ribbon trail when the whisk is lifted.
Sift in 1/2 of the flour and gently fold in the whisked mixture with a metal spoon. 
Add the remaining flour and fold again.
Gently fold in the butter. 
Pour the mixture in the prepared tin.
Bake for 15-20 minutes or till a toothpick inserted in the middle comes out clean.
Allow to cool and cut cake in half.

Pastry Cream filling:
Pour milk, vanilla extract and salt in a saucepan.
Place over medium heat and stir. Bring it to a near boiling point.
Add cornstarch and sugar in another bowl and whisk.
When milk is ready, gently and slowly add to the egg mixture and stir simultaneously. 
Pour the mixture back into the saucepan and continue to cook over low heat till it thickens and coats the back of a spoon.
Pass through a fine mesh and allow to cool.
Whisk in the butter. 
Cover cream with a plastic wrap pressing on top of cream to avoid skin formation.
Chill in fridge. 
Can be stored upto 5 days in refrigeration.

Sprinkle gelatin over water and allow to soften for 3-4 minutes.
Take 1/4 cup cream on a double boiler and heat it.
Add gelatin and whisk. Add in the remaining cream.

Mix in the whipped cream well and transfer the pastry cream in a piping bag and store in fridge till  further use. 

Simple Syrup : 
Combine sugar and water in a pan and bring to a boil. 
Allow to cool.
Can be stored in fridge for upto 1 month.
Can be flavoured too. 

Fraisier Assembly : 
Cling wrap the entire inside of the 6" round pan with some extra hanging out. This will be useful to pull out the gateau from the tin. You may also use a springform pan to make it easier in which case you will only need to line the sides of the pan with cling wrap.
Fit bottom cake layer in the pan and moisten with sugar syrup. 


Slice strawberries in arrange around the sides of the pan.


Pipe cream in between the strawberries and a thin layer across the top of cake.


Chop the remaining strawberries and place them in the middle of the cake.


Cover them with the pastry cream and smoothen top.


Place the second layer of cake on top and moisten with sugar syrup. 


Cover top with some remaining pastry cream or whipped cream.
Refrigerate for 4 hours or overnight.
Pull out the gateau carefully from the tin with the help of the overhanging cling wrap.
Place on a plate and decorate with strawberries and chocolate decorations.


Our anniversary celebration was made delicious with Vishal's Chicken biryani which followed by a visit to a newly opened cafe for some coffee and cupcakes. 


Happy Valentine's day
Amrita

Wednesday, 14 May 2014

Swiss Blackforest cake


So I am back to Baking!
I have been literally struggling to find some time off my schedule to try some new bakes and have finally found so by coming to Allahabad for a month long vacation! It has just been a few days and I along with  Vaanya are having a whale of time running around our palatial house. Vaanya is getting far too much exercises just by walking around the house, a luxury which we do not have in our small den in Kolkata. With a beautiful front lawn and an equally big aangan, she surely is making the most of it. 
While she catches up some rest by sleeping late till morning, I sneak up to the kitchen to whip up a bake! The joy of baking is undescribable in words and can be only understood by equal enthusiasts. I save all kinds of elaborate experiments for this trip and thus finally found the opportunity to put my hands on a on-my-list for a long time - Swiss Black Forest cake. 
A classic and one of the most loved cake, this one turned out far easier and impressive than expected. The original cake recipe obviously calls for fresh cherries and some alcohol in the syrup but I have used easily available candied cherries and a simple jam-dissolved-in-water syrup inspired by my dear friend Kamalika. 
The cake recipe worked wonders and the cake rose up like a dream filling the kitchen with that irresistible smell of a fresh bake.


Recipe source : Cake recipe inspired by Deeba Rajpal who blogs from Passionate about baking.
 
Ingredients :

For the cake : Makes a 9" round cake to serve 8-10
  • 6 eggs
  • 1+1/4 cup powdered sugar
  • 1 cup all purpose flour
  • 3 tbsp cocoa powder
  • 2 tbsp cornflour
  • 1 tsp baking powder
  • 1/2 tsp vanilla essence
  • a pinch of salt
Syrup : 
  • 2 tbsp mixed fruit jam dissolved in little water

For Garnish:
  • 1 1/2 cup non-dairy whipping cream
  • candied cherries
  • grated dark chocolate
 
Procedure
 
Cake : 
Preheat oven to 180 degree Celsius.
Grease and flour a 9" springform pan or a normal round pan.
Sift all purpose flour, baking powder, cocoa powder, cornflour and salt.
Take eggs and sugar in a bowl and beat till triples in volume. This will require an electric beater and will take about 10 minutes. Add vanilla essence and beat again.
Gently fold in the flour mixture into the eggs with light hands so that the air incorporated in the eggs do not escape. 
Pour batter in prepared pan and bake for 30-35 minutes or till a toothpick inserted in the middle comes out clean. 
Allow to cool and slice in 2 equal layers.
 

Whip cream:
Thaw the whipping cream by taking it out 1 hour before required to whip. 
Chill the beaters and the bowl. 
Whip with electric beater for about 5 minutes with 1 minute breaks. Gradually increase speed from low to high. 
Beat till the cream begins forming lines and has thickened enough. Be careful not to overbeat as the cream may curdle.
Refrigerate till required.

Assembly : 
Spread the syrup prepared with jam dissolved in water equally over the cake layers. 
Spread the whipped cream in between the cake layers and sandwich them. 
Spread the remaining cream all over the cake.
Decorate sides with pressing the grated dark chocolate to the sides. Sprinkle some on top too.
Fill an icing bag fitted with star nozzle with some cream and pipe along the edges and one in the middle.
Decorate with candied cherries. 


Notes :  
  • Slice the cake in layers as soon as it cools enough to touch as the cake will get too crumbly if you allow to cool further.
  • With no butter or oil, this cake is a little dry so be careful to sprinkle enough syrup if you like your Black forest moist like me.
Happy Baking
Amrita

Sunday, 8 September 2013

Alfajores-South American Cookies/Biscuits


Alfajores (pronounced Alfa-hoar) are traditional South American shortbread cookies sandwiched with Dulce de leche though there are many modern variations with nuts, fruits, and chocolate. 
These cookies came on my list to use up my homemade Dulche de leche. Actually an opened can of condensed milk started it all which made me take the sinful plunge. Once I had my share of the milky goey goodness, I started looking for recipes that could use it well. David Lebovitz's Dulche de leche Choco brownies came first and then I had to literally struggle and make my brain cells work hard to decide between Whoopie pies or Alfajores. Alfajores won and turned out a true winner. I was pleasantly surprised with the  crispy, delicate and crumbly texture of cookies that made a perfect harmony with the sweet milky dulce de leche. It made a perfect pair and was devoured in no time.
I am a self-admitted big critic of my own bakes and very seldom proclaim my bakes to be good. But these cookies turned out a beautiful crisp batch and I was happy that I chose to bake them. Though I got just a bite as the cookies got over in no time, this definitely is a keeper cookie recipe for me with or without Dulche de leche. Originally brandy goes into binding them but I used curd. You may even use milk or plain water to bind.
A special thanks to my dear friend Sayantani who blogs from the famous A homemaker's diary. She gifted me with a cute egg mould, along with other things, which she got from Japan. Originally used to shape hard boiled eggs, meant for children, I used the backside of it to shape my cookies into an adorable bunny.


Ingredients: I reduced the recipe to 1/8 and yielded 6 sandwiched Alfajores (the number may vary with the size of your cutter) 
  • 3 1/2 tbsp cornflour
  • 2 tbsp all purpose flour
  • pinch of baking powder
  • pinch of salt
  • 2 tbsp butter, cold
  • 1 tbsp powdered sugar
  • 1 drop vanilla essence
  • little curd for kneading
  • 2 tbsp Dulche de leche, for filling


Procedure
Preheat oven to 180 degree Celsius. 
Put cornflour, all purpose flour, baking powder and  salt in a bowl. 
Add the cold butter and rub the flour mixture with it, blending it with your fingers. 
Add powdered sugar and vanilla and mix.
Add little curd, a tsp a time, just to bind the mixture and knead to a dough like consistency.
Let the dough rest for 30 mins in the refrigerator.
Roll the dough to 1/8" thickness and cut in desired shapes with cookie cutters. I used a round cookie cutter and the backside of a rabbit shaped egg mould.
Place cookies on a parchment/butter paper lined baking tray.
Bake cookies for 10-15 mins or till they turn light brown.
Allow to cool to get crisp.
Spread a layer of Dulche de leche or any other filling on one cookie and top with another cookie.


Notes :
  • You can use any shaped cutter for these cookies. 
  • Experiment with other fillings like Nutella or even any flavoured jam.
  • The unfilled baked cookies can be stored in an airtight container at room temperature for 3 days.
  • Filled cookies are best eaten day the same day they are assembled, but can be kept at room temperature for 2 days. 

Happy Alfajores Eating
Amrita

Wednesday, 28 August 2013

Mawa/Khoya Cupcakes


Daring Baker's challenge for this month was hosted by Aparna of My Diverse Kitchen and she challenged us with some amazing Indian Bakes-Mawa cake, Bolinhas de coco(Coconut Biscuits) and Masala biscuits. Traditional Indian cuisine does not boast of baking at all but you may find some adapted recipes which were introduced by traders, invaders and colonial rulers. 
Mawa cakes are typically associated with Irani cafés found mostly in Mumbai, Pune and Hyderabad.These cafés, owned by Zoroastrians who emigrated to Mumbai from Iran in the 19th century to escape persecution of non-muslims, are famous for their good, honest, reasonably priced food and beverages. Some of the very popular food sold in these cafe's are ‘bun maska’ (bread and butter) and ‘paani kam chai’ (a strong Iranian tea), or khari chai (very strong tea), mutton samosas, and Keema Pavs, akuri (a scrambled spicy egg preparation), berry Pulao,  Veg/Chicken Dhansak (a spicy broth with lentils, pulses) and Biryani, cheese khari biscuits, shrewsbury biscuits...just to name a few.
Mawa, also called khoya, is made by reducing milk (usually full-fat) on low heat until all that remain is a mass of slightly caramelized granular dough-like milk solids. This is then used to make a rich and dense cake which along with cardamom and almonds gives it the rich and milky flavour.
I decided to make cupcakes and enhance the Indian flavours with some saffron infused milk that goes in the batter. Along with chopped pista and almonds on top, these cupcakes certainly are full of the true Indian essence.


Ingredients : I halved the recipe to yield 6 cupcakes and a 3 1/2" round small cake
  • 500 ml full fat milk
  • 1/4 cup butter, at room temperature
  • 5 tbsp packed crumbled mawa
  • 1/2 cup + 2 tbsp sugar, powdered
  • 1 egg
  • 2 cardamom pods, powdered
  • 1 cup cake flour (Add 2 tbsp cornflour in 1 cup measurement and fill the rest with all purpose flour)
  • 1/2 tsp baking powder
  • 1/4 cup milk
  • Cashewnuts to top
  • Chopped pista-little
  •  few saffron threads

Procedure :

Mawa :
Pour milk in a heavy bottomed pan and bring it to a boil. Turn down heat to medium and keep cooking the milk till it has reduced to a quarter of the original volume, stirring frequently. This can take between 30-45 mins. By now the colour of milk will be light brownish.
Keep stirring till the milk solids take a lumpy appearance. This is called Mawa/Khoya. Remove from heat and allow to cool.
This yielded around 1/2 cup mawa.
You may refrigerate the mawa for 2-3 days and bring it to room temperature while using it.

Mawa

Cupcakes :
Preheat oven to 180 degree Celsius.
Line cupcake moulds with liners or just grease them well. 
Warm milk and add 5-6 saffron threads and leave aside.
Beat butter, mawa (at room temperature) and sugar till soft and fluffy. I used my electric beater for it.
Add egg and the saffron infused milk(reserving the saffron threads to top on the cupcakes) and beat well.
Add cake flour, baking powder and cardamom powder and mix. 
Pour this batter in the prepared cupcake liners. (My batter was still in excess after filling 6 cupcake liners and so I prepared a 3 1/2" round cake tin and poured the leftover batter in it)
Place cashew nuts(I halved them lengthwise), saffron threads and chopped pista on the cupcakes and the small cake.
Bake for 25-30 mins or till a toothpick inserted in the middle comes out clean.
Allow to cool and serve.


Sending this recipe to the event Little Thumbs Up  which is co-hosted by my dear friend Yen from Eat your heart out  
Photobucket

This recipe is also a part of the amazing KFB blogging marathon that I am part of, along with my fellow members. Do drop in to check what they are doing here : 
A Homemaker's Diary
Silence Sings
My Food My Life
Recipe Junction


Happy Mawa cupcake Eating
Amrita

LinkWithin

Related Posts Plugin for WordPress, Blogger...