Showing posts with label All purpose flour. Show all posts

Thursday, 26 January 2017

Sarson da saag with Makai di tart


As Winter comes, all homes in Punjab get geared up to prepare the most important, the most loved and the most respected meal-Sarson da saag and Makai di roti. This is not just another meal for us but is a meal which is synonymous to our culture and our existence. The sight of beautiful yellow flowers on the mustard plant are an invitation to the most coveted and most awaited meal during Winters. 
This hearty and healthy combination is supposed to warm the bodies to fight the bitter cold. The entire process of making Sarson da saag is not just a process but a ritual which is done very religiously. 
On my recent visit to Punjab, I was lucky to have sarson da saag from someones fields which was fresh and organic. The stem of the leaves of sarson da saag is called 'Gandalan' and a saag made using this part is supposed to be the best saag. The stem is first peeled and this is called 'Chirana' to remove any hard fibre and then all the leaves are washed. The leaves are then chopped using a traditional 'Daat' which is very much like a 'Boti' used in Bengal. The leaves are then cooked in the pressure cooker along with ginger-garlic-green chilly paste and then the saag is mashed using a traditional 'Madani' or 'Ghotna'. Makai atta is then added little by little to thicken the saag and give it some body. This is called 'Aalan'. Alternatively, besan or gehun atta can also be used. The saag is then again put to cook the rawness of the atta. 
Usually saag is cooked in more quantity as it stores very well. In fact, the older it gets the more tastier it gets. When required, a tadka of onions and tomato is given to the saag which is then served with a dollop of white butter or 'Chitta Makhan'. 
Since a recipe of Sarson da saag is so common and readily available everywhere on the net, I was more interested to present it in a little different and modern way. The perks of having an amazing Chef friend is that you can discuss your food planning and get incredible ideas and tips. And that is what lead me to attempt my hands on a Makai da tart. The entire innovative credit goes to my friend cum super chef Vikas Puri who very patiently helped me plan the styling. 
The recipe credit goes to my dear Kamal Masi who also very patiently helped me click and document each step of Saag making. The recipe and method shared here is the traditional way we make it at our home. 


Ingredients :


Organic greens-fresh produce from the farms
Sarson da Saag- For 7-8 servings

  • 3 bunch Sarson saag (Mustard leaves)
  • 1 bunch palak (spinach)
  • 1 bunch bathua (chenopodium leaves)
  • 1 bunch methi (fenugreek leaves)
  • 1 bunch methe, optional (a variety of fenugreek leaves)
  • handful of garlic leaves 
  • 2 tbsp ginger-garlic paste
  • 3-4 green chillies (less or more, according to taste)
  • 2 tbsp makai atta (maize flour)
  • salt to taste
  • ghee
Procedure : 

Sarson da saag : 

Peel the ends of the stems of the Sarson saag leaves. The stems are called 'Gandal' and a saag made of these gandals is a delicacy. Popularly saag made of these stems is called 'Gandalan da saag'. 


Wash all the leaves and then chop them. Traditionally it is done with an instrument called 'daat' in Punjabi (also called 'boti' in Bengali).


Heat 3 cups water in a pressure cooker and keep adding the chopped greens to it. Add more water if required. The chopped greens should get just about soaked in the water. 


As the leaves get cooked, they will change colour and settle down. Stir it once in a while. Meanwhile prepare ginger-garlic-green chilly paste by grinding them all together.
Traditionally, it is done in a vessel called 'Kunda-Sota' where an earthen vessel is the 'Kunda' and a wooden stick is the 'Sota'. The masala is pounded in the kunda with the sota.  
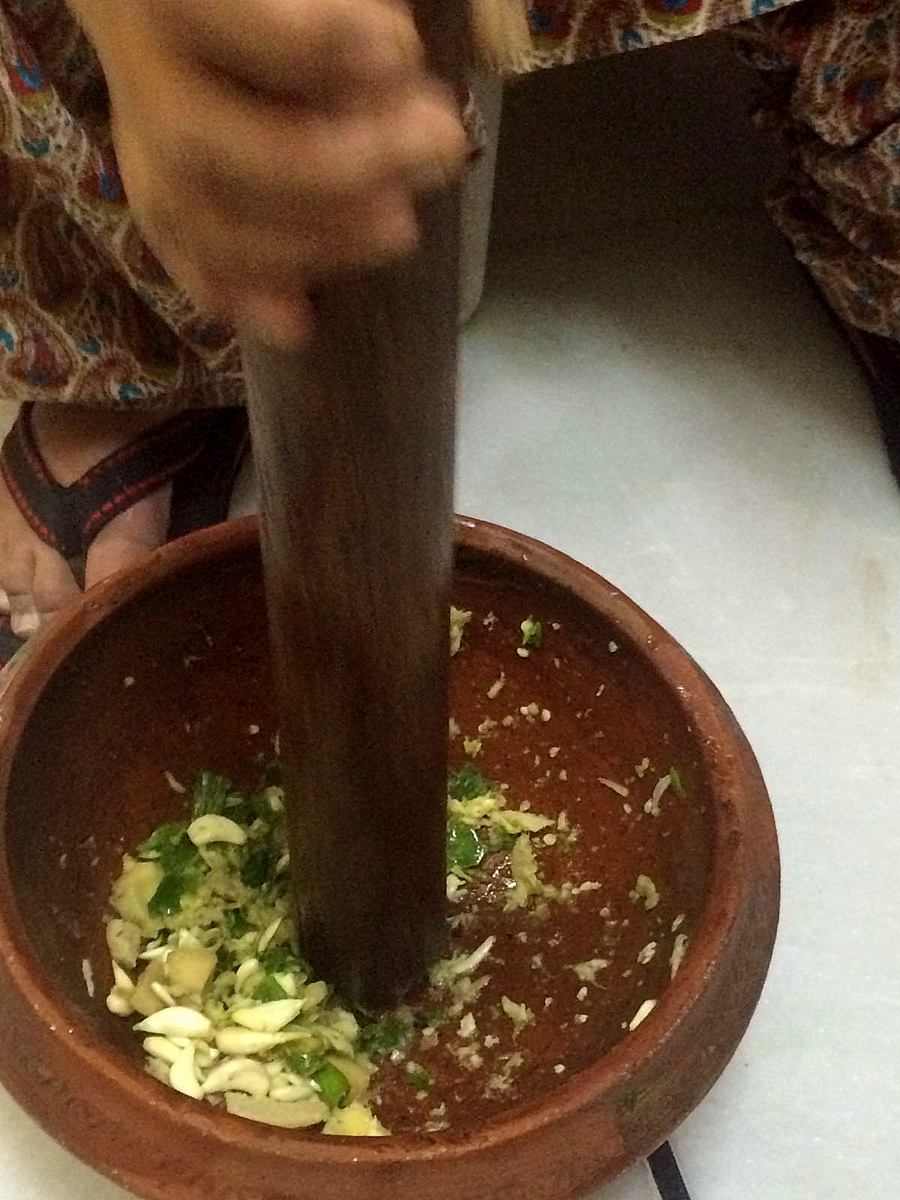

Add the ginger-garlic-green chilly paste in the saag and mix it well. Add salt to taste.


Close the lid of the pressure cooker and allow one whistle on high flame. Thereafter, reduce the flame to minimum and let the saag cook for one hour. 
Let the steam escape and then mix the saag with a hand mixer. Traditionally a 'Madani' is used which is wooden and is popularly used to make Lassi. 
The saag is basically mashed up with the Madani which requires good arm strength. 


Once mashed, little by little makai atta is added to thicken the saag. Keep adding and mixing to reach a required consistency. Put the saag back to heat for about 5 minutes so that the rawness of the makai atta goes away. 


The saag will look something like this pic below-fruit of hard labour and love that goes into making it. 


Saag at this stage can be stored in the fridge for many days. Whatever amount is required is taken out, given a tadka and then eaten.
For Tadka, take ghee/refined oil in a pan and add chopped onions. As they brown a little add chopped tomatoes and then add saag. 
Do not forget to add the most important and coveted ingredient on top of saag before serving-a big dollop of white butter ! 

Sarson da saag with Makai di roti
Sarson da saag with Bajre di roti


Makai di roti : 
  • Makai atta (a handful for each roti required)
  • hot water for kneading
  • ghee for brushing
Procedure : 
Take makai atta in a bowl and add little by little hot water into it. I initially stir it with a spoon as the water is hot but usually women in Punjab are so used to handling the hot water due to extreme winter that they do the entire kneading with hand. 
Knead it to a soft dough and keep aside covered with a wet cloth. 
They say that the makai atta because of its coarse nature yields softer roti's if kneaded with hot water. 
I take a plastic sheet and put the required ball of dough inside, cover again with the plastic sheet and then roll the roti with a rolling pin. Very commonly in Punjab women make it by just placing the ball of dough on a plastic sheet and using wet fingers to make the roti. In earlier days women were expert to make the roti by just using their two hands, no plastic sheet, no rolling pin. 
Heat a tawa and place the roti on it. Let it cook both sides and then add ghee on at least one side to let it cook and get some dark brown spots on it. 

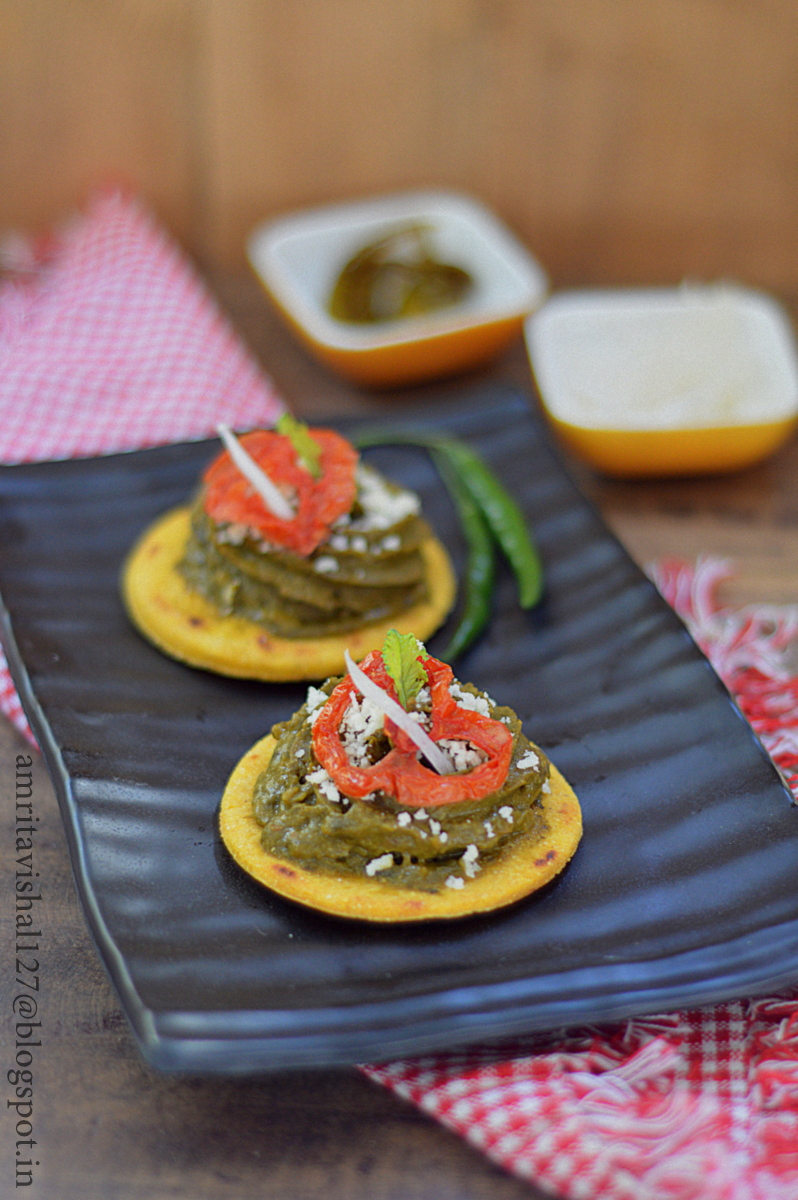
For a modern presentation, you may make small roundels of makai di roti and spoon the saag on it or you may even put saag in a piping bag and pipe on the roti like I did. Remember to keep the saag thick for this presentation. Grate some fresh paneer on top. Oven roast some slices of tomato with a sprinkle of salt and garnish on top. I used juliennes of white radish for garnishing and baby leaf of white radish. 


Makai di Tart : for 2-3 tartlets
  • 3/4 cup makai atta (maize flour)
  • 2-3 tbsp maida (all purpose flour)
  • 40 gms cold butter cut in cubes
  • little cold water for kneading dough
  • a pinch of salt

Procedure : 
Take Makai atta, all purpose flour and salt in a bowl and mix it. Add cold butter cubes in it and then rub the flour with the butter till the mixture resembles breadcrumbs in texture. Add little cold water (as much required) and knead to a dough. Wrap the dough in a cling wrap or a plastic sheet and refrigerate for 30 minutes. 
Preheat oven to 180 degree Celsius. 
Take the dough out from the fridge and leave it for 5-10 mins. Roll it out with a rolling pin and line a mini pie tin with it. Press it in the mould and cut excess from the edges. Take a fork and make few impressions to allow air to escape while baking so that the dough does not puff up. 
Bake for 10-15 minutes or till the tart is done.
Cool it and remove from tin.

Spoon a thick consistency of saag in it or pipe it with a star nozzle, as I have done. Garnish with a sprinkle of grated paneer, oven roasted tomato, julienne of radish and a radish leaf. 


Happy relishing
Amrita

Monday, 4 July 2016

One Pot Ham and Peas Fusilli Pasta


Kolkata Food Bloggers encourages new and interactive events where its members can showcase versatility and passion. Our new ongoing event is featuring one member for a week where the chosen one gets to decide on a theme of their choice. For this week, our featured blogger is Chitrangada Kundu who blogs from Color and Spices, a blog with wonderful recipes and amazing breath-taking food photography. 
Recently, KFB held a demo workshop where Chitrangada tried explaining us a thing or two about Food photography. I was lucky to get an opportunity to attend the same and was enthralled at her knowledge and passion. With the limited time, she tried to pack in as much information as possible and shared lots of her hard-learned tips. 
For this week, our event showcases One Pot meal wonders. I have been elusive of this fuss free way of cooking and decided to try an easy pasta recipe. This is literally a dump in kind of a recipe where everything is just put in the pan and then allowed to cook. Simple and easy as a breeze, it is a quick way to beat some sudden hunger pangs.


Ingredients : Serves 2
  • 1/2 cup Fusilli Pasta
  • 1/4 cup chicken ham, cubed
  • handful of green peas
  • 1 tbsp olive oil
  • 1 medium sized onion, chopped
  • 3-4 cloves of garlic, chopped
  • salt to taste
  • black pepper to taste
  • 1 tsp of mixed dried herbs
  • 1 tbsp all purpose flour
  • 1 cup water
  • 3/4 cup milk
  • parmesan cheese for sprinkling
Procedure : 
Heat oil in a pan and saute onions till translucent. Add chopped garlic and ham cubes. Stir for a minute.
Add flour and the fusilli pasta and mix.
Stir in water and milk. 
Add salt and pepper.
Cook for 10-15 minutes and then stir in the peas.
Cook for another 5 minutes or till the pasta is done. 
Sprinkle parmesan cheese and dried herbs on top and serve. 

This recipe is part of Kolkata Food Bloggers ongoing event One Pot meals which features our blogger Chitrangada Kundu who blogs from Color and Spices


Happy Enjoying a fuss free One Pot meal
Amrita

Saturday, 25 June 2016

Lychee pannacotta with Ginger biscuit crumb and Coconut lemon curd


I am back to crazy 'Masterchef Australia' watching days. With the current season going on at number 8, I realized that I have missed many seasons in between my first tryst with the series. It all started with series 2 and I remember those days when Dinner was finished by 9 PM so that I could indulge in some non-stop gastronomic ride. My baby, Vaanya was then just few months old and needed attention all the time. Vishal and me would take turns to look after her while we eagerly watched each episode very religiously. 
This season my interest got rejuvenated and I have been ogling and drooling at all the artistic desserts that have been put up. Plating is the key in making even a simple dish shine and stand out in front of complex ones. With all this in my mind, I decided to try my hands in a simple dessert with different elements and a pretty plating technique. Firstly, I decided to hero the fruit-Lychee and pondered on all the other components which can go along with it. In terms of flavours, I decided to pair my lychee with ginger and coconut. So, the idea of ginger biscuits crumb and a coconut lemon curd came into my mind which sounded like a perfect harmony to my lychee pannacotta. 
I used some thickened grape juice to brush the plate and then very patiently decorated all the components on it. My over excitement led me to try 2 different platings with the same dessert. I am super mighty happy with the outcome. Do share your thoughts on the dessert. Will mean a lot to me. 


Components : 
  • Lychee Pannacotta
  • Ginger biscuit crumb
  • Coconut and lemon curd
  • Reduced grape juice
  • Fresh lychees
  • Mint leaves
Ingredients and Procedure

Lychee Pannacotta : 
  • 1 cup cream (I used Amul)
  • 9-10 lychees, peeled and deseeded
  • 2 tbsp sugar, powdered
  • 1 1/2 tsp gelatin powder
Blend the lychees in a mixer and strain.
Bloom gelatin in 1 tbsp cold water and allow it to get spongy for about 5 minutes.  
Heat cream and sugar on medium heat and add the pureed and strained lychee mixture. Do not let this mixture boil. 
When the mixture is warm enough to touch, add the bloomed gelatin and mix well. 
Pour in moulds of your choice. I chose my small spherical moulds and some silicon cupcake moulds. 
Refrigerate for 4 hours.

Ginger Biscuit : 
  • 1/2 cup all purpose flour
  • 4 tbsp brown sugar, powdered
  • 25 gms butter, room temperature
  • 1/4 tsp baking powder
  • 1/4 tsp baking soda
  • a pinch of salt
  • 2 tsp dry ginger powder
Beat butter and sugar till light and fluffy.
Add baking powder, baking soda, dry ginger powder, salt to all purpose flour. 
Add flour mixture to butter-sugar mixture and mix well.
Knead the mixture to a dough and cling wrap it. 
Refrigerate for 1 hr.
Preheat the oven to 180 degree Celsius.
Roll the dough and cut round shapes from it.
Place on a baking paper lined baking pan and bake for 15-20 minutes. 


Coconut and lemon curd : 
  • 1 egg yolk
  • 2 tbsp powdered sugar
  • 25 gms butter, cut in cubes
  • 1/4 cup coconut milk
  • 1 tbsp lemon juice
Take egg yolk and sugar in a bowl and put on a double boiler on low heat. 
Keep stirring the mixture.
Add butter cubes and mix well.
Add coconut milk and stir till it thickens for about 3-4 minutes.
Finish with adding lemon juice and mix well.
Allow to cool and then transfer to a piping bag. 

Plating : 
Brush your plate with the reduced grape juice which is made by simply putting grape juice in a pan and heating it till it thickens. 
Crumble the ginger biscuits and put them on the plate in a round shape, a little bigger than the pannacotta size.
Demould the Pannacotta and gently put on top of the ginger biscuit crumb. 
Add some fresh peeled and deseeded lychees.
Pipe the coconut lemon curd in intervals and finish with arranging fresh mint leaves. 


Happy Masterchef Inspirations
Amrita

Wednesday, 2 March 2016

Chocolate glazed Doughnuts


It is amazing how we can push our abilities in times of need. Recently I had the opportunity to participate in a bake sale and managed to churn out quite some goodies in no time. I was amazed at my speed and realized that lack of time is always just an excuse we give ourselves.  
Amongst all the ideas that were floating in my head, I had almost ditched the thought of baking doughnuts because I was really not sure of its sale. But then there was this rising impulse inside me that made me jump up and make the dough and allow it to rest. The fluffy dough was then cut in the shape of a doughnut and fried to a beautiful golden colour. The doughnuts tasted light and fluffy and along with the chocolate glaze turned out to be an absolute treat. 
The icing on my baked goodies is always the family approval esp my daughter's. She was dying to put her hands on the chocolate slathered and sprinklers loaded doughnuts. I waited with a bated breath and saw her reaction as she picked one doughnut. Her head swung in an 'Ummmm' and I instantly knew I had baked goodness. 
The sale did not go too well and I ended up bringing most of the goodies at home. No one regretted as it meant a week long sweet feast at home. :)


Recipe source : Adapted from here

Ingredients : I have reduced the recipe to half and achieved about 14 medium sized doughnuts
  • 1/2 tbsp instant yeast
  • 1/2 cup or more warm milk
  • 1/4 cup powdered sugar
  • 1 egg
  • 1/4 tsp salt
  • 2 1/2 cup all purpose flour
  • 2 tbsp butter, softened
  • refined oil for frying
  • dark chocolate, melted
  • Sprinklers
Procedure : 
Take flour, sugar, salt and yeast in a bowl. Stir.
Add egg. Stir.
Add warm milk a little at a time and knead to a smooth dough. You may require more than 1/2 cup of milk. 
Add butter and knead. 
Take another bowl and grease it. Put the dough in it and cover with a damp muslin cloth. Leave it for an hour or more to double in size. 
You can also refrigerate the dough after the rise in case you want to use next day. Just let it come to room temperature before you roll, cut and fry.
Roll your dough and cut in doughnut shape using round cookie cutters of different size. Let it sit for 1/2 - 1 hour.  
I usually knead the hole back in the dough. You may like to fry them separately too. 
Put oil to fry the doughnuts in a deep pan.
Fry the doughnuts in medium heat till they are golden brown.
Drain on a kitchen towel or a tissue napkin.
Keep melted chocolate in a wide bowl. Dip the doughnuts in it halfway and sprinkle with colourful sprinklers. 
Doughnuts are best eaten the same day, almost soon after frying. You can also refrigerate excess dough and fry fresh as and when needed


Kolkata Food Bloggers are organizing a one of its kind Bake'rs Showcase featuring the best talent in Homebaker's. Folks in Kokata, please book your date and join us in this endeavor where you are guaranteed to find some amazing and creative bakes. Find more details here .


Happy Doughnut eating
Amrita

Sunday, 21 February 2016

Paneer Florentine


I have been struggling to push myself and blog more on the regular savoury food that we have at home. But often, since I like to prepare food fresh and on time, I seldom get to click pictures and thus post on it. A stronger push was thus necessary to let readers know that I do eat things beyond all the cakes and cookies I keep posting. 
Frankly speaking I rarely eat my own sweet bakes and I bake in small quantities sufficient for my daughter and husband. So the regular everyday meal is just like in any other home though I must confess that I am a little lazy in savoury experiments.
Paneer florentine was born out of circumstances of unavailability. Many years ago, myself and Vishal had a dish called Fish Florentine in a restaurant called One step up on Park street. Vishal being the savoury experimenter at our home, decided to give it a try and it came out quite wonderful.
While trying out the same dish in Allahabad, we were stuck at an odd hour where we could not find fish so we thought of trying the same with Paneer. The dish came out wonderful and we were surprised how the humble paneer fitted perfectly in this French dish. 
The word Florentine (pronounced Flor-en-teen), in culinary world, refers to a recipe that is prepared in the style of the Italian region of France. Florentine recipes typically feature a bed of Spinach on which a main ingredient such as meat, poultry or fish is laid and then topped with a Mornay sauce which is a béchamel sauce with shredded or grated Gruyère cheese and an egg yolk. A florentine recipe may also be topped with cheese which is browned as in au gratin.


Ingredients : For 2-3 servings
  • half a bunch of spinach leaves
  • 2-3 cloves of garlic, chopped
  • 150 gms Paneer, cut in cubes
  • 1/2 tbsp butter
  • 1/2 tbsp refined oil
  • 1/2 tbsp all purpose flour (maida)
  • 1/2 tbsp whole wheat flour (atta)
  • 1 1/2 cups milk, warm
  • 1/4 cup mozzarella cheese, grated
Procedure : 
Wash spinach leaves very well.
Boil water in a pan and add the spinach leaves. Turn off the heat and immediately drain the spinach leaves and put in cold water. Drain and roughly chop.
Take oil in a pan and saute half of the chopped garlic. 
Add the spinach and saute for a while. Season with salt.
Lay the spinach in a baking tray of your choice.
Place the paneer cubes randomly on it.


Preheat oven to 180 degree Celsius.
Now, make the béchamel sauce (basic white sauce) by taking butter and oil in a pan. As soon as the butter melts, add the all purpose flour and whole wheat flour. Turn the heat to medium and keep stirring till the flour turns a little brown.
Meanwhile keep milk a little warmed up. Pour this warm milk to the pan and stir continuously till the sauce thickens to the required consistency. Warm milk is poured to avoid the formation of lumps in the sauce.
Season with salt and black pepper.


Pour white sauce on the paneer cubes in the baking pan. 


Sprinkle the grated mozzarella cheese on top and some dried parsley. 
Bake for 15 minutes or till the cheese melts and gets a beautiful brown colour. 
Serve with Garlic toasts or plain buttered toasts.  


Happy Florentine-ing
Amrita


Sunday, 20 December 2015

Sugar Cookies shaped as Gingerbread men


Vaanya, my four and half year old daughter, is at a stage where she is enjoying the world of fairy tales and stories. During the Durga Puja holidays, she got a scrapbook assignment from her Montessori to illustrate her favourite story. Vaanya chose to draw pictures of Goldilocks and the three bears. After the school reopened each story from the scrapbook was read in the class. 
Vaanya's classmate Alvira had chosen The story of Gingerbread Man. Alvira's mother, knowing my passion for baking requested me to bake some Gingerbread cookies for the class. The happy baker in me jumped on the chance to make these cute cookies. We decided not to go the traditional way of adding ginger and spices to the cookies and planned to keep them simple. 
These simple sugar cookies are inspired from Sayantani's blog and I have added a wee bit of cocoa powder to give them a little colour. The cookies are shaped in the Gingerbread man and are decorated with melted white chocolate. 
I was happy to see kids with their gingerbread shaped cookies merrily chomping on it. These cookies are a perfect Christmas treat.


Recipe source : A homemaker's diary

Ingredients : yields about 3 dozen cookies of medium size
  • 3 cups all purpose flour
  • 1 cup powdered sugar
  • 200 gms butter, room temperature
  • 1 egg
  • 1 tsp baking powder
  • 1 tsp vanilla essence
  • 2 tbsp cocoa powder
Procedure
Preheat oven to 170 degree Celsius.
Take butter and sugar in a bowl and beat till it gets light and fluffy.
Sieve all purpose flour, cocoa powder and baking powder.
Add egg and vanilla essence to the butter-sugar mixture and mix well.
Add the flour mixture in 3-4 additions and keep mixing. 
Knead into a dough and wrap in a plastic or cling wrap and refrigerate for an hour.
Take a little of the dough and roll it to the desired thickness, preferably 1/3rd of an inch.
Cut cookies in desired shape and place them on a butter paper lined baking tray.
Bake cookies for 8-10 minutes.
Allow to cool.
Decorate the cookies with melted white chocolate piping or icing sugar mixed with little water. You may add food colour to make colourful icing.


Happy Cookie enjoying
Amrita

Thursday, 10 December 2015

Cold oven Fig and almond tea cake


Winters are here and it is by far my most favourite season because it is the season to bake and indulge in all sinful good things. Baking in the holiday season is such a delight and is soul therapy. The fresh produce in the markets has pushed my lazy self to whip up some bakes and enjoy them.
On a recent trip to our fruit vendor, my husband Vishal spotted fresh figs. He was quick to point them out to me but I refused saying that they will be expensive. But Vishal knowing how much I love to bake with fresh fruits urged me to buy and use them. The box of figs sat in my fridge for two days before the thought of them getting spoilt made me push myself to start baking. 
A quick browse on the net led me to this cold oven tea cake recipe. I have heard of the cold oven baking method but had never tried it. Cold oven baking method is more popular with the pound cake recipe where putting your cake in a cold oven and then adjusting the temperature is believed to help make the cake dense and achieve a more crisp crust on the top. The cake is basically baked at low temperature for a long time in a cold oven which has not been preheated. 
As weird as the method sounds, it worked wonders for my experiment. My cake was, most arguably, the best one I have ever baked. The cake does not rise much which gives it a compact dense texture and the crust on top is to die for. I cooked my fresh figs with some sugar and brandy and used them in the cake along with roasted and chopped almonds. The fresh figs on top added to the figilicious experience. Pairing the slice of cake with our evening tea was just the right thing for this weather.  


Recipe source : Hungry rabbit. I have reduced the recipe to 1/4th and adapted it to yield a 6X3" cake loaf.

Ingredients :
  • 1/2 cup all purpose flour + 1 tbsp cornflour
  • 1/4 cup + 2tbsp powdered sugar
  • 1/4 tsp baking powder
  • pinch of salt
  • 2 tbsp coconut milk (I used Dabur Homemade tetrapack) 
  • 1/4 tsp vanilla extract
  • a drop of almond extract(optional)
  • 3 1/2 tbsp butter
  • 1 egg
  • 8-10 almonds, dry roasted on a pan and chopped
Fig filling
  • 2 fresh figs, chopped
  • 1 tbsp sugar
  • 1 tsp brandy or water

Procedure : 

Fig filing:
Put chopped figs and sugar in a saucepan and add brandy or water. Let it simmer on medium heat till the consistency becomes thick and the figs gets squashed. Cool.

Cold oven tea cake : 
Grease and line 6X3 loaf pan.
In a bowl, combine all pupose flour, cornflour, salt and baking powder.
In a small bowl, mix coconut milk with vanilla and almond extract.
Take butter and sugar in a big bowl and beat till it becomes light and fluffy.
Add egg and beat.
Now add the flour mixture in 3 additions alternating with the coconut milk mixture. 
Add the roasted and chopped almonds to the mixture and drop in little chunks of the fig filling. 
Lightly fold the mixture and pour batter to the prepared baking tin. 
Put the tin in the cold oven and adjust oven temperature to 170 degree Celsius for 30 minutes. Do not open the oven door in between.
Cool.
Garnish with some powdered sugar, fresh fig slices and chopped almonds. 


Notes

  • You may use dried figs instead of the fresh figs I have used for the filling. Just chop dried figs and use them in the batter.
  • Instead of coconut milk, you may use normal milk


Sending this recipe to Kolkata Food Bloggers ongoing event Baking Palooza 2015. Check out the page for some more exciting holiday bakes. 


Happy tea cake enjoying
Amrita

Thursday, 29 October 2015

Crepes with Spinach Paneer filling


This Durga Puja turned out the best one for Vishal Vaanya and me as we had the lovely company of my sis-in-law and her family from Lucknow. We spent seven crazy days full of fun, non stop eating out and visiting beautiful places. It was more of a 're-discovering Kolkata' for me and I have replenished my love for the city. 
Park street, as usual, enthralled us with its beauty and I discovered some lovely restaurants there serving amazing food. Along with my niece, I enjoyed the street food served opposite Vardaan market from the famous Puchka's, Bhelpuri, Jhaalmuri and the irresistible Kulfi. With my sis-in-law, I discovered some amazing shops that I have never visited before. The Santiniketan trip was like a cherry on the cake. I was unaware that there exists such a relaxing and beautiful getaway from the city life. 
Well, everything good comes to an end and their short trip ended soon and now we are struggling to come back to our routine life. 
This particular recipe was tried a month back when I saw it on a tv show. I am a sucker when it comes to breakfast options and the fusion crepes shared on the program excited me. The healthy ingredients made the otherwise 'lazy Savoury experiment' person in me try them soon. 
I served the crepes with some balsamic vinegar and honey glazed beetroot. 
(To make them, take olive oil in a pan and add the chopped beetroot. Add balsamic vinegar, honey and soy sauce and let it cook. Adjust seasoning and serve.)


Ingredients : 

Crepes : 
  • 4 tbsp all purpose flour (maida)
  • 4 tbsp besan (gram flour)
  • a pinch of turmeric powder and red chilli powder
  • salt to taste
Filling : 

  • two handfuls of spinach leaves, washed and finely chopped
  • 50 gms paneer, crumbled
  • 1/4 cup sweet corn kernels
  • a small onion, chopped
  • 1/2 tsp jeera (cumin seeds)
  • 1 tbsp oil
  • salt to taste


Procedure : 

Filling : 
Heat oil in a pan.
Add jeera and as it splutters, add chopped onion.
Cook for a minute and add the chopped spinach leaves.
Cook for another minute or two and then add the crumbled paneer , sweet corn kernels and salt. 
Mix and cook for another minute. 
Allow to cool.


Crepes : 
Take all purpose flour and besan in a bowl. 
Add turmeric powder, red chilli powder and salt and mix well.
Add water, as much as required, to attain a crepe like consistency. 
Heat a non stick pan and pour a little oil.
Add a ladle full of the crepe batter and let it cook.
Turn side and allow to cook.
Remove and let it cool to touch.

Take a crepe and make a slit from the centre.
Arrange the filling on the side next to the slit in a triangular manner.
Start rolling the crepe in a triangular shape with the filling till you finish the entire circle.
You may saute the rolled crepe on the oiled pan again to give it a glaze on top. 


Happy healthy indulgence
Amrita

LinkWithin

Related Posts Plugin for WordPress, Blogger...