Showing posts with label gelatin. Show all posts

Tuesday, 19 July 2016

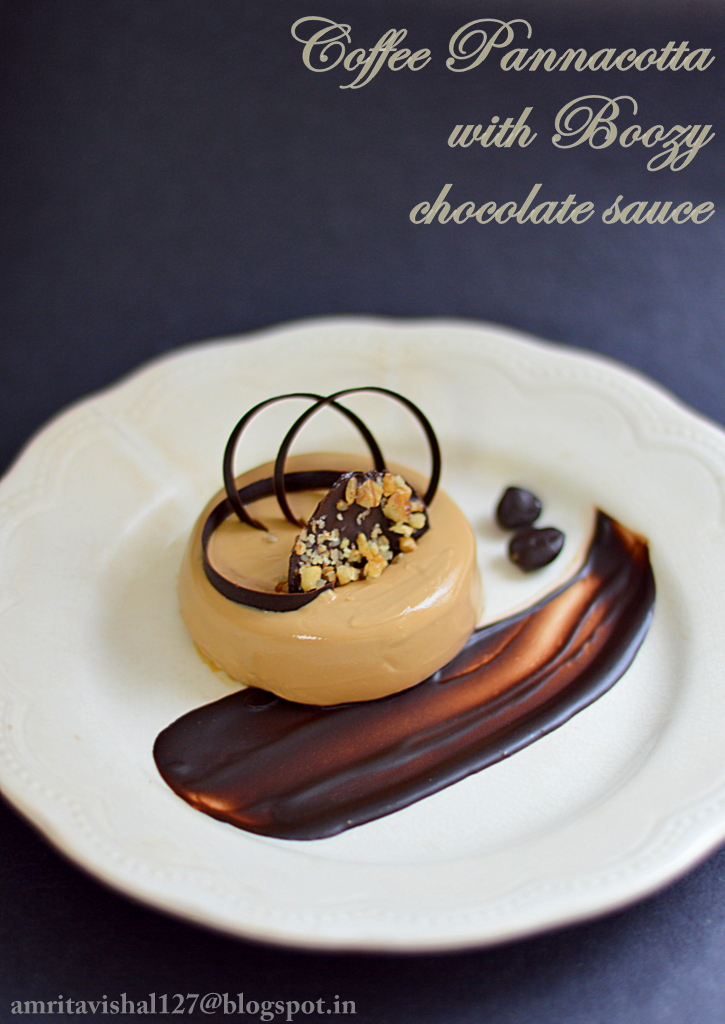
Coffee Pannacotta with Boozy Chocolate sauce


Its our 'Blogger of the week' time and this week features the founder of our group Kamalika Chakrabarty who blogs from Silence sings. Her theme for this week is Chef's Challenge and each member is supposed to make a dish inspired from their favourite chef. 
A little lost in the beginning, I found my answer in Nigella Lawson's Coffee pannacotta with chocolate sauce shown on Masterchef Australia. The moment I saw it, I knew I was making it. And thus I started with making a homemade version of Coffee liqueur (blogpost coming soon next). As usual, I modified the quantity and adjusted it to 2 servings. The original recipe has a more pouring consistency of the chocolate sauce but I have made mine a little thicker for my plating idea. I designed the plate with a little piece of crunch from a chocolate walnut disc and some chocolate rings. 
This dessert is rich, decadent, extremely delicious and a must try for coffee lovers.


Recipe source: Nigella Lawson 

Ingredients : Serves 2
  • 1/2 cream (I used Amul cream)
  • 2 tbsp sugar
  • pinch of salt
  • 1 tbsp instant coffee powder 
  • 2 tbsp water (for dissolving coffee)
  • 3/4 tsp gelatin powder
  • 1 tbsp cold water (for blooming gelatin)
Boozy Chocolate sauce:
  • 50 gms dark chocolate, chopped
  • 2 tbsp coffee liqueur

Procedure : 

Coffee Pannacotta:
Take 1 tbsp cold water in a small bowl and add gelatin powder to it. Mix well and let it bloom for 5 minutes. The gelatin will become spongy. 
Heat 2 tbsp water in a pan and add the coffee powder. Add sugar and stir till it dissolves. 
On low heat, stir in cream. Add salt. Mix well.
Remove from heat and stir in the gelatin. Mix well so that the gelatin dissolves. 
Sieve the mixture to attain a smooth texture and allow it to cool. 
Pour the mixture in desired bowls and refrigerate for 3-4 hrs or till set. 

Boozy Chocolate sauce :
Take coffee liqueur in a pan and boil it. Add chopped chocolate to it and stir well. Remove to a bowl and allow to cool.

Garnish

Chocolate rings : Melt dark chocolate over a double boiler and spread a spoonful on a sheet of acetate with a spatula. Use a pastry comb to make lines through the chocolate. Roll the acetate sheet gently and secure ends with some cello tape. Allow to cool completely. Remove the cello tape gently and take out the curls carefully. 

Chocolate coated coffee beans : Melt some dark chocolate and dip whole coffee beans in it. Remove on a piece of parchment paper and allow to set.

Chocolate walnut disc : Melt some dark chocolate and spread like a circle on a piece of parchment paper. Roughly crush a walnut and sprinkle on the chocolate. Take a small circular cutter and make an impression on the half set chocolate. Allow to cool completely. Remove carefully to get the chocolate disc.

Plating
Take a spoonful of the boozy chocolate sauce and spread it on the plate with the help of a spoon.
Dip the pannacotta mould in little hot water for few seconds and gently remove the pannacotta. Place it on the plate. 
Insert the chocolate walnut disc and the chocolate rings on the pannacotta. 
Place the chocolate coated coffee beans on the plate.

Note : 
  • You can make a chocolate sauce without the liqueur by substituting it with cream. 
  • Taste the pannacotta before setting in the mould for sweetness and add more sugar if required.
This recipe is part of Kolkata Food Bloggers  ongoing event Chef's Challenge where Kamalika Chakrabarty is the featured blogger of the week who blogs from Silence sings


Happy relishing
Amrita

Saturday, 25 June 2016

Lychee pannacotta with Ginger biscuit crumb and Coconut lemon curd


I am back to crazy 'Masterchef Australia' watching days. With the current season going on at number 8, I realized that I have missed many seasons in between my first tryst with the series. It all started with series 2 and I remember those days when Dinner was finished by 9 PM so that I could indulge in some non-stop gastronomic ride. My baby, Vaanya was then just few months old and needed attention all the time. Vishal and me would take turns to look after her while we eagerly watched each episode very religiously. 
This season my interest got rejuvenated and I have been ogling and drooling at all the artistic desserts that have been put up. Plating is the key in making even a simple dish shine and stand out in front of complex ones. With all this in my mind, I decided to try my hands in a simple dessert with different elements and a pretty plating technique. Firstly, I decided to hero the fruit-Lychee and pondered on all the other components which can go along with it. In terms of flavours, I decided to pair my lychee with ginger and coconut. So, the idea of ginger biscuits crumb and a coconut lemon curd came into my mind which sounded like a perfect harmony to my lychee pannacotta. 
I used some thickened grape juice to brush the plate and then very patiently decorated all the components on it. My over excitement led me to try 2 different platings with the same dessert. I am super mighty happy with the outcome. Do share your thoughts on the dessert. Will mean a lot to me. 


Components : 
  • Lychee Pannacotta
  • Ginger biscuit crumb
  • Coconut and lemon curd
  • Reduced grape juice
  • Fresh lychees
  • Mint leaves
Ingredients and Procedure

Lychee Pannacotta : 
  • 1 cup cream (I used Amul)
  • 9-10 lychees, peeled and deseeded
  • 2 tbsp sugar, powdered
  • 1 1/2 tsp gelatin powder
Blend the lychees in a mixer and strain.
Bloom gelatin in 1 tbsp cold water and allow it to get spongy for about 5 minutes.  
Heat cream and sugar on medium heat and add the pureed and strained lychee mixture. Do not let this mixture boil. 
When the mixture is warm enough to touch, add the bloomed gelatin and mix well. 
Pour in moulds of your choice. I chose my small spherical moulds and some silicon cupcake moulds. 
Refrigerate for 4 hours.

Ginger Biscuit : 
  • 1/2 cup all purpose flour
  • 4 tbsp brown sugar, powdered
  • 25 gms butter, room temperature
  • 1/4 tsp baking powder
  • 1/4 tsp baking soda
  • a pinch of salt
  • 2 tsp dry ginger powder
Beat butter and sugar till light and fluffy.
Add baking powder, baking soda, dry ginger powder, salt to all purpose flour. 
Add flour mixture to butter-sugar mixture and mix well.
Knead the mixture to a dough and cling wrap it. 
Refrigerate for 1 hr.
Preheat the oven to 180 degree Celsius.
Roll the dough and cut round shapes from it.
Place on a baking paper lined baking pan and bake for 15-20 minutes. 


Coconut and lemon curd : 
  • 1 egg yolk
  • 2 tbsp powdered sugar
  • 25 gms butter, cut in cubes
  • 1/4 cup coconut milk
  • 1 tbsp lemon juice
Take egg yolk and sugar in a bowl and put on a double boiler on low heat. 
Keep stirring the mixture.
Add butter cubes and mix well.
Add coconut milk and stir till it thickens for about 3-4 minutes.
Finish with adding lemon juice and mix well.
Allow to cool and then transfer to a piping bag. 

Plating : 
Brush your plate with the reduced grape juice which is made by simply putting grape juice in a pan and heating it till it thickens. 
Crumble the ginger biscuits and put them on the plate in a round shape, a little bigger than the pannacotta size.
Demould the Pannacotta and gently put on top of the ginger biscuit crumb. 
Add some fresh peeled and deseeded lychees.
Pipe the coconut lemon curd in intervals and finish with arranging fresh mint leaves. 


Happy Masterchef Inspirations
Amrita

Saturday, 23 May 2015

Summer Indulgence-Mango Cheesecake and a fun competition between team KFB and Crossindia

Pic courtesy : Swarnendu De

KolkataFood Bloggers recently had a competition of its kind with Crossindia team which happens to be my husbands dream project. The idea was to get together and have fun over food which is a common passion of both the teams. Team Crossindia has developed this cooking challenges on a monthly basis as their team building and bonding exercise. 
On a scorching May afternoon we all met for a memorable day of fun, food and interaction. The competition had 3 segments of serving for about 20 people with a starter, a main dish and a dessert by both the teams. 
Loads of planning, hard work and dedication went into the competition and some fabulous dishes were churned out by both teams. 
For starters team KFB presented an innovative dish named Vodka Prawn Croquettes which had a unique filling and an outer covering. This was served with a tamarind based relish. 


And team Crossindia presented a classic dish with an amazing presentation called Devilled Crab where crab meat and mushrooms were mixed with a rich white sauce and cheese toppings and was served in crab shells itself. 


The main dish from KFB was a family recipe of Bangladeshi Roast Chicken adorned with boiled eggs and served with pulao which was devoured in no time. 


Team Crossindia served a classic Thai dish called Pla Manao where steamed Bhetki fish was served with a thai sauce flavoured with thai herbs, lemons and palm sugar.


Finally the dessert section had a Summer special in Mango Cheesecake presented by team KFB which had three layers of goodness-a biscuit layer, a mango flavoured cheesecake layer topped with a fresh mango jelly layer garnished with fresh fruits. 


Team Crossindia served and won all hearts with a Thai dessert called Tap Tim Samsee which is coconut cream flavoured with pandana leaves and served with chilled and coloured water chestnuts.  


For each course of meal, people were requested to vote for their favourite dish. Team Crossindia won hearts and votes with their splendid dishes. Team KFB lost by marginal votes but went back with a memorable day. 
Here are some pics of the fun we all had. 
Pic courtsey : Swarnendu De


Dart fun
Chit chats 
Team KFB

Team Crossindia

Hop on to the recipe of the dessert fit for these summers

Ingredients : Yields about 8 individual servings

Biscuit layer : 
  • 6-8 digestive biscuits 
  • 3-4 tbsp melted butter
Cheesecake : 
  • 1 block of Philadelphia cream cheese, room temperature 
  • 1/2 cup powdered sugar
  • 1 cup mango pulp, strained (requires about 2 mangoes)
  • 1 tbsp gelatin
  • 1/4 cup hot water
  • 100 gms whipped cream
Mango jelly layer : 
  • 1 cup mango pulp
  • 1 tbsp gelatin
  • 1/4 cup hot water
Procedure : 

Biscuit layer :
Crush biscuits fine. 
Add melted butter and mix well. 
If the mixture starts clumping together, it is ready to be pressed onto the base of the serving glass. If not, add more butter. 
Refrigerate.


Cheesecake layer :
In a bowl whip the cream cheese well. 
Add sugar and mix.
Add mango pulp.
Dissolve gelatin in hot water and allow it cool a little bit. 
Add to the cream cheese mixture and mix well.
Gently fold in whipped cream.
Spoon the mixture in the serving glasses and refrigerate for an hour.

Mango jelly layer : 
Dissolve gelatin in hot water and allow to cool little bit.
Mix with the mango pulp and pour on top of the serving glasses.


Serve chilled with some fruits as garnish.

Notes : 
  • Replace cream cheese with equal quantity of paneer and hung curd. Blend well in a mixer to get a smooth consistency. 
  • Experiment with other flavours like strawberry, blueberry or lemon.
Sending this recipe to KFB's ongoing event Summer related recipes :  


Happy Cheese-caking
Amrita

Monday, 16 February 2015

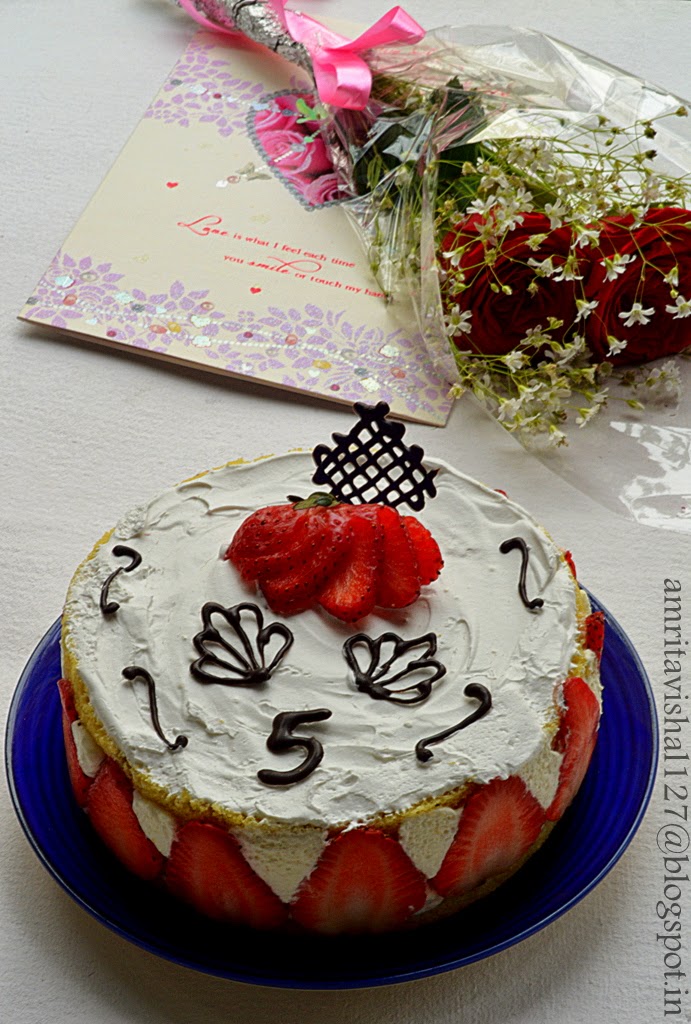
Fraisier-French Strawberry Gâteau


This Valentine's day completed 5 blissful years of my marriage with my best friend, my soulmate Vishal. Time has certainly flown by and it seems like just yesterday that we had limited time to spend with each other. We kept our distant relationship alive on letters and stuck by each others choice even with family's disapproval. It is really amazing to think back of those days and imagine at the conviction we had in each other. I guess that is the reason we were united with our family's blessings. And what better day for that!
Valentine's day is also my in-laws anniversary and therefore the choice of date for our marriage. My parents had no objection to it but since we had a Gurudwara wedding, it was important that it should be a Sunday. Sikh weddings rituals take place in the morning and Sunday being a holiday for all is naturally the most convenient day to invite people. Believe it or not 14 Feb 2010 was a Sunday!
With such a mushy story, I needed a mushy cake for the grand 5 year celebration. This particular cake caught my fancy as it more of the technique in assembly than the bake in itself. A fairly simple method with lovely results, is exactly what I wanted for the anniversary celebrations. Fraisier is a gâteau which has structure made up of strawberries and pastry cream supported by thin layers of sponge. The fraisier gets its name from the french word “fraise” which means strawberry. Traditionally this cake has a marzipan top. The elements can be made few days in advance which makes it easier to just assemble it a day before required. 
My maiden attempt, thankfully, went off well and once the gateau was out on a plate to be photographed, my daughter Vaanya kept pulling me asking for the chocolate decorations. With some hurried pictures, the gateau was all hers. There is no joy comparable to the one you get when you see your tiny one enjoy what you have made. Vaanya was all over the cake licking off the cream, pinching off the chocolate decorations and pulling the strawberry slices from its place. 


Ingredients : For a 6" round gâteau

Genoise cake:
  • 2 eggs
  • 25 gms butter, at room temperature
  • zest of half a lemon
  • 1/2 cup powdered sugar
  • 1/2 cup self raising flour (substitute with 1/2 cup all purpose flour+3/4 tsp baking powder+1/8 tsp salt)
Pastry Cream filling:
  • 1/2 cup milk
  • 1/4 tsp vanilla essence
  • pinch of salt
  • 1 tbsp cornflour
  • 2 tbsp powdered sugar
  • 1/2 egg (beat one egg in a bowl and use half the quantity)
  • 1 tbsp butter
  • 1/2 tsp gelatin
  • 1/2 tbsp water
  • 1/2 cup whipped cream
Sugar syrup :
  • 1/4 cup sugar
  • 1/4 cup water
You will also require:
  • 9-10 strawberries
  • Chocolate decorations
Procedure : 

Genoise : 
Preheat oven to 180 degree Celsius.
Grease and line a 6" round baking tin.
Place sugar, eggs and lemon zest in a bowl and place it over a pan of simmering water as a double boiler. Take care that the water should not touch the bowl of eggs. 
Whisk the mixture over medium heat till it doubles in volume. You will know the right stage once the mixture forms a ribbon trail when the whisk is lifted.
Sift in 1/2 of the flour and gently fold in the whisked mixture with a metal spoon. 
Add the remaining flour and fold again.
Gently fold in the butter. 
Pour the mixture in the prepared tin.
Bake for 15-20 minutes or till a toothpick inserted in the middle comes out clean.
Allow to cool and cut cake in half.

Pastry Cream filling:
Pour milk, vanilla extract and salt in a saucepan.
Place over medium heat and stir. Bring it to a near boiling point.
Add cornstarch and sugar in another bowl and whisk.
When milk is ready, gently and slowly add to the egg mixture and stir simultaneously. 
Pour the mixture back into the saucepan and continue to cook over low heat till it thickens and coats the back of a spoon.
Pass through a fine mesh and allow to cool.
Whisk in the butter. 
Cover cream with a plastic wrap pressing on top of cream to avoid skin formation.
Chill in fridge. 
Can be stored upto 5 days in refrigeration.

Sprinkle gelatin over water and allow to soften for 3-4 minutes.
Take 1/4 cup cream on a double boiler and heat it.
Add gelatin and whisk. Add in the remaining cream.

Mix in the whipped cream well and transfer the pastry cream in a piping bag and store in fridge till  further use. 

Simple Syrup : 
Combine sugar and water in a pan and bring to a boil. 
Allow to cool.
Can be stored in fridge for upto 1 month.
Can be flavoured too. 

Fraisier Assembly : 
Cling wrap the entire inside of the 6" round pan with some extra hanging out. This will be useful to pull out the gateau from the tin. You may also use a springform pan to make it easier in which case you will only need to line the sides of the pan with cling wrap.
Fit bottom cake layer in the pan and moisten with sugar syrup. 


Slice strawberries in arrange around the sides of the pan.


Pipe cream in between the strawberries and a thin layer across the top of cake.


Chop the remaining strawberries and place them in the middle of the cake.


Cover them with the pastry cream and smoothen top.


Place the second layer of cake on top and moisten with sugar syrup. 


Cover top with some remaining pastry cream or whipped cream.
Refrigerate for 4 hours or overnight.
Pull out the gateau carefully from the tin with the help of the overhanging cling wrap.
Place on a plate and decorate with strawberries and chocolate decorations.


Our anniversary celebration was made delicious with Vishal's Chicken biryani which followed by a visit to a newly opened cafe for some coffee and cupcakes. 


Happy Valentine's day
Amrita

Friday, 24 January 2014

The Wicked Triple Chocolate pudding


24th of each month is a reminder to us to be thankful for the wonderful presence of our loving daughter Vaanya. Today has been 2 years and 8 months of the most beautiful and happy days of our lives. Vaanya continues to bring love, warmth and sunshine to our lives in the most uninhibited way. As parents, we are growing everyday, learning the simple lessons of life like unconditional love and care. Vaanya has taught us tremendous patience and has made us stop and enjoy small moments of life which we would otherwise miss in our fast paced professional lives.
Vaanya has started Montessori and has overcome the stage of crying and reached a stage of reluctance where everyday she tries to think of a new excuse not go to school. On her holidays, I feel more happy to have my little pumpkin catch a little more sleep and enjoy a bit more of the careless life she is used to. Sooner or later, I will have to let her go to face the world. I have to let her make new friends and have a world of her own. 
That reminds me about the amazing set of friends I have found in Kolkata Food Bloggers, a group that was started 1 year back by the most humble and talented person I know, Kamalika Chakrabarty. We have got together to celebrate KFB's first birthday by sharing finger food or desserts on our FB page. This recipe is dedicated to the most down to earth and immensely talented group that I am proudly a part of. Check out more amazing recipes shared on the birthday bash here.
Coming back to today's recipe, this was attempted when I was holidaying in Allahabad. Vishal joined us for the new year and we celebrated it in the most beautiful way with family over a Barbeque dinner. Vishal made the most yummy Chicken tandoori kebabs and Kakori kebabs which got polished in no time. The Barbeque was such a hit that it was repeated soon after a few day for Kushal (Vishal's younger brother) and his friends. This dessert was attempted for that party and turned out to be a unanimous winner and so wicked that it made one of Kushal's friend (who was on a strict diet)  give up his rigorous schedule and plunge right through it, making me have a devilish smile.    


Ingredients : For 4-5 servings

Chocolate Cake layer:
  • 1 cup sugar, powdered
  • 1 cup all purpose flour
  • 1/4 cup + 2 tbsp cocoa powder
  • 3/4 tsp baking powder
  • 3/4 tsp baking soda 
  • 1/4 tsp salt
  • 1 egg
  • 1/2 cup milk
  • 1/4 cup vegetable oil
  • 1/2 cup boiling water
Dark Chocolate cream layer:
  • 1 cup whipped cream
  • 75 gm dark chocolate, chopped
  • 1 tsp gelatin, powdered
  • 2 tbsp cold water
  • 1/4 cup milk
White Chocolate cream layer:
  • 1 cup whipped cream
  • 75 gm white chocolate, chopped
  • 1 tsp gelatin, powdered
  • 2 tbsp cold water
  • 1/4 cup milk


Procedure

Chocolate Cake layer:
Preheat oven to 180 degree Celsius. 
Grease and line a 9" round baking tin.
Take a bowl and mix sugar, flour, cocoa powder, baking powder, baking soda and salt.
Add eggs, milk and oil. 
Mix well so all the ingredients are incorporated well. Stir in boiling water (do not worry about lumps) The batter will be quite thin. 
Pour the batter in the prepared tin.
Bake for 35-40 mins or till a toothpick inserted in the middle comes out clean.
Cool the cake on a rack.
Cut cake into desired shape to fit in the choice of serving bowl/glass. 
Moisten the cake layer with a mixture of 1 tbsp sugar and 1 tbsp cocoa powder dissolved in 1/4 cup warm milk(Optional step)
I served the dessert in small glasses and so cut rounds of cake and fitted in the glass as the bottom layer. 
Dark Chocolate cream layer:
Take cold water in a small bowl and sprinkle gelatin over it.
Allow it to bloom and become spongy for 5-10 mins. 
Heat milk to a simmer and add chopped chocolate.
Remove from heat and stir well to dissolve the chocolate.
Add gelatin to the milk-chocolate mixture and mix well to dissolve it. 
Take whipped cream in a wide bowl and gently fold in the milk-chocolate-gelatin mixture.
Spoon the mixture on the chocolate cake layer in the glasses and refrigerate for an hour. 

White Chocolate cream layer:
Follow the same steps as above.
Spoon the white chocolate cream mixture over the dark chocolate cream layer in the glasses and allow to refrigerate for another hour to set. 

Sprinkle some grated dark chocolate over the dessert before serving.


Notes
  • You will have some cake bits left which can be eaten as it is or assembled with leftover cream.
  • You can also make alternate layers of the cake with white chocolate cream for an easier version.
Happy Wicked Indulgence
Amrita

Wednesday, 14 August 2013

Polka dot Sandesh Cheesecake


Happy Independence day.
Sāre jahāñ se acchā hindostāñ hamārā ham bulbuleñ haiñ us kī vuh gulsitāñ hamārā
(Better than the entire world, is our Hindustan,
We are its nightingales, and it (is) our garden abode)


This Urdu poem written by Muhammad Iqbal is  perhaps the most endearing of all songs and is a gentle reminder of an era where people were ready to give up their lives for the love of their country. Along with mentioning the grandeur of our country this poem tells us that religion does not teach us to fight with each other, rather it teaches us to live in harmony.
The passion and the will to die that even the common man had at the time of Independence still amazes me to no end. How can one want to just go and die. How deep and true can such a love be. From young to elderly men/women, all were united to fight against the British Empire and free our country. Such is the power of togetherness and unity.
Can one even think of doing it today? What happens to those cases of murder and rape that we stand for which seem to fade off with time and our memories. Indeed a very grave question but an important one.

I think its time we celebrate true freedom by promoting a culture where Respect, Dignity and Equality are the main components. Lets try and live up to the dreams of those thousands of lives that happily laid down just so that you and me can live and breathe in a free country.
This Polka dot cheesecake is my humble ode to my country that I am extremely proud of. May the New India emerge with flying colours.


Ingredients : Serves 3-4. I used a 3 1/2" round cookie cutter to set the cheesecake

Sandesh
  • 700 ml milk
  • a pinch of citric acid/1/2 tsp lime juice
  • 3-4 tbsp powdered sugar
  • Few drops of orange and green food colouring
Cheesecake
  • 3-4 digestive biscuits
  • 1 tbsp melted/softened butter
  • 1/4 cup cream cheese(I used Philadelphia)
  • 1 tsp+ 1 tsp gelatin (for setting cheesecake in two layers)
  • 2 tbsp cold water for blooming gelatin
  • 2 tbsp powdered sugar
  • Chopped Pista and Saffron threads for garnishing

Procedure :

Sandesh 
Take milk in a pan and bring it to a boil.
Mix in the lime juice or citric acid and stir till you see the milk curdling and the whey separating.
Turn off the flame and let it stand for 2 mins. Meanwhile prepare a vessel by placing a muslin cloth or use a colander.
Strain the mixture into the muslin cloth. I usually save the whey to use it to knead my dough for roti or use it while boiling dal.
Bring the sides of the muslin cloth together and hang it to drain excess liquid for 30 mins. This is the Chenna.
Take the chenna in a plate and knead it with the heel of your palm for 5-10 mins till you get a smooth and doughy texture. 
Keep half of the chenna aside to use it in the cheesecake.
Add sugar to the remaining half and mix well.
Divide into 2 equal halves and add few drops of orange and green food colour respectively. Mix well.
Make small round balls out of it and keep them aside.


Cheesecake 
Place the biscuits in a kitchen towel/cloth and crush them with a rolling pin. Gather in a bowl.
Add melted/softened butter and mix well. 

Press the biscuit mixture evenly on the base of the cookie cutter. Refrigerate to set for 1/2 hour.
Sprinkle 1 tsp gelatin over 1 tbsp cold water and let it sit for 5 mins till it gets spongy. 
Take the remaining chenna and mix it very well with the cream cheese and sugar. Divide this mixture in two parts and warm the mixture. It should not be too hot. It should be warm enough to dip your finger. I microwaved my mixture for 10-15 secs. Add the bloomed gelatin to it.
Place the green coloured sandesh balls on the set biscuit base.


Pour the gelatin mixed part of the mixture on top of it.


Refrigerate for an hour or till set.
Place the orange coloured sandesh balls on it.


Sprinkle 1 tsp gelatin over 1 tbsp cold water and let it sit for 5 mins till it gets spongy.  
Warm the remaining chenna-cream cheese mixture and add gelatin to it. Pour on top of the orange coloured sandesh and refrigerate for 2-3 hours for the entire cheesecake to set well.
Garnish with chopped pista and few threads of Saffron.

Slice and surprise with orange and green polks dot sandesh inside.


Happy Independence day to all of you
Amrita

LinkWithin

Related Posts Plugin for WordPress, Blogger...