Showing posts with label dark chocolate. Show all posts

Tuesday, 19 July 2016

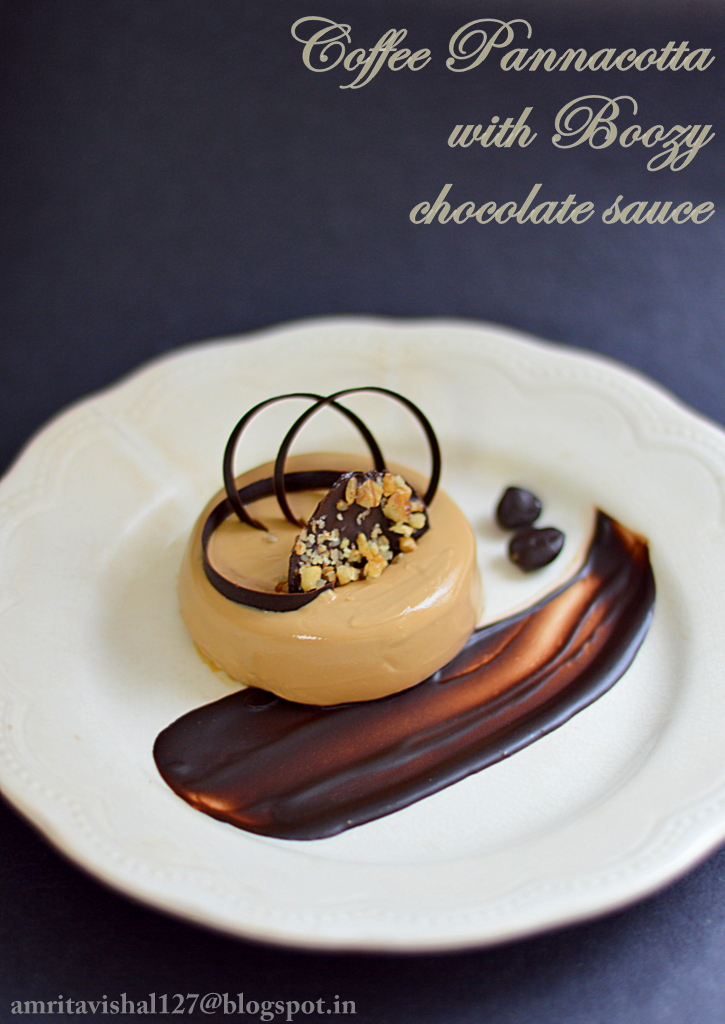
Coffee Pannacotta with Boozy Chocolate sauce


Its our 'Blogger of the week' time and this week features the founder of our group Kamalika Chakrabarty who blogs from Silence sings. Her theme for this week is Chef's Challenge and each member is supposed to make a dish inspired from their favourite chef. 
A little lost in the beginning, I found my answer in Nigella Lawson's Coffee pannacotta with chocolate sauce shown on Masterchef Australia. The moment I saw it, I knew I was making it. And thus I started with making a homemade version of Coffee liqueur (blogpost coming soon next). As usual, I modified the quantity and adjusted it to 2 servings. The original recipe has a more pouring consistency of the chocolate sauce but I have made mine a little thicker for my plating idea. I designed the plate with a little piece of crunch from a chocolate walnut disc and some chocolate rings. 
This dessert is rich, decadent, extremely delicious and a must try for coffee lovers.


Recipe source: Nigella Lawson 

Ingredients : Serves 2
  • 1/2 cream (I used Amul cream)
  • 2 tbsp sugar
  • pinch of salt
  • 1 tbsp instant coffee powder 
  • 2 tbsp water (for dissolving coffee)
  • 3/4 tsp gelatin powder
  • 1 tbsp cold water (for blooming gelatin)
Boozy Chocolate sauce:
  • 50 gms dark chocolate, chopped
  • 2 tbsp coffee liqueur

Procedure : 

Coffee Pannacotta:
Take 1 tbsp cold water in a small bowl and add gelatin powder to it. Mix well and let it bloom for 5 minutes. The gelatin will become spongy. 
Heat 2 tbsp water in a pan and add the coffee powder. Add sugar and stir till it dissolves. 
On low heat, stir in cream. Add salt. Mix well.
Remove from heat and stir in the gelatin. Mix well so that the gelatin dissolves. 
Sieve the mixture to attain a smooth texture and allow it to cool. 
Pour the mixture in desired bowls and refrigerate for 3-4 hrs or till set. 

Boozy Chocolate sauce :
Take coffee liqueur in a pan and boil it. Add chopped chocolate to it and stir well. Remove to a bowl and allow to cool.

Garnish

Chocolate rings : Melt dark chocolate over a double boiler and spread a spoonful on a sheet of acetate with a spatula. Use a pastry comb to make lines through the chocolate. Roll the acetate sheet gently and secure ends with some cello tape. Allow to cool completely. Remove the cello tape gently and take out the curls carefully. 

Chocolate coated coffee beans : Melt some dark chocolate and dip whole coffee beans in it. Remove on a piece of parchment paper and allow to set.

Chocolate walnut disc : Melt some dark chocolate and spread like a circle on a piece of parchment paper. Roughly crush a walnut and sprinkle on the chocolate. Take a small circular cutter and make an impression on the half set chocolate. Allow to cool completely. Remove carefully to get the chocolate disc.

Plating
Take a spoonful of the boozy chocolate sauce and spread it on the plate with the help of a spoon.
Dip the pannacotta mould in little hot water for few seconds and gently remove the pannacotta. Place it on the plate. 
Insert the chocolate walnut disc and the chocolate rings on the pannacotta. 
Place the chocolate coated coffee beans on the plate.

Note : 
  • You can make a chocolate sauce without the liqueur by substituting it with cream. 
  • Taste the pannacotta before setting in the mould for sweetness and add more sugar if required.
This recipe is part of Kolkata Food Bloggers  ongoing event Chef's Challenge where Kamalika Chakrabarty is the featured blogger of the week who blogs from Silence sings


Happy relishing
Amrita

Wednesday, 2 March 2016

Chocolate glazed Doughnuts


It is amazing how we can push our abilities in times of need. Recently I had the opportunity to participate in a bake sale and managed to churn out quite some goodies in no time. I was amazed at my speed and realized that lack of time is always just an excuse we give ourselves.  
Amongst all the ideas that were floating in my head, I had almost ditched the thought of baking doughnuts because I was really not sure of its sale. But then there was this rising impulse inside me that made me jump up and make the dough and allow it to rest. The fluffy dough was then cut in the shape of a doughnut and fried to a beautiful golden colour. The doughnuts tasted light and fluffy and along with the chocolate glaze turned out to be an absolute treat. 
The icing on my baked goodies is always the family approval esp my daughter's. She was dying to put her hands on the chocolate slathered and sprinklers loaded doughnuts. I waited with a bated breath and saw her reaction as she picked one doughnut. Her head swung in an 'Ummmm' and I instantly knew I had baked goodness. 
The sale did not go too well and I ended up bringing most of the goodies at home. No one regretted as it meant a week long sweet feast at home. :)


Recipe source : Adapted from here

Ingredients : I have reduced the recipe to half and achieved about 14 medium sized doughnuts
  • 1/2 tbsp instant yeast
  • 1/2 cup or more warm milk
  • 1/4 cup powdered sugar
  • 1 egg
  • 1/4 tsp salt
  • 2 1/2 cup all purpose flour
  • 2 tbsp butter, softened
  • refined oil for frying
  • dark chocolate, melted
  • Sprinklers
Procedure : 
Take flour, sugar, salt and yeast in a bowl. Stir.
Add egg. Stir.
Add warm milk a little at a time and knead to a smooth dough. You may require more than 1/2 cup of milk. 
Add butter and knead. 
Take another bowl and grease it. Put the dough in it and cover with a damp muslin cloth. Leave it for an hour or more to double in size. 
You can also refrigerate the dough after the rise in case you want to use next day. Just let it come to room temperature before you roll, cut and fry.
Roll your dough and cut in doughnut shape using round cookie cutters of different size. Let it sit for 1/2 - 1 hour.  
I usually knead the hole back in the dough. You may like to fry them separately too. 
Put oil to fry the doughnuts in a deep pan.
Fry the doughnuts in medium heat till they are golden brown.
Drain on a kitchen towel or a tissue napkin.
Keep melted chocolate in a wide bowl. Dip the doughnuts in it halfway and sprinkle with colourful sprinklers. 
Doughnuts are best eaten the same day, almost soon after frying. You can also refrigerate excess dough and fry fresh as and when needed


Kolkata Food Bloggers are organizing a one of its kind Bake'rs Showcase featuring the best talent in Homebaker's. Folks in Kokata, please book your date and join us in this endeavor where you are guaranteed to find some amazing and creative bakes. Find more details here .


Happy Doughnut eating
Amrita

Monday, 8 February 2016

Little cake hearts


'The town is getting painted red', literally, with Valentine's day just around the corner. Everywhere across the city you see heart shapes of all sizes and the colour red in everything. The flower shops are getting geared up with red flowers and the card shops have stacked themselves with cards that express love. 
I have never understood the importance of one particular day to express love. But a Valentine's day is of utmost importance to me as it is the day I got married to the love of my life, my husband Vishal. We have never been flower and card crazy, but yes I love to make something special for this memorable day. 
This year, I took the cheats way and made these little cake hearts out of leftover cake and chocolate ganache. It requires a bit of patience to shape them in perfection and the rest is a breeze. Just dip them in your favourite melted chocolate, milk or dark and let it set. For the more experimental lot, try binding the cake crumbs with some rum or vodka instead of the ganache and you have some boozy little chocolate hearts. 


Ingredients : No fixed measurements. I made these with some leftover brownie and leftover ganache. You may use any cake recipe. Try one of these : Comfort chocolate cake, Perfect chocolate cake, Everyday yoghurt cake, brownies
  • 1/2 cake crumbs (crumble the cake you are using with a fork or with your fingers)
  • 1 tbsp chocolate ganache ( made with equal quantity of chopped dark chocolate stirred in hot cream(Amul cream) ) 
  • melted Milk chocolate or dark chocolate compound for the coating on top
  • melted white chocolate for drizzling on top
Procedure : 
Take cake crumbs in a bowl and mix with the ganache. If not using ganache, use a little bit of butter or cream to bind the cake crumbs. If you want to be more experimental, try binding the cake crumbs with some alcohol like rum or vodka. 
When squeezed between your fingers the cake should bind together. 
Make little heart shapes with the cake dough.
Refrigerate for 5-10 minutes.
Dip these little cake hearts in the melted chocolate. Keep on a sheet of parchment paper/butter paper and allow to set completely. If in a hurry refrigerate them. 
Take melted white chocolate in a piping bag and snip off the end. Drizzle the white chocolate on top of the cake hearts and allow to set. 


It can't get easier than these bite sized little delights. For the lazy bakers, these can even be made with store bought cake. All you need is a little bit of patience, some melted chocolate and loads of love to make them. 


My little valentine, my daughter Vaanya enjoying her cake hearts. After much cajoling (and more cake hearts) she agreed to pose for some pictures. 


Happy little cake hearts relishing
Amrita

Monday, 14 December 2015

Chocolate Cloud Roll with Strawberry cream filling


Winter time marketing is so much fun as you get to see and buy such a fresh and colourful range of vegetables and fruits. Fresh strawberries boxes are nowadays seen with every fruit seller and with the prices now reduced to almost  half with what it started off, I decided to do a strawberry recipes marathon. 
My first thought was to simply fill a tried and tested Chocolate cloud roll recipe with whipped cream tossed with strawberries. This particular recipe has been made by me many times but has never been documented in the blog. Amongst all the baking books sitting pretty on my bookshelf, Cake Bible by Rose Levy Beranbaum is my favourite for many reasons than one. Firstly she gives scientific explanations to her bakes and her recipes are very detailed and easy to follow. Her Chocolate Cloud roll recipe is as delicate as it sounds and has a melt in mouth texture.
As Rose mentions, this is more of a flourless souffle than a cake. With no flour to give it a definite texture this cake is very very light and is just about sweet. I have usually filled the cake with a dark chocolate ganache but this time tried a whipped cream and strawberry filling. The cake can have endless fillings from a jam, chocolate ganache, coffee flavoured cream filling or just a plain whipped cream with fruits filling. 
Do not forget to follow the baking tin instruction which mentions a grease, line,  grease and then flour. This is very important as the cake otherwise will stick to your butter/parchment paper. 


Recipe source : Cake Bible by Rose Levy Beranbaum

Ingredients : I have reduced the recipe to 1/2 and baked in a 11X8 " jelly roll pan
  • 3 eggs, separated
  • 3 tbsp and a 1/2 tbsp powdered sugar, separate 
  • 50 gms melted dark chocolate
  • a pinch of cream of tartar (optional)
Strawberry cream : 
  • 1/2 cup whipped cream
  • 4-5 chopped strawberries
Garnish : 
  • melted dark chocolate
  • chopped strawberries
  • icing sugar

Procedure

Preheat oven to 176 degree Celsius.
Grease your jelly roll pan and then line it with butter/parchment paper and then grease it again and lightly flour it. 
Take egg whites in a bowl and beat till foamy. Add cream of tartar and beat again till soft peaks form. Sprinkle 1/2 tbsp sugar and beat again till stiff peaks form. 
In another bowl beat 3 tbsp sugar and egg yolks for about 3-4 minutes till light and fluffy. Add melted chocolate and beat again till incorporated.
With a rubber spatula or a whisk, fold 1/4 of the egg white mixture into the egg yolk-chocolate mixture. Gently fold in the remaining egg white mixture.
Pour batter in the prepared tin and spread with the spatula. Bake for 15 minutes.
Take a piece of butter/parchment paper the size of the tin and sprinkle it with cocoa powder. Invert the cake on it and let it cool. Remove the parchment paper to spread the strawberry filling and roll the cake gently. 
Garnish with a dusting of icing sugar/powdered sugar, melted dark chocolate drizzle and chopped strawberries. 
Slice and serve.


Happy cake relishing
Amrita

Thursday, 27 August 2015

Chocolate Salami


Raksha Bandhan or Rakhi has been a fairly simple festival in my house while I was growing. Being Sikhs, we have adapted a lot of our customs from Hinduism and therefore we celebrate a simplified version of it which means no tilak and Pooja. I remember seeing my Aunt perform the morning fast before tying the sacred thread on my Father and Uncle's wrist but as children we never had to do that. As children, I would tease my younger brother that being a girl is so lucky as you get 2 gifts in a year, one on birthday and another on Rakhi. At home, Mom would make some bread rolls for breakfast and thus our Rakhi would be over with some sweets. 
This year, Vaanya, my daughter will get to tie a Rakhi on my nephew. I see a part of my childhood in her and am looking forward to see her enjoy the day with her little brother. She is naturally too small to understand the importance of Rakhi but I am sure with time she will cherish these moments just like me. 
This year I wanted to try a rather very simple sweet. Something which does not require much work and is done in a jiffy. Therefore I decided to play with these Chocolate Salami where there is no definite recipe and you can add just about anything that you want. 
Chocolate Salami or Salame di cioccolata or Salame de chocolate is a traditional Italian and Portuguese dessert which is made from dark chocolate, broken bits of biscuits or cookies, butter, eggs and alcohol like rum or port wine.
A misleading name, Chocolate Salami is named because of its appearance where the dessert is shaped like a log and is cut in roundels while serving.
I skipped the eggs and got an intensely rich, rum laden chocolatey goodness in this dessert. For a children's version I used milk chocolate and skipped the nuts and fruits. Instead I added some cake pieces, biscuits of my daughter's choice and some almond powder. 
This dessert has endless variations. Go ahead and enjoy making and relishing it this festive season.


Ingredients : Makes around 7-8 slices of the chocolate salami
  • 200 gms dark chocolate, chopped
  • 1/4 cup cream(I used Amul)
  • 2 tbsp butter
  • 3-4 pieces of Marie biscuits or any digestive biscuits
  • 1/2 cup of assorted nuts and dried fruits(I used almonds, walnuts, cashews, pista and cranberries)
  • 2-3 tbsp rum (optional, may be substituted with orange juice)
Procedure : 
Dry roast the nuts and chop them fine. Mix with the chopped cranberries and keep aside.
Roughly break the biscuits in medium sized chunks and keep aside.
Heat cream in a pan. Be careful not to burn it.
Remove from heat and add the chopped chocolate to it. Mix it well so that the chocolate melts.
Now add the butter and mix. 
Throw in the nuts and biscuits and give it a stir. 
Allow this mixture to cool and thicken for around 4-5 minutes, or more if required.
Put this, now thickened mixture, onto a cling wrap and give it a log shape. Twist both the ends to secure it.
Pop it in the refrigerator for 3-4 hrs. 
In between take it out and roll it to maintain the shape.
Slice it and serve.

Note : For a children's version I used milk chocolate instead of dark one and added digestive biscuits, chocolate biscuits, cake pieces. I also added 1 tbsp of almond powder instead of the chopped nuts. And yes, the rum has been omitted there. 


Happy Raksha Bandhan
Amrita

Saturday, 22 August 2015

Opéra Cake


Birthdays are a special day in my household for more reasons than one. For the baker in me, it is a day to put my hands on a long awaited cake that has been on my list for a long time and that finally gets to see the light of the day. With my husband Vishal's birthday falling on 27th last month, I needed to try a rather special cake. And so it had to be the coveted Opera cake, the French classic cake which I have been scared to try because of the sheer number of elements it has. 
The Opera has an equally amazing history too. Story goes that in 1955 French pastry chef Cyriaque Gavillon, working at the legendary Dalloyau shop in Paris, invented the Opera while wanting to create a cake with complex layers in terms of texture and taste. His wife, Andrée,  told him that it reminded her of the famous Paris Opera house, which eventually was the name given to the cake. 
Another story goes that the cake was invented in the Paris Opera to help people stay awake through the final acts of the lengthy shows being heavy coffee laden. 
An Opera cake consists of thin layers of almond sponge called Jaconde which is moistened with a coffee syrup and is then sandwiched with layers of coffee buttercream and chocolate ganache. The cake is then topped with a chocolate glaze. Traditionally the cake is adorned with a edible gold leaf and has the word 'Opera' piped on it.
This cake was even more special and was the right choice for Vishal's birthday as both me and Vishal are ardent fans of music. We love to spend our time singing songs while Vishal strums his Guitar. Music is the key to our hearts and holds us close together. 
The cake turned out a winner as everyone who got to taste it loved it. Being very critical about my own cakes, I found the sponges a bit over soaked but that was not an issue with anyone else.
My over excited daughter was much more eager about her Papa's birthday and made a very sweet card for him. 


Recipe adapted from : Joe Pastry

Ingredients and Procedure

Jaconde (Sponge cake)
  • 3 egg whites
  • 2 tbsp granulated sugar
  • 1/2 cup almond meal
  • 1/2 cup powdered sugar
  • 3 eggs
  • 1/4 cup all purpose flour
  • 1 tbsp clarified butter, melted
Preheat oven to 200 degree Celsius.
Grease and line a jelly roll pan 28X21 cm with baking paper and then grease it again.
Take egg whites in a bowl and whip till soft peaks. Add granulated sugar and beat again till stiff peaks. Keep aside.
Take whole eggs and almond meal in a bowl and beat till light and foamy for about 3 minutes.
Add flour and mix.
Incorporate the egg whites in 3 additions carefully with gentle mixing. 
Fold in the melted clarified butter.
Pour batter in the prepared pan and spread with a spatula.
Bake 8-10 minutes.
Cool and flip it over baking sheet. Carefully peel the baking sheet and keep aside.
Can be refrigerated for a day. 

Coffee Buttercream
  • 3 egg yolks
  • 1/2 cup powdered sugar
  • 2 tbsp water
  • 1/2 tsp vanilla extract
  • 200 gms butter, at room temperature
  • 1 tbsp instant coffee powder
  • 1 tsp hot water
Dissolve coffee powder in hot water and keep aside.
Take egg yolks in a bowl and whip for 5 minutes.
Prepare sugar syrup by combining sugar and water in a saucepan and allowing the sugar to melt. When the mixture starts bubbling, remove from flame and pour the syrup in a steady stream over the egg yolks while beating continuously. 
Add the butter and vanilla extract and whip together. 
Add the coffee mixture and mix. 
Refrigerate for further use.
Can be made a day in advance.

Chocolate Ganache : 
  • 1 cup chopped dark chocolate
  • 1 cup cream (I used Amul )
Heat cream in a pan. Take care not to scald it.
Remove from heat and add the chopped chocolate. Mix well and keep aside.
Can be refrigerated.

Coffee flavoured cake syrup : 
  • 1/2 cup water
  • 1/4 cup sugar
  • 1 tbsp instant coffee powder
Dissolve sugar in hot water and add coffee powder.
Cool and keep aside.

Chocolate glaze : I made a ganache instead of the traditional tempered chocolate topping
  • 1/2 cup chopped dark chocolate
  • 1/2 cup cream
Heat cream and add chocolate. Stir and mix well.
Keep aside.

Chocolate writing : 
Melt a little chocolate and add few drops of vegetable oil to it. Mix well and put in a piping bag and use. 

Assembly : 
Cut the Jacondes in half(to get 2 rectangles).
So you have 4 layers Jaconde sponge.
Take a layer and apply coffee syrup. 
Apply layer of ganache.
Apply coffee buttercream layer.
Put another sponge and apply coffee syrup.
Repeat with ganache and coffee buttercream with all layers till the top.
Pour the chocolate ganache on top. 
Let it firm up in the fridge.
Trim edges from all sides to show the neat layers.


Happy Opera Relishing
Amrita

Monday, 24 November 2014

Sachertorte


I have been missing on daring the challenges at the Daring Bakers but have never failed to check on them every month. For the month of October we were challenged to put our hands on an Austrian Sachertorte by Korena. The moment I saw the challenge I knew I had to kick my off late lazy self and make this beauty. After all who can ever say a no to a chocolate cake.
Sachertorte is one elegant cake which is filled with apricot jam and is covered with a fudge like chocolate glaze and has the word 'Sacher' written across it. Ideally served with a generous dollop of schlag (unsweetened whipped cream), this cake is on every baker's must-try list. 
The Sachertorte was first created in Austria when Prince Metternich requested for a fancy dessert for his guests. With the pastry chef being ill that night, the task fell on an apprentice called Franz Sacher who created the historical cake. Franz's son later opened the Sacher hotel in Vienna where the closely guarded secret recipe of the cake is served to this day. 
With its amazing history and world wide repertoire, there was no way I could miss attempting this cake in my humble kitchen and there was no other occasion befitting for it than my Sweet day today. Vaanya turns 3 1/2 years today. This month had also blessed us with a baby boy in my brothers house. There is someone smaller than Vaanya now :) It is such a joy to relive those moments and cherish the time when she was this small and would fit in our arms. A time when every piece of clothing was still big for her. A time when she had no hair on her head and I would wait for them to grow. A time when I would wait for her to speak to me and demand little things from me. 
Time flies and today I have a new set of wishes for her. Parenting is such a never ending thing and such a joy. 


Recipe source : Korena from Korena in the kitchen

Ingredients : 

Cake : 
  • 60 gms butter, softened
  • 1/2 cup powdered sugar
  • 3 eggs, separated
  • 1/4 cup granulated sugar
  • 90 gms dark chocolate, chopped
  • 1/2 tsp vanilla extract
  • 1/2 cup all purpose flour
Apricot glaze : 
  • 15 dried apricots, soaked in water overnight
  • 3 tbsp sugar
Chocolate glaze : 
  • 1/2 cup granulated sugar
  • 1/4 cup water
  • 50 gms chopped dark chocolate
Writing chocolate : 
  • 2 tbsp chopped chocolate
  • 1/2 tsp vegetable oil
Procedure : 

Cake : 
Preheat oven to 190 degree Celsius.
Grease and line a 7" square baking tray.
Melt chocolate on a double boiler or in the microwave and set aside to cool.
Take butter in a large bowl and beat till creamy and light.
Add powdered sugar and beat.
Beat in the egg yolks, one at a time.
Add in the cooled chocolate and vanilla extract.
In another clean bowl, beat the egg whites with a tbsp of granulated sugar. Gradually add in the rest of the sugar and continue beating till they form shiny peaks. 
Now stir in 1/3 of the egg whites mixture into the chocolate mixture. Gradually mix in the remaining. 
Sift flour and add in the mixture in two additions with gentle hands.
Spread the batter in the prepared pan and bake for 35-45 minutes or till a toothpick inserted in the middle comes out clean.
Cool completely and cut in two even layers.

Apricot glaze : 
Deseed the apricots that have plumped with overnight soaking and reserve the flesh.
Put the apricots in a pan and cook over medium heat with sugar till it thickens. 
Keep mashing the mixture with a spoon and add a little water in between. 
In about 20-25 minutes you will have a thick jam consistency.
Remove from heat and cool.
Strain the mixture through a sieve to achieve a smooth consistency.

Spread this glaze in between the cake layer and spread on top and sides too.

Chocolate glaze : 
Place sugar and water in a heavy bottomed pan over medium heat and bring to a boil, stirring occasionally. Cook for 5 minutes or till you get a one string consistency i.e. when you take a drop of the sugar in between your thumb and index finger and pull apart, it should make a single thread.
Remove from heat and whisk in the chopped chocolate.
Pour immediately over the cake which should be placed on a wire mesh to collect all the excess chocolate glaze.
Allow to set.

Writing chocolate : 
Melt chocolate and mix in the vegetable oil.
Put in a piping bag and snip of the end.
Write the word Sacher on the cake or decorate as you like.

Slice and serve.


Notes : 
  • If you have apricot jam or preserve, boil 1 cup of it with 2 tbsp of rum or water over medium heat and cook till mixture thickens for about 2-3 minutes.
  • You may use a round shaped pan which is how ideally this cake is served.
  • You can substitute this recipe of chocolate glaze with a simple chocolate ganache recipe if you do not like very sweet frostings. 


Wednesday, 27 August 2014

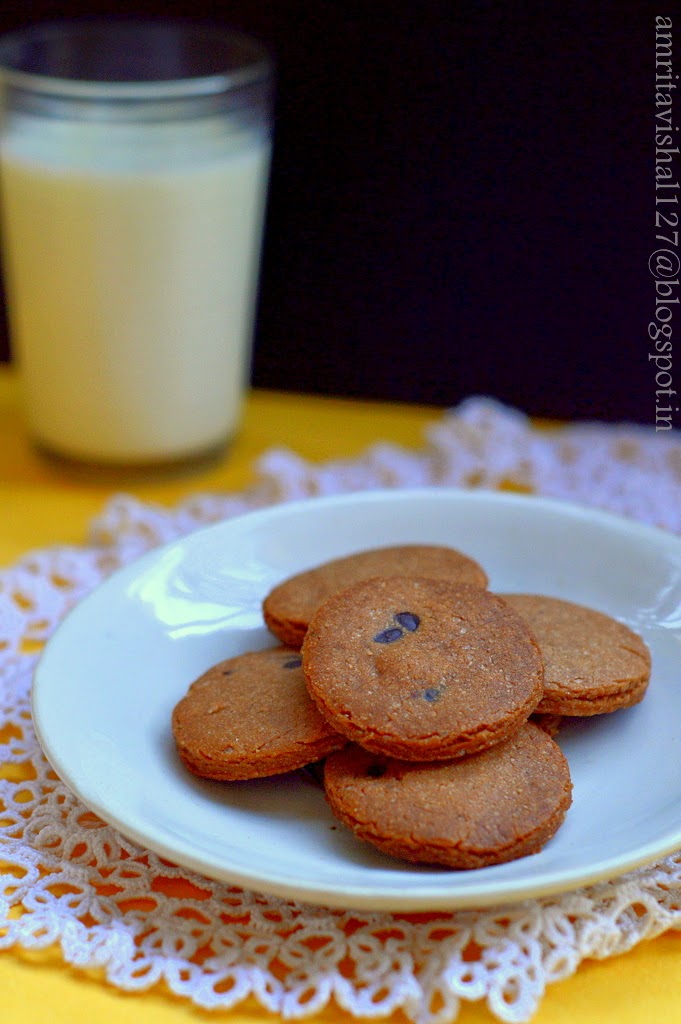
Cookie glass & some choco-chip cookies


Every now and then I am on a break from our blog. I guess with everything that you are passionate about there comes a time when you want to take a break.. relax..take a backseat and just wait for the right moment to get back on your feet and start again....that is if you are still passionate about it. 
Thankfully my passion to cook and click is still alive and hence here I am sharing a little overdued 'Sweet day' post. 
Choco chip cookies is not something new to the world of baking. In fact they were invented accidentally by Ruth Graves Wakefield of Toll House Inn who replaced baker's chocolate with chopped pieces of semisweet chocolate bar from Nestle which did not melt and only softened giving birth to the famous Chocochip cookies.
As famous as the chocochip cookies itself is its pairing with a glass of milk. There is certainly something about dunking your cookie in a glass of milk and eating it which is loved by all. 
Recently I chanced upon the Cronut Guru Dominique Ansel's newest invention-The Cookie shots where he has given a new dimension to the timeless pairing of cookies and milk. He made cookies shaped in glasses which can hold the milk and therefore you can drink your milk and eat your cookie at the same time. The cookie shots are lined with a layer of melted chocolate to avoid the milk seeping in the cookie and breaking it. 
I decided to try them at home but struggled with any pan of that shape. Found on the net about using stainless steel for baking and chose some glasses for my experiment which turned out pretty good. Stainless steel can get very very hot and hence you need to be very very careful while dealing with it for baking. Another important thing is greasing the glasses really really well. I regretted not trying one batch by lining the glass with butter paper/parchment paper. I overbaked one batch and had the toughest time of my life trying to get the cookie out from the glass. Well, it finally crumbled and came out a mess. Thankfully one cookie glass came out good enough for my experiment and I loved pouring my milk into it and enjoyed the experience of having my milk in a cookie glass! 
This sweet recipe definitely had to be on my Sweet day recipe list. Vaanya, my daughter enjoyed the cookies more than the cookie glass. I guess the traditional did beat the modern here. 


Recipe : Adapted from here 

Ingredients : Yields about 15 small cookies (2" round) and 2 cookie glasses (3" height)
  • 1/2 cup butter, room temperature
  • 3 tbsp sugar, powdered
  • 4 tbsp brown sugar, powdered
  • 1/4 tsp baking powder
  • 1 1/4 cup all purpose flour
  • 1 tbsp cocoa powder
  • 1/4 tsp salt
  • 1/4 cup choco-chips
  • 1/4 cup melted dark chocolate


Procedure : 
Take butter and both sugars in a bowl and whisk till light and fluffy.
Add all purpose flour, cocoa powder, baking powder and salt and knead to a smooth dough.
Knead in the choco chips. 
Refrigerate the dough wrapped in cling film for 30 minutes. 
Preheat the oven to 180 degree Celsius.
Take Stainless steel glasses and brush inside with butter liberally. Take little portions of the dough and press against the steel glass and smoothen it. 
Refrigerate the glass for 15 minutes for the dough to set.


Roll the leftover dough to 1/4 " thickness and cut out round shapes with a cutter. 
Place them on an aluminium lined baking tray. 


Bake the cookies for 10 minutes and allow them to cool.
Put the steel glasses in the oven and bake for 15-17 minutes.
Allow to cool completely as the steel glass will be very hot.
When completely cool tap the cookie glass out of the stainless steel glass. 
Coat the inside with melted chocolate and let it dry.


Pour milk in the cookie glasses and serve. 
Enjoy a sip from the cookie glass and take a bite from the cookie glass or just enjoy the choco chip cookies classic style by dunking them in a glass of milk.


Notes:
  • You can use deep muffin pans to make the cookie glasses instead of the stainless steel glass
  • Melted white chocolate can also be used to coat the inside of the cookie glass
  • You may omit the cocoa powder in the dough for the more classic Choco-chip cookies

Happy Chocochip cookies devouring
Amrita
Friday, 25 July 2014

Chocolate mousse-2 ingredient recipe


Threshold
We are at the threshold of a new beginning. A new chapter is awaiting to unfold in our lives. Our tiny tot (who is three years now) is about to join school. Vaanya is about to enter a magical world of learning new things everyday, of making new friends and of understanding the things about life. Vishal and I, as any parent, are both very anxious and excited at this stage. Our talks revolve around discussing schools nowadays. A girls or a co-ed, a convent or an international, an ICSE or a CBSE....why is choosing a school so difficult. 
With so much going around nowadays, getting to hear horrific incidents about the things happening in schools, I sit and wonder what exactly am I looking for. Do I put her in a school that thrives on reputation since ages or do I put her in a school which exceeds in the number of extra-curricular activities they engage the child into. Every school has its own positive and negative aspects which naturally makes the whole thing all the more difficult.
We as parents want Vaanya to grow in an environment where she learns the values, the discipline and the true essence of life. We want her to enjoy the wonderful days of school and become a beautiful, sensitive and a caring human being.   
After some years, we will face this same anxiety while choosing a college for her and then after more years while getting her married. Parents and their anxieties...we now understand. Circle of life, they rightly say. 
For my 'Sweet Day' this time, I am sharing an extremely easy and quick eggless chocolate mousse. It just requires 2 ingredients and is as simple as ABC.


Ingredients : Serves 2
  • dark chocolate, roughly chopped to fill 1 cup (I used Morde dark compound)
  • 1 cup whipped cream


Procedure : 
Take some water in a pan boil it. Reduce the heat to medium and let the water simmer. 
Take a bowl big enough to fit on top of the pan in a way that the water should not touch the bowl.
Add the chopped chocolate to the bowl and place it on top of the pan and allow it to melt over the simmering water. Be careful as to not let the chocolate burn.  
Allow the chocolate to cool little bit. 
Keep about 1/4 of the whipped cream aside for garnishing.
Add 1/2 of the whipped cream to the melted chocolate and fold gently. 
Add the remaining half and fold it gently too. 
Once you see no more of the white streaks in the chocolate and the cram has been folded well, divide the mixture in serving glasses/bowls. 
Refrigerate for 2 hours to set.
Garnish with whipped cream piped on top through a star nozzle and some chocolate shavings. 


Notes : 

  • You can alternately melt chocolate in the microwave for about a minute in 10 sec bursts.
  • You may add some brewed coffee to the melted chocolate to intensify flavours. 
  • To make chocolate shavings, simply grate a bar of chocolate. 


Happy Mousse devouring
Amrita

LinkWithin

Related Posts Plugin for WordPress, Blogger...