Showing posts with label Egg. Show all posts

Saturday, 25 June 2016

Lychee pannacotta with Ginger biscuit crumb and Coconut lemon curd


I am back to crazy 'Masterchef Australia' watching days. With the current season going on at number 8, I realized that I have missed many seasons in between my first tryst with the series. It all started with series 2 and I remember those days when Dinner was finished by 9 PM so that I could indulge in some non-stop gastronomic ride. My baby, Vaanya was then just few months old and needed attention all the time. Vishal and me would take turns to look after her while we eagerly watched each episode very religiously. 
This season my interest got rejuvenated and I have been ogling and drooling at all the artistic desserts that have been put up. Plating is the key in making even a simple dish shine and stand out in front of complex ones. With all this in my mind, I decided to try my hands in a simple dessert with different elements and a pretty plating technique. Firstly, I decided to hero the fruit-Lychee and pondered on all the other components which can go along with it. In terms of flavours, I decided to pair my lychee with ginger and coconut. So, the idea of ginger biscuits crumb and a coconut lemon curd came into my mind which sounded like a perfect harmony to my lychee pannacotta. 
I used some thickened grape juice to brush the plate and then very patiently decorated all the components on it. My over excitement led me to try 2 different platings with the same dessert. I am super mighty happy with the outcome. Do share your thoughts on the dessert. Will mean a lot to me. 


Components : 
  • Lychee Pannacotta
  • Ginger biscuit crumb
  • Coconut and lemon curd
  • Reduced grape juice
  • Fresh lychees
  • Mint leaves
Ingredients and Procedure

Lychee Pannacotta : 
  • 1 cup cream (I used Amul)
  • 9-10 lychees, peeled and deseeded
  • 2 tbsp sugar, powdered
  • 1 1/2 tsp gelatin powder
Blend the lychees in a mixer and strain.
Bloom gelatin in 1 tbsp cold water and allow it to get spongy for about 5 minutes.  
Heat cream and sugar on medium heat and add the pureed and strained lychee mixture. Do not let this mixture boil. 
When the mixture is warm enough to touch, add the bloomed gelatin and mix well. 
Pour in moulds of your choice. I chose my small spherical moulds and some silicon cupcake moulds. 
Refrigerate for 4 hours.

Ginger Biscuit : 
  • 1/2 cup all purpose flour
  • 4 tbsp brown sugar, powdered
  • 25 gms butter, room temperature
  • 1/4 tsp baking powder
  • 1/4 tsp baking soda
  • a pinch of salt
  • 2 tsp dry ginger powder
Beat butter and sugar till light and fluffy.
Add baking powder, baking soda, dry ginger powder, salt to all purpose flour. 
Add flour mixture to butter-sugar mixture and mix well.
Knead the mixture to a dough and cling wrap it. 
Refrigerate for 1 hr.
Preheat the oven to 180 degree Celsius.
Roll the dough and cut round shapes from it.
Place on a baking paper lined baking pan and bake for 15-20 minutes. 


Coconut and lemon curd : 
  • 1 egg yolk
  • 2 tbsp powdered sugar
  • 25 gms butter, cut in cubes
  • 1/4 cup coconut milk
  • 1 tbsp lemon juice
Take egg yolk and sugar in a bowl and put on a double boiler on low heat. 
Keep stirring the mixture.
Add butter cubes and mix well.
Add coconut milk and stir till it thickens for about 3-4 minutes.
Finish with adding lemon juice and mix well.
Allow to cool and then transfer to a piping bag. 

Plating : 
Brush your plate with the reduced grape juice which is made by simply putting grape juice in a pan and heating it till it thickens. 
Crumble the ginger biscuits and put them on the plate in a round shape, a little bigger than the pannacotta size.
Demould the Pannacotta and gently put on top of the ginger biscuit crumb. 
Add some fresh peeled and deseeded lychees.
Pipe the coconut lemon curd in intervals and finish with arranging fresh mint leaves. 


Happy Masterchef Inspirations
Amrita

Wednesday, 2 March 2016

Chocolate glazed Doughnuts


It is amazing how we can push our abilities in times of need. Recently I had the opportunity to participate in a bake sale and managed to churn out quite some goodies in no time. I was amazed at my speed and realized that lack of time is always just an excuse we give ourselves.  
Amongst all the ideas that were floating in my head, I had almost ditched the thought of baking doughnuts because I was really not sure of its sale. But then there was this rising impulse inside me that made me jump up and make the dough and allow it to rest. The fluffy dough was then cut in the shape of a doughnut and fried to a beautiful golden colour. The doughnuts tasted light and fluffy and along with the chocolate glaze turned out to be an absolute treat. 
The icing on my baked goodies is always the family approval esp my daughter's. She was dying to put her hands on the chocolate slathered and sprinklers loaded doughnuts. I waited with a bated breath and saw her reaction as she picked one doughnut. Her head swung in an 'Ummmm' and I instantly knew I had baked goodness. 
The sale did not go too well and I ended up bringing most of the goodies at home. No one regretted as it meant a week long sweet feast at home. :)


Recipe source : Adapted from here

Ingredients : I have reduced the recipe to half and achieved about 14 medium sized doughnuts
  • 1/2 tbsp instant yeast
  • 1/2 cup or more warm milk
  • 1/4 cup powdered sugar
  • 1 egg
  • 1/4 tsp salt
  • 2 1/2 cup all purpose flour
  • 2 tbsp butter, softened
  • refined oil for frying
  • dark chocolate, melted
  • Sprinklers
Procedure : 
Take flour, sugar, salt and yeast in a bowl. Stir.
Add egg. Stir.
Add warm milk a little at a time and knead to a smooth dough. You may require more than 1/2 cup of milk. 
Add butter and knead. 
Take another bowl and grease it. Put the dough in it and cover with a damp muslin cloth. Leave it for an hour or more to double in size. 
You can also refrigerate the dough after the rise in case you want to use next day. Just let it come to room temperature before you roll, cut and fry.
Roll your dough and cut in doughnut shape using round cookie cutters of different size. Let it sit for 1/2 - 1 hour.  
I usually knead the hole back in the dough. You may like to fry them separately too. 
Put oil to fry the doughnuts in a deep pan.
Fry the doughnuts in medium heat till they are golden brown.
Drain on a kitchen towel or a tissue napkin.
Keep melted chocolate in a wide bowl. Dip the doughnuts in it halfway and sprinkle with colourful sprinklers. 
Doughnuts are best eaten the same day, almost soon after frying. You can also refrigerate excess dough and fry fresh as and when needed


Kolkata Food Bloggers are organizing a one of its kind Bake'rs Showcase featuring the best talent in Homebaker's. Folks in Kokata, please book your date and join us in this endeavor where you are guaranteed to find some amazing and creative bakes. Find more details here .


Happy Doughnut eating
Amrita

Sunday, 20 December 2015

Sugar Cookies shaped as Gingerbread men


Vaanya, my four and half year old daughter, is at a stage where she is enjoying the world of fairy tales and stories. During the Durga Puja holidays, she got a scrapbook assignment from her Montessori to illustrate her favourite story. Vaanya chose to draw pictures of Goldilocks and the three bears. After the school reopened each story from the scrapbook was read in the class. 
Vaanya's classmate Alvira had chosen The story of Gingerbread Man. Alvira's mother, knowing my passion for baking requested me to bake some Gingerbread cookies for the class. The happy baker in me jumped on the chance to make these cute cookies. We decided not to go the traditional way of adding ginger and spices to the cookies and planned to keep them simple. 
These simple sugar cookies are inspired from Sayantani's blog and I have added a wee bit of cocoa powder to give them a little colour. The cookies are shaped in the Gingerbread man and are decorated with melted white chocolate. 
I was happy to see kids with their gingerbread shaped cookies merrily chomping on it. These cookies are a perfect Christmas treat.


Recipe source : A homemaker's diary

Ingredients : yields about 3 dozen cookies of medium size
  • 3 cups all purpose flour
  • 1 cup powdered sugar
  • 200 gms butter, room temperature
  • 1 egg
  • 1 tsp baking powder
  • 1 tsp vanilla essence
  • 2 tbsp cocoa powder
Procedure
Preheat oven to 170 degree Celsius.
Take butter and sugar in a bowl and beat till it gets light and fluffy.
Sieve all purpose flour, cocoa powder and baking powder.
Add egg and vanilla essence to the butter-sugar mixture and mix well.
Add the flour mixture in 3-4 additions and keep mixing. 
Knead into a dough and wrap in a plastic or cling wrap and refrigerate for an hour.
Take a little of the dough and roll it to the desired thickness, preferably 1/3rd of an inch.
Cut cookies in desired shape and place them on a butter paper lined baking tray.
Bake cookies for 8-10 minutes.
Allow to cool.
Decorate the cookies with melted white chocolate piping or icing sugar mixed with little water. You may add food colour to make colourful icing.


Happy Cookie enjoying
Amrita

Monday, 14 December 2015

Chocolate Cloud Roll with Strawberry cream filling


Winter time marketing is so much fun as you get to see and buy such a fresh and colourful range of vegetables and fruits. Fresh strawberries boxes are nowadays seen with every fruit seller and with the prices now reduced to almost  half with what it started off, I decided to do a strawberry recipes marathon. 
My first thought was to simply fill a tried and tested Chocolate cloud roll recipe with whipped cream tossed with strawberries. This particular recipe has been made by me many times but has never been documented in the blog. Amongst all the baking books sitting pretty on my bookshelf, Cake Bible by Rose Levy Beranbaum is my favourite for many reasons than one. Firstly she gives scientific explanations to her bakes and her recipes are very detailed and easy to follow. Her Chocolate Cloud roll recipe is as delicate as it sounds and has a melt in mouth texture.
As Rose mentions, this is more of a flourless souffle than a cake. With no flour to give it a definite texture this cake is very very light and is just about sweet. I have usually filled the cake with a dark chocolate ganache but this time tried a whipped cream and strawberry filling. The cake can have endless fillings from a jam, chocolate ganache, coffee flavoured cream filling or just a plain whipped cream with fruits filling. 
Do not forget to follow the baking tin instruction which mentions a grease, line,  grease and then flour. This is very important as the cake otherwise will stick to your butter/parchment paper. 


Recipe source : Cake Bible by Rose Levy Beranbaum

Ingredients : I have reduced the recipe to 1/2 and baked in a 11X8 " jelly roll pan
  • 3 eggs, separated
  • 3 tbsp and a 1/2 tbsp powdered sugar, separate 
  • 50 gms melted dark chocolate
  • a pinch of cream of tartar (optional)
Strawberry cream : 
  • 1/2 cup whipped cream
  • 4-5 chopped strawberries
Garnish : 
  • melted dark chocolate
  • chopped strawberries
  • icing sugar

Procedure

Preheat oven to 176 degree Celsius.
Grease your jelly roll pan and then line it with butter/parchment paper and then grease it again and lightly flour it. 
Take egg whites in a bowl and beat till foamy. Add cream of tartar and beat again till soft peaks form. Sprinkle 1/2 tbsp sugar and beat again till stiff peaks form. 
In another bowl beat 3 tbsp sugar and egg yolks for about 3-4 minutes till light and fluffy. Add melted chocolate and beat again till incorporated.
With a rubber spatula or a whisk, fold 1/4 of the egg white mixture into the egg yolk-chocolate mixture. Gently fold in the remaining egg white mixture.
Pour batter in the prepared tin and spread with the spatula. Bake for 15 minutes.
Take a piece of butter/parchment paper the size of the tin and sprinkle it with cocoa powder. Invert the cake on it and let it cool. Remove the parchment paper to spread the strawberry filling and roll the cake gently. 
Garnish with a dusting of icing sugar/powdered sugar, melted dark chocolate drizzle and chopped strawberries. 
Slice and serve.


Happy cake relishing
Amrita

Thursday, 10 December 2015

Cold oven Fig and almond tea cake


Winters are here and it is by far my most favourite season because it is the season to bake and indulge in all sinful good things. Baking in the holiday season is such a delight and is soul therapy. The fresh produce in the markets has pushed my lazy self to whip up some bakes and enjoy them.
On a recent trip to our fruit vendor, my husband Vishal spotted fresh figs. He was quick to point them out to me but I refused saying that they will be expensive. But Vishal knowing how much I love to bake with fresh fruits urged me to buy and use them. The box of figs sat in my fridge for two days before the thought of them getting spoilt made me push myself to start baking. 
A quick browse on the net led me to this cold oven tea cake recipe. I have heard of the cold oven baking method but had never tried it. Cold oven baking method is more popular with the pound cake recipe where putting your cake in a cold oven and then adjusting the temperature is believed to help make the cake dense and achieve a more crisp crust on the top. The cake is basically baked at low temperature for a long time in a cold oven which has not been preheated. 
As weird as the method sounds, it worked wonders for my experiment. My cake was, most arguably, the best one I have ever baked. The cake does not rise much which gives it a compact dense texture and the crust on top is to die for. I cooked my fresh figs with some sugar and brandy and used them in the cake along with roasted and chopped almonds. The fresh figs on top added to the figilicious experience. Pairing the slice of cake with our evening tea was just the right thing for this weather.  


Recipe source : Hungry rabbit. I have reduced the recipe to 1/4th and adapted it to yield a 6X3" cake loaf.

Ingredients :
  • 1/2 cup all purpose flour + 1 tbsp cornflour
  • 1/4 cup + 2tbsp powdered sugar
  • 1/4 tsp baking powder
  • pinch of salt
  • 2 tbsp coconut milk (I used Dabur Homemade tetrapack) 
  • 1/4 tsp vanilla extract
  • a drop of almond extract(optional)
  • 3 1/2 tbsp butter
  • 1 egg
  • 8-10 almonds, dry roasted on a pan and chopped
Fig filling
  • 2 fresh figs, chopped
  • 1 tbsp sugar
  • 1 tsp brandy or water

Procedure : 

Fig filing:
Put chopped figs and sugar in a saucepan and add brandy or water. Let it simmer on medium heat till the consistency becomes thick and the figs gets squashed. Cool.

Cold oven tea cake : 
Grease and line 6X3 loaf pan.
In a bowl, combine all pupose flour, cornflour, salt and baking powder.
In a small bowl, mix coconut milk with vanilla and almond extract.
Take butter and sugar in a big bowl and beat till it becomes light and fluffy.
Add egg and beat.
Now add the flour mixture in 3 additions alternating with the coconut milk mixture. 
Add the roasted and chopped almonds to the mixture and drop in little chunks of the fig filling. 
Lightly fold the mixture and pour batter to the prepared baking tin. 
Put the tin in the cold oven and adjust oven temperature to 170 degree Celsius for 30 minutes. Do not open the oven door in between.
Cool.
Garnish with some powdered sugar, fresh fig slices and chopped almonds. 


Notes

  • You may use dried figs instead of the fresh figs I have used for the filling. Just chop dried figs and use them in the batter.
  • Instead of coconut milk, you may use normal milk


Sending this recipe to Kolkata Food Bloggers ongoing event Baking Palooza 2015. Check out the page for some more exciting holiday bakes. 


Happy tea cake enjoying
Amrita

Saturday, 22 August 2015

Opéra Cake


Birthdays are a special day in my household for more reasons than one. For the baker in me, it is a day to put my hands on a long awaited cake that has been on my list for a long time and that finally gets to see the light of the day. With my husband Vishal's birthday falling on 27th last month, I needed to try a rather special cake. And so it had to be the coveted Opera cake, the French classic cake which I have been scared to try because of the sheer number of elements it has. 
The Opera has an equally amazing history too. Story goes that in 1955 French pastry chef Cyriaque Gavillon, working at the legendary Dalloyau shop in Paris, invented the Opera while wanting to create a cake with complex layers in terms of texture and taste. His wife, Andrée,  told him that it reminded her of the famous Paris Opera house, which eventually was the name given to the cake. 
Another story goes that the cake was invented in the Paris Opera to help people stay awake through the final acts of the lengthy shows being heavy coffee laden. 
An Opera cake consists of thin layers of almond sponge called Jaconde which is moistened with a coffee syrup and is then sandwiched with layers of coffee buttercream and chocolate ganache. The cake is then topped with a chocolate glaze. Traditionally the cake is adorned with a edible gold leaf and has the word 'Opera' piped on it.
This cake was even more special and was the right choice for Vishal's birthday as both me and Vishal are ardent fans of music. We love to spend our time singing songs while Vishal strums his Guitar. Music is the key to our hearts and holds us close together. 
The cake turned out a winner as everyone who got to taste it loved it. Being very critical about my own cakes, I found the sponges a bit over soaked but that was not an issue with anyone else.
My over excited daughter was much more eager about her Papa's birthday and made a very sweet card for him. 


Recipe adapted from : Joe Pastry

Ingredients and Procedure

Jaconde (Sponge cake)
  • 3 egg whites
  • 2 tbsp granulated sugar
  • 1/2 cup almond meal
  • 1/2 cup powdered sugar
  • 3 eggs
  • 1/4 cup all purpose flour
  • 1 tbsp clarified butter, melted
Preheat oven to 200 degree Celsius.
Grease and line a jelly roll pan 28X21 cm with baking paper and then grease it again.
Take egg whites in a bowl and whip till soft peaks. Add granulated sugar and beat again till stiff peaks. Keep aside.
Take whole eggs and almond meal in a bowl and beat till light and foamy for about 3 minutes.
Add flour and mix.
Incorporate the egg whites in 3 additions carefully with gentle mixing. 
Fold in the melted clarified butter.
Pour batter in the prepared pan and spread with a spatula.
Bake 8-10 minutes.
Cool and flip it over baking sheet. Carefully peel the baking sheet and keep aside.
Can be refrigerated for a day. 

Coffee Buttercream
  • 3 egg yolks
  • 1/2 cup powdered sugar
  • 2 tbsp water
  • 1/2 tsp vanilla extract
  • 200 gms butter, at room temperature
  • 1 tbsp instant coffee powder
  • 1 tsp hot water
Dissolve coffee powder in hot water and keep aside.
Take egg yolks in a bowl and whip for 5 minutes.
Prepare sugar syrup by combining sugar and water in a saucepan and allowing the sugar to melt. When the mixture starts bubbling, remove from flame and pour the syrup in a steady stream over the egg yolks while beating continuously. 
Add the butter and vanilla extract and whip together. 
Add the coffee mixture and mix. 
Refrigerate for further use.
Can be made a day in advance.

Chocolate Ganache : 
  • 1 cup chopped dark chocolate
  • 1 cup cream (I used Amul )
Heat cream in a pan. Take care not to scald it.
Remove from heat and add the chopped chocolate. Mix well and keep aside.
Can be refrigerated.

Coffee flavoured cake syrup : 
  • 1/2 cup water
  • 1/4 cup sugar
  • 1 tbsp instant coffee powder
Dissolve sugar in hot water and add coffee powder.
Cool and keep aside.

Chocolate glaze : I made a ganache instead of the traditional tempered chocolate topping
  • 1/2 cup chopped dark chocolate
  • 1/2 cup cream
Heat cream and add chocolate. Stir and mix well.
Keep aside.

Chocolate writing : 
Melt a little chocolate and add few drops of vegetable oil to it. Mix well and put in a piping bag and use. 

Assembly : 
Cut the Jacondes in half(to get 2 rectangles).
So you have 4 layers Jaconde sponge.
Take a layer and apply coffee syrup. 
Apply layer of ganache.
Apply coffee buttercream layer.
Put another sponge and apply coffee syrup.
Repeat with ganache and coffee buttercream with all layers till the top.
Pour the chocolate ganache on top. 
Let it firm up in the fridge.
Trim edges from all sides to show the neat layers.


Happy Opera Relishing
Amrita

Monday, 13 July 2015

Cherry Clafoutis


The markets have been flooded with cherries for a while and I have been wondering how to use them best, apart from eating. For a crazy baker like me, it is not best till they are used in a bake. And therefore the hunt began and I was amazed to find out that I had not yet tried this very simple but very famous French bake. 
Cherry Clafoutis or clafouti (kla-foo-tee) is basically a baked French dessert where cherries are arranged in a dish and covered with a pancake like batter. It is commonly eaten as breakfast too. 
Ideally the best variety of plump red cherries are used which are pitted and then tossed in a little butter and sugar.
The variety of cherries I got were definitely not the best and I had to spend some time pitting the seeds from them. But once that was done, the entire process was literally a cakewalk. 


Recipe adapted from : Joy of Baking

Ingredients : Serves 2

Batter : 
  • 1/4 cup all purpose flour
  • 1 egg
  • 1 1/2 tbsp powdered sugar
  • 1/4 cup + 2 tbsp milk (full cream)
  • 1/2 tbsp melted butter
  • 1/4 tsp vanilla extract
Cherries : 
  • 20-25 cherries, pitted
  • 1/2 tbsp butter
  • 1/2 tbsp granulated sugar
Procedure : 
Preheat oven to 200 degree Celsius.
Take butter in a saucepan and add the pitted cherries to it. Sprinkle sugar and cook till the sugar melts. Remove from heat and keep aside.
Mix all purpose flour, sugar, egg, milk, butter and vanilla extract. 
Place cooked cherries in the tin of choice. I used my tart tins and covered the loose bottom with foil. You can use a ceramic ovenfree bowl too. 
Pour the prepared batter over the cherries and bake for 18-20 minutes or till the mixture has set. 
Serve with fresh cherries. 


Sending this recipe to KFB's ongoing event celebrating the Monsoons


Happy Clafouti baking
Amrita

Thursday, 4 June 2015

Brazilian Carrot Cake


Baking is my weakness. Period. 
And when I meet people from different countries, I end up talking to them about their confectionery culture. To the western world, baking is quite their way of life unlike ours. Therefore I love to know and understand about the different techniques and ingredients that goes into their baking. 
Recently I got an opportunity to meet a Brazilian brother sister duo who had come to Kolkata to learn and experience the intricacies of Indian food. And they were here only for a week! Vishal, my husband, had the responsibility of introducing Indian food to them and also give them some quick classes. Thus started one crazy week of the most concised course on Indian food. They went back with aching stomachs and 'please no more food' on their lips and absolutely mesmerized with the variety of spices, techniques and ingredients that we use.
As soon as I found my opportunity, I questioned them about their cake culture. While they went on explaining to me in their broken English about the different varieties, this particular cake caught my fancy. A carrot cake has been on my baking list(like a hundred others) for a long time. I have always been of the opinion to bake with the red juicy variety that you get only in Winters. When I learnt from them that the bright orange variety is the ones they bake with, I knew it was my 'Voila' moment. 
Unlike the popular American version of carrot cake, the Brazilian carrot cake uses raw carrots blended and then added to the batter. I knew I had to bake this one before I add yet another bake to my list. The cake gets a beautiful orange hue with the use of those bright coloured carrots. With very simple ingredients and instructions, making this cake is a breeze and with a simple chocolate frosting dressed on top of the cake, this cake is a must try.  


The darling daughter loving the cake and happy mommy clicking away :)

Recipe adapted from : Allrecipes

Ingredients : Yields a 5" long loaf cake

  • 1 medium sized carrot
  • 1 egg
  • 3/4 cup powdered sugar
  • 1 cup all purpose flour
  • 1/2 cup oil
  • 1 tsp baking powder
  • pinch of salt
Chocolate Glaze :
  • 2 tbsp cocoa powder
  • 1 tbsp powdered sugar
  • 1 tbsp milk
Procedure : 
Preheat oven to 180 degree Celsius.
Grease and flour a loaf baking tray or a round baking tray.
Peel and chop carrot in small chunks and place in a blender with oil. Blend it well.
Add egg and blend again. 
Pour this mixture in a bowl.
Mix in the sugar, all purpose flour, baking powder and salt. 
Pour this mixture into the prepared cake tin. 
Bake for 25-30 minutes or till a toothpick inserted in the middle comes out clean. 

Mix all the ingredients under the chocolate glaze and spread on the cooled cake. Refrigerate for the icing to set well.
Slice and serve.


Happy carrot cake enjoying
Amrita

Monday, 16 February 2015

Fraisier-French Strawberry Gâteau


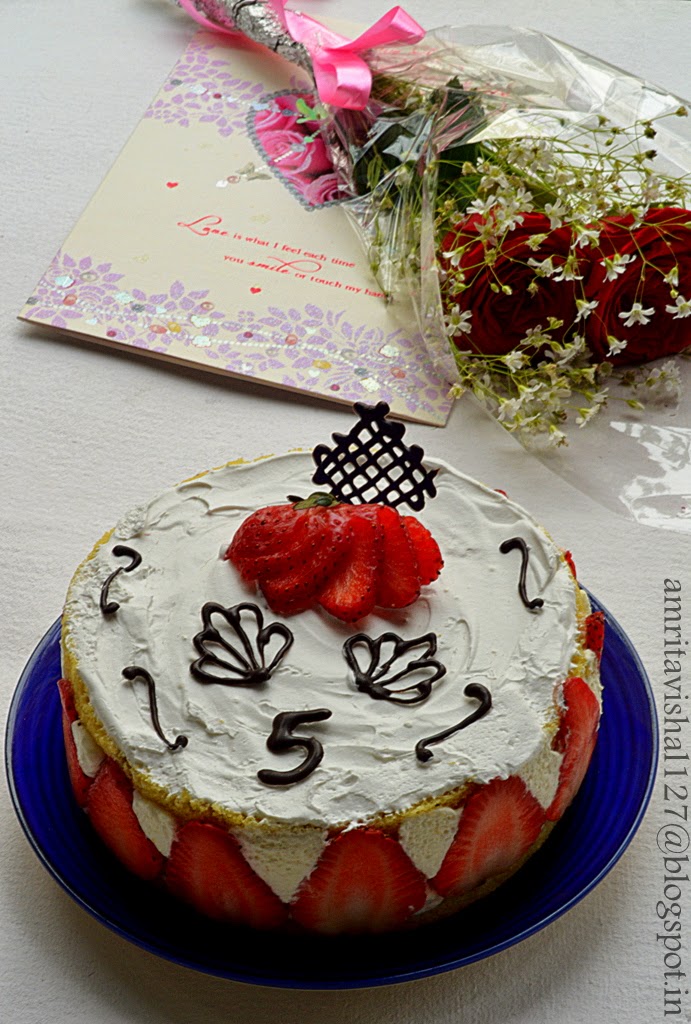
This Valentine's day completed 5 blissful years of my marriage with my best friend, my soulmate Vishal. Time has certainly flown by and it seems like just yesterday that we had limited time to spend with each other. We kept our distant relationship alive on letters and stuck by each others choice even with family's disapproval. It is really amazing to think back of those days and imagine at the conviction we had in each other. I guess that is the reason we were united with our family's blessings. And what better day for that!
Valentine's day is also my in-laws anniversary and therefore the choice of date for our marriage. My parents had no objection to it but since we had a Gurudwara wedding, it was important that it should be a Sunday. Sikh weddings rituals take place in the morning and Sunday being a holiday for all is naturally the most convenient day to invite people. Believe it or not 14 Feb 2010 was a Sunday!
With such a mushy story, I needed a mushy cake for the grand 5 year celebration. This particular cake caught my fancy as it more of the technique in assembly than the bake in itself. A fairly simple method with lovely results, is exactly what I wanted for the anniversary celebrations. Fraisier is a gâteau which has structure made up of strawberries and pastry cream supported by thin layers of sponge. The fraisier gets its name from the french word “fraise” which means strawberry. Traditionally this cake has a marzipan top. The elements can be made few days in advance which makes it easier to just assemble it a day before required. 
My maiden attempt, thankfully, went off well and once the gateau was out on a plate to be photographed, my daughter Vaanya kept pulling me asking for the chocolate decorations. With some hurried pictures, the gateau was all hers. There is no joy comparable to the one you get when you see your tiny one enjoy what you have made. Vaanya was all over the cake licking off the cream, pinching off the chocolate decorations and pulling the strawberry slices from its place. 


Ingredients : For a 6" round gâteau

Genoise cake:
  • 2 eggs
  • 25 gms butter, at room temperature
  • zest of half a lemon
  • 1/2 cup powdered sugar
  • 1/2 cup self raising flour (substitute with 1/2 cup all purpose flour+3/4 tsp baking powder+1/8 tsp salt)
Pastry Cream filling:
  • 1/2 cup milk
  • 1/4 tsp vanilla essence
  • pinch of salt
  • 1 tbsp cornflour
  • 2 tbsp powdered sugar
  • 1/2 egg (beat one egg in a bowl and use half the quantity)
  • 1 tbsp butter
  • 1/2 tsp gelatin
  • 1/2 tbsp water
  • 1/2 cup whipped cream
Sugar syrup :
  • 1/4 cup sugar
  • 1/4 cup water
You will also require:
  • 9-10 strawberries
  • Chocolate decorations
Procedure : 

Genoise : 
Preheat oven to 180 degree Celsius.
Grease and line a 6" round baking tin.
Place sugar, eggs and lemon zest in a bowl and place it over a pan of simmering water as a double boiler. Take care that the water should not touch the bowl of eggs. 
Whisk the mixture over medium heat till it doubles in volume. You will know the right stage once the mixture forms a ribbon trail when the whisk is lifted.
Sift in 1/2 of the flour and gently fold in the whisked mixture with a metal spoon. 
Add the remaining flour and fold again.
Gently fold in the butter. 
Pour the mixture in the prepared tin.
Bake for 15-20 minutes or till a toothpick inserted in the middle comes out clean.
Allow to cool and cut cake in half.

Pastry Cream filling:
Pour milk, vanilla extract and salt in a saucepan.
Place over medium heat and stir. Bring it to a near boiling point.
Add cornstarch and sugar in another bowl and whisk.
When milk is ready, gently and slowly add to the egg mixture and stir simultaneously. 
Pour the mixture back into the saucepan and continue to cook over low heat till it thickens and coats the back of a spoon.
Pass through a fine mesh and allow to cool.
Whisk in the butter. 
Cover cream with a plastic wrap pressing on top of cream to avoid skin formation.
Chill in fridge. 
Can be stored upto 5 days in refrigeration.

Sprinkle gelatin over water and allow to soften for 3-4 minutes.
Take 1/4 cup cream on a double boiler and heat it.
Add gelatin and whisk. Add in the remaining cream.

Mix in the whipped cream well and transfer the pastry cream in a piping bag and store in fridge till  further use. 

Simple Syrup : 
Combine sugar and water in a pan and bring to a boil. 
Allow to cool.
Can be stored in fridge for upto 1 month.
Can be flavoured too. 

Fraisier Assembly : 
Cling wrap the entire inside of the 6" round pan with some extra hanging out. This will be useful to pull out the gateau from the tin. You may also use a springform pan to make it easier in which case you will only need to line the sides of the pan with cling wrap.
Fit bottom cake layer in the pan and moisten with sugar syrup. 


Slice strawberries in arrange around the sides of the pan.


Pipe cream in between the strawberries and a thin layer across the top of cake.


Chop the remaining strawberries and place them in the middle of the cake.


Cover them with the pastry cream and smoothen top.


Place the second layer of cake on top and moisten with sugar syrup. 


Cover top with some remaining pastry cream or whipped cream.
Refrigerate for 4 hours or overnight.
Pull out the gateau carefully from the tin with the help of the overhanging cling wrap.
Place on a plate and decorate with strawberries and chocolate decorations.


Our anniversary celebration was made delicious with Vishal's Chicken biryani which followed by a visit to a newly opened cafe for some coffee and cupcakes. 


Happy Valentine's day
Amrita

LinkWithin

Related Posts Plugin for WordPress, Blogger...