Showing posts with label Sweet. Show all posts

Friday, 13 January 2017

Pinni


Its Lohri today! Lohri is an important festival of Punjab and is celebrated with utmost fun and fervor. It is popularly believed that Lohri marks the end of the bitter cold but traditionally it is associated with harvest of Rabi crops. It is celebrated on the 13th Jan every year and marks the last day of Paush and beginning of Magh(both Indian calendar months)  when the sun changes its course.
Like any other festivals, Lohri is associated with yummy food esp the winter must Sarson da saag and Makai di roti. Along with it people relish on Pinni, ganne di kheer, makhane di kheer. In the evening, bonfires are lit and everyone sits around spending lovely time singing, dancing, talking and eating Gajak, rewadi, chikki, moongphuli, popcorn etc
I remember when we were small, my Grandmother, ,my Aunt and my Mom would be busy throughout the day making delicious things for the evening bonfire. Amongst all the things I fondly remember my love for the kurmura ladoo which is made with puffed rice and jaggery.
While vacationing in Punjab recently, we had a relative who gave us heaps of homemade khoya. My elder Masi was quick to use it into some seriously out-of-the-world delicious Pinni. I was so amazed at the purity and simplicity of the recipe. Just mixing of few basic ingredients and you have such a yummy  traditional ladoo.
Try this super easy and super yummy Pinni from Punjab.


Recipe source : My Masi
Ingredients
  • 3 cups good quality khoya/mawa/milk solids
  • 1 cup whole wheat flour/atta
  • 1/2 cup ghee/clarified butter
  • 3/4- 1 cup desi khand/shakar bura/powdered sugar (depending on your taste)
Procedure : 
Take ghee in a heavy bottomed vessel and warm it. 
Add atta to the ghee and on a medium flame cook it. till it slightly changes colour.
Add sugar to it and mix well. 
Now add khoya and cook till everything comes together and mixes well.
Let it cool a little and then make balls out of it. Put a halved cashew on top or just let it be.


Note :
  • Use very good quality of khoya for Pinni. I used homemade khoya which I received from a relative on my trip to Punjab. 
  • Desi Khand or Shakar Bura is powdered sugar made of jaggery. It is healthier than using refined sugar. You can replace it with easily available powdered sugar. 
  • Adding cashew or almond or any other dry fruit is optional. You may even add chopped dry fruits in the mixture and then make Pinni out of it. 
Sending  this recipe to Kolkata Food Bloggers ongoing event 

Happy Lohri
Amrita

Sunday, 31 July 2016

Chocolate mud cake with SMBC frosting


It was time of the year to bake a cake again and I jumped on the opportunity to try my hands on some techniques I have never tried before. It was my dear Husband's birthday on the 27th of this month and more than us, our daughter Vaanya was super excited about the celebration. The cake was attempted keeping Vaanya and her fetish with pink in mind. And boy, how elated she was to look at it. 
I had seen a similar image of a cake on Pinterest one day and had decided to attempt it. With the D day nearing, I pushed myself out of a lazy slumber and bought the necessary equipments and ingredients. The cakes were baked a night before and while they got baked in batches, I made the icing. The cakes were cooled, stacked with the icing in between and given a crumb coat. Next morning, I gave all the finishing touches to the cake while my daughter was away at school. The cake was dressed up in a pink drip and adorned with buttercream flowers. I knew Vaanya was going to love all the pinkness.  
The day was spent in a long drive to the highway and once we came back home in the evening, Vaanya was eager to have the cake cut. The day came to an end with the cake cutting, eating cheer and laughter. May God bless us with such beautiful moments forever.


Chocolate Mud cake 

Recipe source : Cocawind

My notes : 
  • I halved the recipe and then pour the batter in two 6" round pans.
  • Baked them at 180 degree Celsius for 20-25 mins. 
  • Made other half of the recipe and repeated to yield four 6" round cakes.
  • Trim tops so that all are equal.
Swiss Meringue Buttercream icing (SMBC) 

Recipe source : Here

My notes : 
  • I followed the recipe to the T
  • Separated 3/4 of the icing and kept separate for frosting the cake.
  • Added pink food colour till I achieved the desired colour and frosted each cake layer with it. 
  • Once all the layers were stacked, I frosted the outside and refrigerated to set. I kept mine overnight. You may keep for 3-4 hrs.
  • With a glass of hot water and an offset spatula, give the cake a final frosting finish. Every time dip in the hot water, wipe your spatula and try and give a neat finish to the frosting. 
  • Refrigerate

Pink Drip : 

Take equal quantity of white chocolate and cream. Heat cream and add chopped white chocolate to it. Stir it well. Add little milk to make it a little runny. Add pink food colour. 
Take spoonfuls of the drip and pour on the edge of the frosted cake, all around. Now fill the top of the cake with the drip too. Refrigerate.


Buttercream flowers

To the rest of the SMBC icing, divide into 4. Colour pink to one part, purple to another, green to the third and leave the 4th as it is. 
Pipe pink icing to a piping bag with a Rose petal nozzle and pipe flowers over a piece of butter paper and over a flower nail. Once done, transfer the piece of butter paper to a flat plate and refrigerate.
Repeat same with purple flower.
Watch here 
Pipe some of the icing(not coloured) over the top of the cake, half an inch behind from the outer diameter. 
Peel the flowers from the butter paper and put on the cake. Arrange it the way you want.
Pipe the leaves with a leaf nozzle.
Refrigerate.


Happy Cake decorating
Amrita

Tuesday, 19 July 2016

Coffee Pannacotta with Boozy Chocolate sauce


Its our 'Blogger of the week' time and this week features the founder of our group Kamalika Chakrabarty who blogs from Silence sings. Her theme for this week is Chef's Challenge and each member is supposed to make a dish inspired from their favourite chef. 
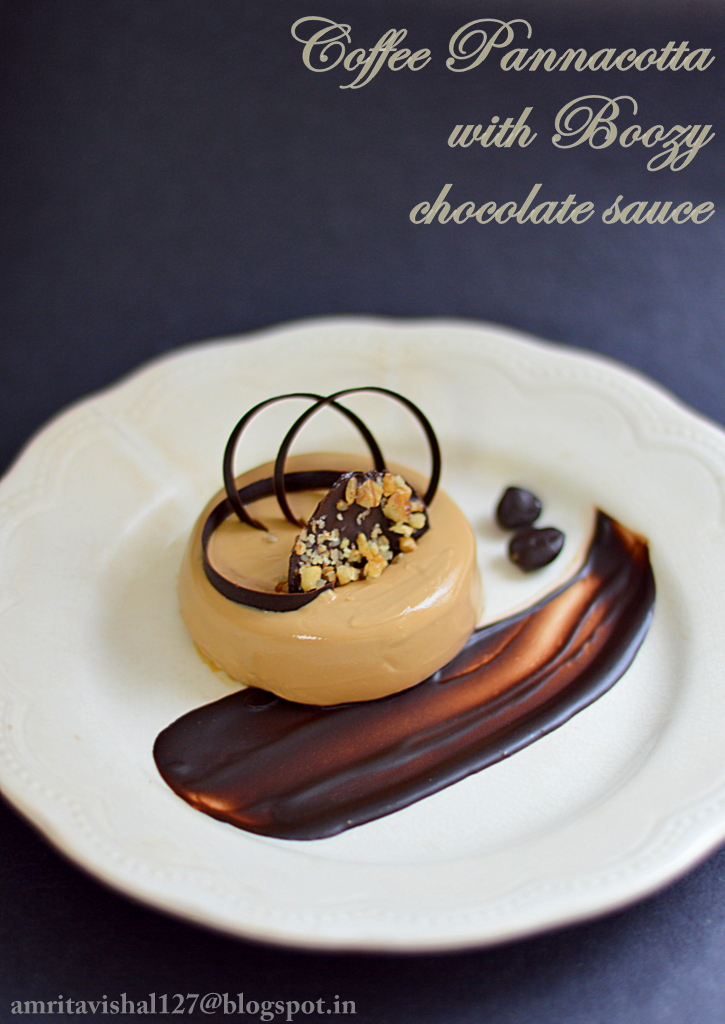
A little lost in the beginning, I found my answer in Nigella Lawson's Coffee pannacotta with chocolate sauce shown on Masterchef Australia. The moment I saw it, I knew I was making it. And thus I started with making a homemade version of Coffee liqueur (blogpost coming soon next). As usual, I modified the quantity and adjusted it to 2 servings. The original recipe has a more pouring consistency of the chocolate sauce but I have made mine a little thicker for my plating idea. I designed the plate with a little piece of crunch from a chocolate walnut disc and some chocolate rings. 
This dessert is rich, decadent, extremely delicious and a must try for coffee lovers.


Recipe source: Nigella Lawson 

Ingredients : Serves 2
  • 1/2 cream (I used Amul cream)
  • 2 tbsp sugar
  • pinch of salt
  • 1 tbsp instant coffee powder 
  • 2 tbsp water (for dissolving coffee)
  • 3/4 tsp gelatin powder
  • 1 tbsp cold water (for blooming gelatin)
Boozy Chocolate sauce:
  • 50 gms dark chocolate, chopped
  • 2 tbsp coffee liqueur

Procedure : 

Coffee Pannacotta:
Take 1 tbsp cold water in a small bowl and add gelatin powder to it. Mix well and let it bloom for 5 minutes. The gelatin will become spongy. 
Heat 2 tbsp water in a pan and add the coffee powder. Add sugar and stir till it dissolves. 
On low heat, stir in cream. Add salt. Mix well.
Remove from heat and stir in the gelatin. Mix well so that the gelatin dissolves. 
Sieve the mixture to attain a smooth texture and allow it to cool. 
Pour the mixture in desired bowls and refrigerate for 3-4 hrs or till set. 

Boozy Chocolate sauce :
Take coffee liqueur in a pan and boil it. Add chopped chocolate to it and stir well. Remove to a bowl and allow to cool.

Garnish

Chocolate rings : Melt dark chocolate over a double boiler and spread a spoonful on a sheet of acetate with a spatula. Use a pastry comb to make lines through the chocolate. Roll the acetate sheet gently and secure ends with some cello tape. Allow to cool completely. Remove the cello tape gently and take out the curls carefully. 

Chocolate coated coffee beans : Melt some dark chocolate and dip whole coffee beans in it. Remove on a piece of parchment paper and allow to set.

Chocolate walnut disc : Melt some dark chocolate and spread like a circle on a piece of parchment paper. Roughly crush a walnut and sprinkle on the chocolate. Take a small circular cutter and make an impression on the half set chocolate. Allow to cool completely. Remove carefully to get the chocolate disc.

Plating
Take a spoonful of the boozy chocolate sauce and spread it on the plate with the help of a spoon.
Dip the pannacotta mould in little hot water for few seconds and gently remove the pannacotta. Place it on the plate. 
Insert the chocolate walnut disc and the chocolate rings on the pannacotta. 
Place the chocolate coated coffee beans on the plate.

Note : 
  • You can make a chocolate sauce without the liqueur by substituting it with cream. 
  • Taste the pannacotta before setting in the mould for sweetness and add more sugar if required.
This recipe is part of Kolkata Food Bloggers  ongoing event Chef's Challenge where Kamalika Chakrabarty is the featured blogger of the week who blogs from Silence sings


Happy relishing
Amrita

Wednesday, 6 July 2016

Mango Sorbet


We have almost reached the fag end of the lovely Mango season and like every year I did my experiments with the mighty fruit. The mango ice cream I experimented this year was loved and relished so much that I made it three times over. The Lychee lemon sorbet was a hit too at home, so much so it gave me the idea to try a mango version of it. Since I do not have an Ice cream machine, the texture of the Lychee sorbet was not very soft. I expected the same with my Mango sorbet, but surprisingly it came out much smoother in texture. I reckon, it is because of the texture of the fruit which lend its natural smoothness. 
The lovely part of a sorbet is that it just melts in your mouth and refreshes your palate making you feel not too heavy with the dessert. It is light, refreshing and a smooth dessert and this season I am in love with Sorbet's. 
Since my last experiment with Lychee pannacotta , I have been hit hard with the dessert plating bug (if there is any) There was no set plan for plating this dessert but since the texture of the mango sorbet was so smooth that I got near perfect quenelles, I quickly planned one before clicking pictures of the same. I randomly put the quenelles on some chocolate biscuit crumb and threw in some mango cubes along with mint leaves. 


Ingredients : Serves 2-3
  • Mango pulp from 1 ripe mango(I used a variety called Langda)
  • 1/4 cup or less sugar, depending on the sweetness of the mango
  • 1/4 cup water
Procedure : 
Heat sugar and water in a pan till sugar dissolves.
Strain the mango pulp to remove any fibre and add it to the pan.
Cook for a minute and them remove from flame.
Allow to cool completely.
Transfer to a freeze proof container and freeze overnight or for minimum 6 hrs.
Next morning break the crystals with a fork and put it back in the freezer. Repeat 3-4 times. This will help achieve a smooth texture.
For plating, crumble a chocolate biscuit (I used hide and seed) and put on a plate. Make quenelles out of the mango sorbet with the help of two spoons and place on top of the biscuit crumbs. Place cubes of mango randomly on the plate and finish with mint leaves. 
Otherwise just scoop out the sorbet and enjoy it. 


Happy Mango Relishing
Amrita

This recipe is a part of Kolkata Food Bloggers ongoing event 'Celebrating Summer Fruits'. Find more recipes here 


Monday, 27 June 2016

Easy Mango Ice cream


Of the few things to love about Summers is the availabilty of the king of fruits-the Majestic Mango. I absolutely adore mangoes and have a little weak heart for the variety which is interestingly called 'Langda' or 'Langra'. The origin of the name is debateful but it is believed that since most of the names are derived from the places of origin, it too could be named after a certain place called so. But, whats in a name. Langda has a distinct taste and even though it has a green skin which might trick you into feeling its not ripe, it is one of the most sweetest mangoes. 
Vaanya, my daughter, is a mango lover too. This season she has been wanting to eat the Langda over another sweet mango called Himsagar and has been relishing her Mango escapades with the oozing nectar and the consequent mess. 
A very ripe Langda in my fridge made me kick my lazy self and turn it into an easy mango ice cream which has been in my list for a long time. This is one super simple recipe, very much like the easy strawberry one I made. It is best to make it a night before and let it set in the freezer overnight and then relish it in the day. 


 Ingredients : 
  • 3-4 tbsp condensed milk (adjust depending on the sweetness of your mangoes)
  • 1 ripe mango, peeled and pureed( I used Langda variety of Mango)
  • 1/2 cup milk
  • 1/2 cup whipped cream(see notes)
Procedure : 
In a bowl, combine milkmaid, mango puree and milk. 
Fold in the whipped cream and pour in a freeze proof tin.
Allow to set in the freezer for 5-6 hours. Best is to leave overnight.
Take out and beat the mixture and allow to set again in the freezer. Repeat this 4-5 times to break the ice crystals. 
Scoop and serve.

Note:

  • Take 1/4 cup of whipping cream and then whip it with a handheld beater till it gets thick and fluffy. 
  • In case, you do not have condensed milk, add powdered sugar to the mango puree.
  • Remember, this is a soft set variety of ice cream and therefore will not be as firm.


Happy Mango relishing
Amrita

Saturday, 25 June 2016

Lychee pannacotta with Ginger biscuit crumb and Coconut lemon curd


I am back to crazy 'Masterchef Australia' watching days. With the current season going on at number 8, I realized that I have missed many seasons in between my first tryst with the series. It all started with series 2 and I remember those days when Dinner was finished by 9 PM so that I could indulge in some non-stop gastronomic ride. My baby, Vaanya was then just few months old and needed attention all the time. Vishal and me would take turns to look after her while we eagerly watched each episode very religiously. 
This season my interest got rejuvenated and I have been ogling and drooling at all the artistic desserts that have been put up. Plating is the key in making even a simple dish shine and stand out in front of complex ones. With all this in my mind, I decided to try my hands in a simple dessert with different elements and a pretty plating technique. Firstly, I decided to hero the fruit-Lychee and pondered on all the other components which can go along with it. In terms of flavours, I decided to pair my lychee with ginger and coconut. So, the idea of ginger biscuits crumb and a coconut lemon curd came into my mind which sounded like a perfect harmony to my lychee pannacotta. 
I used some thickened grape juice to brush the plate and then very patiently decorated all the components on it. My over excitement led me to try 2 different platings with the same dessert. I am super mighty happy with the outcome. Do share your thoughts on the dessert. Will mean a lot to me. 


Components : 
  • Lychee Pannacotta
  • Ginger biscuit crumb
  • Coconut and lemon curd
  • Reduced grape juice
  • Fresh lychees
  • Mint leaves
Ingredients and Procedure

Lychee Pannacotta : 
  • 1 cup cream (I used Amul)
  • 9-10 lychees, peeled and deseeded
  • 2 tbsp sugar, powdered
  • 1 1/2 tsp gelatin powder
Blend the lychees in a mixer and strain.
Bloom gelatin in 1 tbsp cold water and allow it to get spongy for about 5 minutes.  
Heat cream and sugar on medium heat and add the pureed and strained lychee mixture. Do not let this mixture boil. 
When the mixture is warm enough to touch, add the bloomed gelatin and mix well. 
Pour in moulds of your choice. I chose my small spherical moulds and some silicon cupcake moulds. 
Refrigerate for 4 hours.

Ginger Biscuit : 
  • 1/2 cup all purpose flour
  • 4 tbsp brown sugar, powdered
  • 25 gms butter, room temperature
  • 1/4 tsp baking powder
  • 1/4 tsp baking soda
  • a pinch of salt
  • 2 tsp dry ginger powder
Beat butter and sugar till light and fluffy.
Add baking powder, baking soda, dry ginger powder, salt to all purpose flour. 
Add flour mixture to butter-sugar mixture and mix well.
Knead the mixture to a dough and cling wrap it. 
Refrigerate for 1 hr.
Preheat the oven to 180 degree Celsius.
Roll the dough and cut round shapes from it.
Place on a baking paper lined baking pan and bake for 15-20 minutes. 


Coconut and lemon curd : 
  • 1 egg yolk
  • 2 tbsp powdered sugar
  • 25 gms butter, cut in cubes
  • 1/4 cup coconut milk
  • 1 tbsp lemon juice
Take egg yolk and sugar in a bowl and put on a double boiler on low heat. 
Keep stirring the mixture.
Add butter cubes and mix well.
Add coconut milk and stir till it thickens for about 3-4 minutes.
Finish with adding lemon juice and mix well.
Allow to cool and then transfer to a piping bag. 

Plating : 
Brush your plate with the reduced grape juice which is made by simply putting grape juice in a pan and heating it till it thickens. 
Crumble the ginger biscuits and put them on the plate in a round shape, a little bigger than the pannacotta size.
Demould the Pannacotta and gently put on top of the ginger biscuit crumb. 
Add some fresh peeled and deseeded lychees.
Pipe the coconut lemon curd in intervals and finish with arranging fresh mint leaves. 


Happy Masterchef Inspirations
Amrita

Friday, 17 June 2016

Lychee lemon Sorbet


Summers are synonymous with lovely fruits like the eternal Mango and Lychees amongst others. I have fond memories of devouring these luscious lychees, enjoying the process of peeling the red covering and then de-seeding the white juicy pulp with the sweet nectar flowing down my elbows. The lychees always needed to be refrigerated for some time to enjoy them even more. Enjoying lychees in Summer time was such a ritual that I never realized that some of the best lychees are found in Calcutta. This realization was conveyed to me by my dear friend Afsana who hails from Bombay. According to her lychees in Bombay are horribly expensive and not as plump and juicy as the ones we find here. Now, I believe in every word on fruits that comes out from Afsana's mouth because she knows them in and out. It was while staying in Hostel that I realized how good she is in picking fruits from the market. She would touch, smell, ponder on them and then buy. She would know how to select a fruit, how to find out if its good or bad at an age where I didn't bother about fruits or vegetables. She would talk about the benefits of eating fruits and encourage spending money on a fruit than other junk food. She truly is my Fruit Guru. 

Vaanya, my daughter, has been waiting for Summers to relish Mangoes. Just before the Mango season started she asked me if it was Summers because she knows she can eat the fruit only in that season. This season she has equally, if not more, enjoyed the Lychees. During our vacations in Allahabad, she relished on the peeled, de-seeded and refrigerated lychees that I would very fondly prepare for her almost every day. 
Seasonal fruits itch me to put my hands on desserts and this season I wanted to experiment with the lychees. I started with the super easy Sorbet and found it extremely refreshing and a perfect palate cleanser. It just washes down your gut with that lingering taste of the sweet lychees and the lemon and makes you crave for more. 
Do try this recipe at least once for its a keeper. I plan to try out the same with a pack of readymade lychee juice for some non- seasonal indulgence. Shall update it here with the experiment soon. Till then enjoy the real thing. 


Ingredients : 

  • 8-10 peeled and de-seeded Lychees
  • 1/4 cup sugar
  • 1 cup water
  • 1 tbsp lemon juice
Procedure : 
Put lychees, sugar and water in a pan and bring it to a boil. Once sugar dissolves, turn heat off and allow the mixture to cool.
With a hand blender, blend the lychees in the pan.
Stir in the lemon juice. 
Strain the mixture and transfer to a container and freeze for 3-4 hrs. 
Take out and with a fork break the crystals and put the container back to the freezer. Repeat this 3-4 times. 
Serve and enjoy. 

Note : Try adding grated ginger to the pan with lychees and then blend them all and freeze as per the above instructions. 

Happy Sorbet-ing
Amrita

Friday, 8 April 2016

Rasmadhuri


April heralds the welcoming of new year all over India. It is amazing to see a true example of unity in diversity through the new year celebrations all over. The essence of the celebrations are more or less the same everywhere. 
Celebrated with different names, it basically marks the beginning of the harvest season and arrival of Spring.

It is called Vaisakhi in Punjab, Vishu in Kerala, Ugadi in Karnataka and Andhra pradeshChaitti in Himachal Pradesh, Mahavishuva Sankrant in Orissa, Navreh in Kashmir, Cheiraoba in Manipur, Puthandu in Tamil Nadu, Gudi Padwa in Maharashtra, Rongali Bihu in Assam.
Poila Boishakh is celebrated in West Bengal which literally means first day of the first month. An auspicious time for marriages and beginning of all business activities, it is celebrated with traditional dressing and food. 
Born and brought up in Kolkata, I have had a mixture of celebrations with each festival. To me, Poila Boisakh means the rustle and bustle at Chaitra sales, cleaning up the house spic and span, throwing away old unwanted things and bringing in new stuff. No Bengali festival is complete without their elaborate meals and it is the perfect time of the year to visit eateries serving traditional Bengali thali's-the amish and niramish ones. People are seen jostling in their favourite sweet shops to buy the most coveted mishti for the celebrations. Each shop burns the midnight oil to create sweet delicacies which are devoured with much fun and fervour.
Poila Boisakh is also incomplete without the traditional dressing. It is so wonderful to see the passionate and artistic community of Bengalis stick to their roots and wear traditional dresses. So while women don their favourite sarees, the men are seen with their Panjabi or dhoti. Even the little ones are seen donning traditional dresses. 
Bengali is one of the sweetest known language and throughout the day it is lovely to hear people wishing each other in the melodious 'Shubho Noboborsho'. 
An important part of new year is the cleaning of the house. It is Spring cleaning time of the year where old unwanted things are thrown away, houses are painted, nook and corners cleaned of dirt and pests. This is time of the year when the Summer has just entered the city and humidity is also a bit high hence cockroaches sneak out from their hiding and make their way into our homes, crawling in through the dirty drain pipes bringing in all the disease causing bacteria with them. The most easiest and sure shot way to get complete rid of them is Godrej LAL HIT, with its deep reach nozzle, it is able to get rid of the cockroaches hiding in your kitchen sink outlet, under the gas cylinder or under your fridge. This ensures a hygienic environment for the family which is of utmost importance, esp during Poila Boisakh where we are eager to cook the quintessential and delicious Payesh. From this Poila Boisakh onwards, make it a point while cleaning your kitchen to use Godrej LAL HIT in the places where cockroaches hide frequently-like sink outlets, under the fridge and gas cylinder and around the dustbin. 
I planned to try my hands on a mishti for this new year and have come up with Rasmadhuri where a rasagulla log is sandwiched with a saffron infused sandesh and then covered with the same. In the essence of the traditional festivity, I have placed the mishti in banana leaf wrappers. 


Ingredients : Yields about 6 in number
  • 500 ml cow's milk (or full cream milk)
  • 1 tbsp lemon juice/a pinch of citric acid
  • 1/2 cup sugar
  • 1 1/2 cup water
  • a tsp each of chopped almonds, pista and raisins
  • few strands of saffron in little warm milk
  • 2 tbsp powdered sugar
Procedure : 
Heat milk in a pan and let it come to a boil. 
Add citric acid/lemon juice and stir well. 
Soon you will see the milk curdling and whey separating. 
Wait till the whey separates well.
Remove from heat and using a muslin cloth drain the chenna(curdled milk) from whey. 
Hang the muslin cloth to drain excess water for half an hour. 
Remove and put on a plate. Cover with another plate and put a heavy object to drain any remaining liquid for about half an hour.
Take out the chenna and knead with the heel of your palm till smooth and reaches dough consistency. This requires patience and strong arm muscles and can take around 10 minutes.
Make cylindrical shapes out of 1/3 rd of the kneaded chenna and keep remaining aside.

Make sugar syrup by boiling 1/2 cup sugar and 1 1/2 cup water in a wide mouthed pan. 
Lower the log shaped chenna very gently in the sugar syrup.
Let them simmer on medium heat for 15-20 minutes or till they begin floating on the surface. 
Strain out the chenna cylinders and reserve for further use.

Alternatively, take sugar and water in a pressure cooker and as the syrup comes to a rolling boil, lower the chenna cylinders. Put the lid on and cook on medium heat for 2 whistles. Allow the heat to dissipate naturally and take out the cooked chenna cylinders.

Divide the remaining kneaded chenna again into two. To one part add  1 tbsp powdered sugar, chopped nuts and saffron infused milk. 
Cut the chenna cylinders into half and sandwich with the nuts and saffron milk added chenna.


Place these sandwiched logs in Banana leaf wrappers.

Add 1 tbsp of milk and 1 tbsp powdered sugar to the 1/3rd remaining chenna and mix it well. Add more milk if required to get a diluted consistency. Fill the banana leaf wrappers with this diluted chenna. 
Refrigerate for it to set.
Garnish with  saffron coloured streaks on top and a pista. 


Banana leaf wrapper can be made very easily at home. Here is a picture tutorial. 

Disclaimer : This post is in association with Godrej LAL HIT.

Shubho Noboborsho
Amrita

Wednesday, 2 March 2016

Chocolate glazed Doughnuts


It is amazing how we can push our abilities in times of need. Recently I had the opportunity to participate in a bake sale and managed to churn out quite some goodies in no time. I was amazed at my speed and realized that lack of time is always just an excuse we give ourselves.  
Amongst all the ideas that were floating in my head, I had almost ditched the thought of baking doughnuts because I was really not sure of its sale. But then there was this rising impulse inside me that made me jump up and make the dough and allow it to rest. The fluffy dough was then cut in the shape of a doughnut and fried to a beautiful golden colour. The doughnuts tasted light and fluffy and along with the chocolate glaze turned out to be an absolute treat. 
The icing on my baked goodies is always the family approval esp my daughter's. She was dying to put her hands on the chocolate slathered and sprinklers loaded doughnuts. I waited with a bated breath and saw her reaction as she picked one doughnut. Her head swung in an 'Ummmm' and I instantly knew I had baked goodness. 
The sale did not go too well and I ended up bringing most of the goodies at home. No one regretted as it meant a week long sweet feast at home. :)


Recipe source : Adapted from here

Ingredients : I have reduced the recipe to half and achieved about 14 medium sized doughnuts
  • 1/2 tbsp instant yeast
  • 1/2 cup or more warm milk
  • 1/4 cup powdered sugar
  • 1 egg
  • 1/4 tsp salt
  • 2 1/2 cup all purpose flour
  • 2 tbsp butter, softened
  • refined oil for frying
  • dark chocolate, melted
  • Sprinklers
Procedure : 
Take flour, sugar, salt and yeast in a bowl. Stir.
Add egg. Stir.
Add warm milk a little at a time and knead to a smooth dough. You may require more than 1/2 cup of milk. 
Add butter and knead. 
Take another bowl and grease it. Put the dough in it and cover with a damp muslin cloth. Leave it for an hour or more to double in size. 
You can also refrigerate the dough after the rise in case you want to use next day. Just let it come to room temperature before you roll, cut and fry.
Roll your dough and cut in doughnut shape using round cookie cutters of different size. Let it sit for 1/2 - 1 hour.  
I usually knead the hole back in the dough. You may like to fry them separately too. 
Put oil to fry the doughnuts in a deep pan.
Fry the doughnuts in medium heat till they are golden brown.
Drain on a kitchen towel or a tissue napkin.
Keep melted chocolate in a wide bowl. Dip the doughnuts in it halfway and sprinkle with colourful sprinklers. 
Doughnuts are best eaten the same day, almost soon after frying. You can also refrigerate excess dough and fry fresh as and when needed


Kolkata Food Bloggers are organizing a one of its kind Bake'rs Showcase featuring the best talent in Homebaker's. Folks in Kokata, please book your date and join us in this endeavor where you are guaranteed to find some amazing and creative bakes. Find more details here .


Happy Doughnut eating
Amrita

Friday, 12 February 2016

'Struck by an arrow' Heart shaped Boozy Cake-pops


Sometimes experiments can take you for a ride, I mean the good way. The little cake hearts I made were so little in quantity that they got over in no time. So I had to kick my 'nowadays laziest' self and make something on similar lines. With just 2 days to go to our Anniversary, I thought these cute 'Struck by an arrow' heart shaped cake pops that I had eyed on Pinterest shall be a good idea. A perfect treat for the 2 Valentine's of my life, my husband Vishal and our darling daughter, Vaanya. 
For me and Vishal, I decided to go the boozy way and added some dark rum to the cake crumbs. And for our daughter, I made some non alcoholic cake pops in her favourite colour Pink. 
Cake pops have been a rage in the world of confection for some years now. In simple words, it is cake shaped as lollipops. The credit goes to Angie Dudley, a food blogger who runs a blog called Bakerella. On February 1, 2008, she posted something on her blog that literally changed her life. She posted these cupcake pops 

Image from Bakerella
These cupcake pops became so popular that they paved her way to a new chapter of life. A month after she posted these adorable treats , she was invited to the Martha Stewart show. She went on to write a book and is recognized worldwide as the inventor of cake pops. For more details about her journey read here


Ingredients : No particular measurements here. I made my favourite Comfort Chocolate cake  with a little more cocoa powder and used it. You may use any cake recipe. 
  • about 1 1/2 cups cake crumbs (just crumble the cake with hands)
  • 1-2 tbsp dark rum (you may use vodka,wine or make them non boozy with some orange juice) I made half batch boozy and another non alcoholic for my daughter
  • about 1/2 cup Melted white chocolate(done on a double boiler)
  • red food colouring
Procedure
Take cake crumbs in a bowl and mix rum/vodka/wine a little at a time. Take a little mixture in your fingers and see if you can bind it. 
If apprehensive to use alcohol, leave it altogether and use some melted butter, chocolate ganache, some cream or orange juice for binding. Remember to use a little at a time because you just need to bind the cake crumbs together and not make a gloopy glue :)
Take a little mixture at a time and shape them in hearts. Keep them on a greased plate and refrigerate.
Take melted chocolate and dip one end of the lollipop sticks (you can use the wooden ones like I did or stick to the plastic ones) Insert that end to the cake hearts from one side and leave it to set. If you want, you may also insert the lollipop stick at the bottom of the cake heart.
Dip half of the hearts in the white melted chocolate and keep aside to set. Remember to keep them on a piece of parchment/butter paper. Once set, you will need to dip them again to give a second coating as the chocolate cake will see through white chocolate coating. Once done keep a spoonful of the melted white chocolate in a piping bag.
To the remaining white chocolate, add a drop of the red food colour. Ideally gel based, but I did mine with the regular liquid food colour. Add drops and mix till you get the desired pink colour.
Now dip the remaining cake pops in the pink coloured chocolate and repeat the same process as done with white chocolate coated cake pops. After the second coating is dried, take a spoonful of pink coloured melted chocolate in a piping bag. 
At any point of time if the chocolate gets hard, put it back on double boiler.
Now just drizzle randomly pink coloured chocolate on the white cake pops and white one on the pink cake pops. 
Allow to set.


Vaanya, my daughter, enjoyed the non alcoholic heart shaped cake pops I made with half the batch. Her thumbs up to my bakes is my biggest reward. 


Happy Cake pop eating
and Happy Anniversary to us :)
Amrita

LinkWithin

Related Posts Plugin for WordPress, Blogger...