Showing posts with label lemon zest. Show all posts

Monday, 16 February 2015

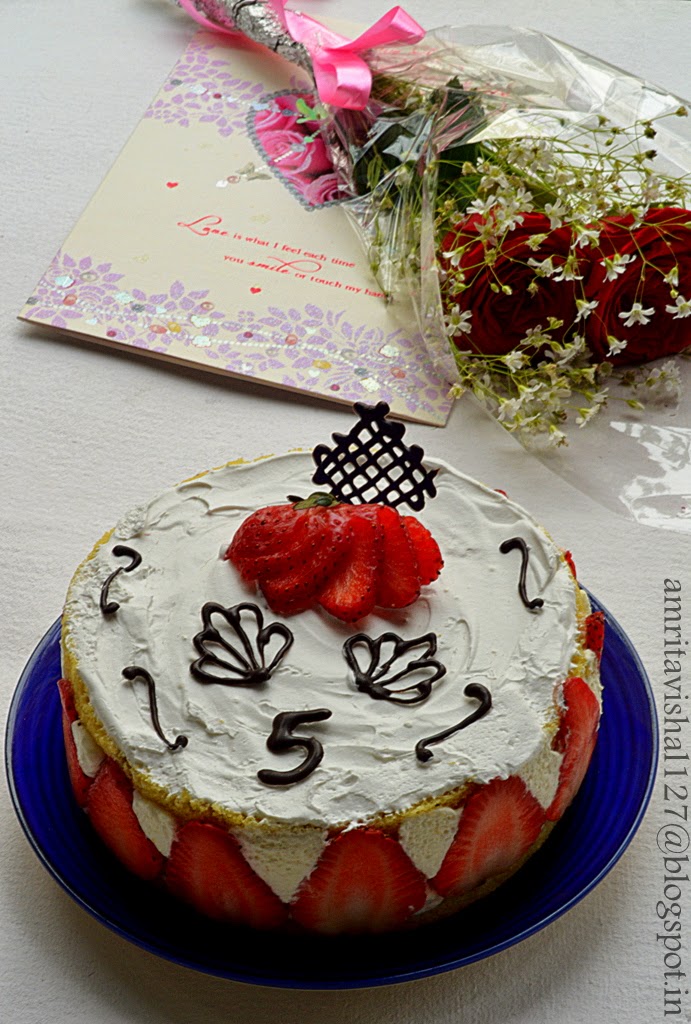
Fraisier-French Strawberry Gâteau


This Valentine's day completed 5 blissful years of my marriage with my best friend, my soulmate Vishal. Time has certainly flown by and it seems like just yesterday that we had limited time to spend with each other. We kept our distant relationship alive on letters and stuck by each others choice even with family's disapproval. It is really amazing to think back of those days and imagine at the conviction we had in each other. I guess that is the reason we were united with our family's blessings. And what better day for that!
Valentine's day is also my in-laws anniversary and therefore the choice of date for our marriage. My parents had no objection to it but since we had a Gurudwara wedding, it was important that it should be a Sunday. Sikh weddings rituals take place in the morning and Sunday being a holiday for all is naturally the most convenient day to invite people. Believe it or not 14 Feb 2010 was a Sunday!
With such a mushy story, I needed a mushy cake for the grand 5 year celebration. This particular cake caught my fancy as it more of the technique in assembly than the bake in itself. A fairly simple method with lovely results, is exactly what I wanted for the anniversary celebrations. Fraisier is a gâteau which has structure made up of strawberries and pastry cream supported by thin layers of sponge. The fraisier gets its name from the french word “fraise” which means strawberry. Traditionally this cake has a marzipan top. The elements can be made few days in advance which makes it easier to just assemble it a day before required. 
My maiden attempt, thankfully, went off well and once the gateau was out on a plate to be photographed, my daughter Vaanya kept pulling me asking for the chocolate decorations. With some hurried pictures, the gateau was all hers. There is no joy comparable to the one you get when you see your tiny one enjoy what you have made. Vaanya was all over the cake licking off the cream, pinching off the chocolate decorations and pulling the strawberry slices from its place. 


Ingredients : For a 6" round gâteau

Genoise cake:
  • 2 eggs
  • 25 gms butter, at room temperature
  • zest of half a lemon
  • 1/2 cup powdered sugar
  • 1/2 cup self raising flour (substitute with 1/2 cup all purpose flour+3/4 tsp baking powder+1/8 tsp salt)
Pastry Cream filling:
  • 1/2 cup milk
  • 1/4 tsp vanilla essence
  • pinch of salt
  • 1 tbsp cornflour
  • 2 tbsp powdered sugar
  • 1/2 egg (beat one egg in a bowl and use half the quantity)
  • 1 tbsp butter
  • 1/2 tsp gelatin
  • 1/2 tbsp water
  • 1/2 cup whipped cream
Sugar syrup :
  • 1/4 cup sugar
  • 1/4 cup water
You will also require:
  • 9-10 strawberries
  • Chocolate decorations
Procedure : 

Genoise : 
Preheat oven to 180 degree Celsius.
Grease and line a 6" round baking tin.
Place sugar, eggs and lemon zest in a bowl and place it over a pan of simmering water as a double boiler. Take care that the water should not touch the bowl of eggs. 
Whisk the mixture over medium heat till it doubles in volume. You will know the right stage once the mixture forms a ribbon trail when the whisk is lifted.
Sift in 1/2 of the flour and gently fold in the whisked mixture with a metal spoon. 
Add the remaining flour and fold again.
Gently fold in the butter. 
Pour the mixture in the prepared tin.
Bake for 15-20 minutes or till a toothpick inserted in the middle comes out clean.
Allow to cool and cut cake in half.

Pastry Cream filling:
Pour milk, vanilla extract and salt in a saucepan.
Place over medium heat and stir. Bring it to a near boiling point.
Add cornstarch and sugar in another bowl and whisk.
When milk is ready, gently and slowly add to the egg mixture and stir simultaneously. 
Pour the mixture back into the saucepan and continue to cook over low heat till it thickens and coats the back of a spoon.
Pass through a fine mesh and allow to cool.
Whisk in the butter. 
Cover cream with a plastic wrap pressing on top of cream to avoid skin formation.
Chill in fridge. 
Can be stored upto 5 days in refrigeration.

Sprinkle gelatin over water and allow to soften for 3-4 minutes.
Take 1/4 cup cream on a double boiler and heat it.
Add gelatin and whisk. Add in the remaining cream.

Mix in the whipped cream well and transfer the pastry cream in a piping bag and store in fridge till  further use. 

Simple Syrup : 
Combine sugar and water in a pan and bring to a boil. 
Allow to cool.
Can be stored in fridge for upto 1 month.
Can be flavoured too. 

Fraisier Assembly : 
Cling wrap the entire inside of the 6" round pan with some extra hanging out. This will be useful to pull out the gateau from the tin. You may also use a springform pan to make it easier in which case you will only need to line the sides of the pan with cling wrap.
Fit bottom cake layer in the pan and moisten with sugar syrup. 


Slice strawberries in arrange around the sides of the pan.


Pipe cream in between the strawberries and a thin layer across the top of cake.


Chop the remaining strawberries and place them in the middle of the cake.


Cover them with the pastry cream and smoothen top.


Place the second layer of cake on top and moisten with sugar syrup. 


Cover top with some remaining pastry cream or whipped cream.
Refrigerate for 4 hours or overnight.
Pull out the gateau carefully from the tin with the help of the overhanging cling wrap.
Place on a plate and decorate with strawberries and chocolate decorations.


Our anniversary celebration was made delicious with Vishal's Chicken biryani which followed by a visit to a newly opened cafe for some coffee and cupcakes. 


Happy Valentine's day
Amrita

Thursday, 24 April 2014

Fig tarts with pista crumble


24th of the month and it is time for our 'Sweet day' celebration. 
For those who do not know, every 24th I share a sweet creation to celebrate the birth of the little angel in our lives, our munchkin, our daughter Vaanya.
Next month Vaanya will turn 3 years old and we will have a grand family get together in Allahabad.
I love baking with fruits and look forward to seasonal ones to experiment. Having not much opportunity to find figs here in Kolkata, once I did I jumped onto trying 2-3 recipes with it which have been in the folder since months. 
This recipe was first viewed on Masterchef Australia where Gary Mehigan took a masterclass. The combination of pista with fresh figs intrigued me a lot and I was happy to finally out my hands on it. 
As usual I have reduced the recipe to suit our small family. I have modified the procedure to my ease and have used my tried and tested tart shell recipe. 


Recipe from : Adapted from Masterchef Australia

Ingredients : I reduced the recipe to get two 3" tarts 

Shortcrust pastry for tart shells:
  • 1/4 cup all purpose flour
  • 2 tbsp cold butter
  • 1 tbsp powdered sugar
  • cold water for kneading
Pista Crumble :  
  • 5-6 blanched, peeled and finely chopped pista
  • 1 tbsp sugar
  • 1 tbsp all purpose flour
  • 1/2 tbsp chilled butter
Frangipane filling :
  • 2 tbsp unsalted butter, room temperature
  • 2 tbsp sugar
  • 1 small egg
  • 1/4 tsp zest of a lemon
  • 1/4 cup all purpose flour
  • 15 blanched and peeled almonds
  • 20 blanched and peeled pistachios
  • 2 tbsp honey
Garnish : 
  • 1 fig, slices/wedges
  • chopped pista
 

 Procedure

Shortcrust pastry :
Take flour and butter in a bowl and rub the butter cubes with the flour till the mixture resembles breadcrumbs (in texture).
Now add cold water 1 tbsp at a time and knead to get a smooth dough. Do not over knead.
Wrap this dough in a plastic sheet and refrigerate for half an hour.
Take out the dough and roll it with a rolling pin on a floured surface. Roll it roughly to the size of the chosen tart tin with 1/8" thickness.
Gently press the dough down so that it lines the bottom and sides of the tart tin. Trim excess dough.
Line all the tart tins the same way. Make holes on the sides and bottom with a fork and refrigerate for another half an hour.
Preheat the oven to 180 degree Celsius. Bake the tarts for 15-20 mins or till they get a light brown colour.
Take them out and let them cool.
For a detailed step by step illustration refer here

Pista Crumble : 
Take a bowl and mix pista, sugar and flour. Rub butter into this mixture. Leave small lumps of butter in it. Keep aside.

Frangipane Filling :
Grind almonds and pistachios with honey till you get a fine paste. 
Preheat oven to 160 degree Celsius. 
Whisk butter and sugar in a bowl till creamy. 
Add egg, lemon zest, flour and almond-pista paste. Mix well. 
Spoon the mixture in the prepared tart shells till 3/4 full. 
Sprinkle the pista crumble on it.
Press in the fig slices/wedges. 
Bake for 20-25 minutes or till the top browns a little. 
Allow to cool.
Sprinkle chopped pista on top and serve.


Happy Fig tart enjoying
Amrita

Monday, 3 March 2014

Linzer Cookies


Time and again I get into this phase where I do not get the energy or enthusiasm to write on the blog. Do not get me wrong. I do not stop experimenting and clicking pictures of the food that we eat. It is just that, you feel stuck at times and want some time to get out of it and share again. I have several recipes waiting in my drafts that I really want to share, some experiments that went surprisingly well, some grandma recipes that I relish everyday and also some recipes that failed.
So here I am back again sharing a recipe that I tried as part of our monthly challenge at Baking partners. February is the month of romance and the perfect month to put your hands on some warm and fuzzy bakes. I, as usual, reduced the recipe to suit our little family of three. 
Linzer cookies are famous all around the world and are pretty easy to make. All you need to do is make the dough and cut out shapes and bake. It is then sandwiched with jam. 
Let me confess that I have never liked jam in my life. I mean, I am the kind who hates the widely loved butter and jam sandwich. Therefore I bought a small pouch of jam good enough to just sandwich these cookies. To my surprise Vaanya, my almost three year old daughter, loved it immensely. She kept licking the jam so very sweetly and I as a mother was so happy to see it. 


These cookies were a winner at my home. In fact, I had to hide one sandwiched cookie for Vishal, as Vaanya and me were very quick to finish them. Truly a perfect Valentine treat for 14th February which also happened to be our 4th Marriage Anniversary this year.


Recipe source : Swathi Iyer, Adapted from the book by Alice Medrich, Chewy, Gooey, Crispy, Crunchy


Ingredients : I reduced the recipe by ¼ to yield 4 sandwiched cookies.

  • ¼ cup All purpose flour
  • 2 tbsp ground almonds, blanched and powdered (see notes)
  • 3 tsp granulated sugar
  • Pinch of salt
  • ¼ tsp cinnamon powder
  • 1 tbsp butter, room temperature
  • A drop of almond extract(optional)
  • ¼ tsp grated lemon zest
  • Mixed fruit jam (or any other of your choice)
  • Icing sugar for dusting


Procedure:

Combine flour, ground almonds, sugar, salt, cinnamon powder, almond extract, lemon zest in a bowl.

Add butter and mix well till the mixture comes together as a ball. (If required, add little milk)

Flatten the dough ball and wrap it with clingfilm. Refrigerate for 2 hours or overnight. You can even keep it upto 3 days. The dough can be freezed for 3 months.
Before rolling the cookies, allow the dough to come to room temperature. 

Preheat oven to 170 degree Celsius.

Take out the dough and roll it 1/8” thick.

Cut out 8 round shape with a cookie cutter. I used my 2” round cookie cutter.

You can use scraps and roll it again to cut shapes.

Cut out a heart shape in the middle of 4 round cut outs.

Line and grease a baking tray and place the cookie cut outs. Refrigerate for 15 minutes to firm up the cookies.

Bake for 20-25 minutes or till the cookies have browned well.

Allow to cool.

Spread a layer of jam on the round cookie and sandwich with the heart cut out. Sprinkle the icing sugar on top.


Notes
  • Blanch almonds by dropping them in boiling water for 5 minutes. Strain and dry them on a kitchen towel. Dry roast on a pan or in the oven till just about dry, for 3-4 minutes. Do not let them brown.  Then grind them to a powder along with a tsp of sugar. 
  • You can use any other shape of cookie cutter, though round is more traditional. 
  • Try with any other flavour of jam.
Happy cookie making
Amrita

Sunday, 22 December 2013

Swedish Cinnamon rolls/Kanel Snegle


I have been out from Kolkata for almost two weeks now and have been enjoying an amazing and relaxing time in Allahabad. Vaanya is enjoying the most having found a friend in Tunnu, our kitten. Its a visual treat to see Vaanya and Tunnu play and enjoy each other's company. Vaanya teases her by pulling a piece of rope and Tunnu tries to catch it which she finally does by jumping on it. Tunnu loves to sneak upto Vaanya and play with her shoe. 
I have been enjoying doing nothing and spending some quality time with Vaanya and enjoying some amazing and yummy food made by Amma. With Christmas nearing I had a tough time gearing myself for some bakes and finally managed to do so by attempting these Swedish Cinnamon rolls which was part of our November 'We Knead to bake' Challenge. It came out exceedingly well with the amazing fragrance and flavour of Cinnamon and the beautiful hint of lemon. I shaped them like a Christmas tree for some fun holiday bake.


Recipe source : Aparna

Ingredients : makes 16-17 rolls

Starter:
  • 3/4 cup warm milk
  • 1 1/2 tsp instant yeast
  • 1 1/2 cup all purpose flour
Dough:
  • All starter
  • 1 1/2 cup all purpose flour
  • 1 tsp salt
  • 4 cardamoms, powdered
  • 1 tsp lemon zest
  • 1/2 cup sugar, powdered
  • 45 gm butter, at room temperature
Filling:
  • 55 gm butter, at room temperature
  • 6 tbsp granulated sugar/brown sugar
  • 1 1/2 tsp cinnamon powder
  • 1/4 cup almonds, blanched, dried and coarsely powdered
Topping:
  • milk for brushing
  • granulated sugar for sprinkling

Procedure:
Mix all ingredients under starter into a sticky dough. Place in an large oiled bowl, loosely cover it and refrigerate overnight. 
The next day take it out and leave for 30 mins to come to room temperature. 
Tear the starter to large pieces and place in a bowl.
Sift flour, cardamom and salt and add to the starter.
Mix in lemon zest and sugar.
Now add butter and knead till you get a smooth and elastic dough.
Roll the dough to a rectangle roughly 20x12". 
Make filling by mixing butter, sugar and cinnamon powder.
Spread the filling all over the rolled dough.
Sprinkle the coarsely ground almonds all over.
Tightly roll the dough from the shorter end and cut into 16 equal pieces with a knife. 
Place them on a butter paper/parchment lined baking tray. I placed 11 pieces together in a tree shape and put the others on the sides. 
Let them rise for 10-15 mins.
Preheat oven to 200 degree Celsius.
Brush them with milk and sprinkle sugar on top.
Bake for 15 mins or till they brown well. 

Notes:

  • You can use brown sugar for sprinkling on top for a better looking roll.
  • The lemon zest adds an amazing flavour to the rolls, so do not consider omitting it. 
  • Blanch almonds in boiling water for 2 minutes and remove the skin. Dry roast in a pan on medium heat. Cool and grind to get ground almonds.
Sending this recipe to Kolkata Food Blogger's ongoing baking event 'Baking Palooza 2013'

Happy Cinnamon rolls relishing

Amrita

LinkWithin

Related Posts Plugin for WordPress, Blogger...