Showing posts with label Almonds. Show all posts

Thursday, 10 December 2015

Cold oven Fig and almond tea cake


Winters are here and it is by far my most favourite season because it is the season to bake and indulge in all sinful good things. Baking in the holiday season is such a delight and is soul therapy. The fresh produce in the markets has pushed my lazy self to whip up some bakes and enjoy them.
On a recent trip to our fruit vendor, my husband Vishal spotted fresh figs. He was quick to point them out to me but I refused saying that they will be expensive. But Vishal knowing how much I love to bake with fresh fruits urged me to buy and use them. The box of figs sat in my fridge for two days before the thought of them getting spoilt made me push myself to start baking. 
A quick browse on the net led me to this cold oven tea cake recipe. I have heard of the cold oven baking method but had never tried it. Cold oven baking method is more popular with the pound cake recipe where putting your cake in a cold oven and then adjusting the temperature is believed to help make the cake dense and achieve a more crisp crust on the top. The cake is basically baked at low temperature for a long time in a cold oven which has not been preheated. 
As weird as the method sounds, it worked wonders for my experiment. My cake was, most arguably, the best one I have ever baked. The cake does not rise much which gives it a compact dense texture and the crust on top is to die for. I cooked my fresh figs with some sugar and brandy and used them in the cake along with roasted and chopped almonds. The fresh figs on top added to the figilicious experience. Pairing the slice of cake with our evening tea was just the right thing for this weather.  


Recipe source : Hungry rabbit. I have reduced the recipe to 1/4th and adapted it to yield a 6X3" cake loaf.

Ingredients :
  • 1/2 cup all purpose flour + 1 tbsp cornflour
  • 1/4 cup + 2tbsp powdered sugar
  • 1/4 tsp baking powder
  • pinch of salt
  • 2 tbsp coconut milk (I used Dabur Homemade tetrapack) 
  • 1/4 tsp vanilla extract
  • a drop of almond extract(optional)
  • 3 1/2 tbsp butter
  • 1 egg
  • 8-10 almonds, dry roasted on a pan and chopped
Fig filling
  • 2 fresh figs, chopped
  • 1 tbsp sugar
  • 1 tsp brandy or water

Procedure : 

Fig filing:
Put chopped figs and sugar in a saucepan and add brandy or water. Let it simmer on medium heat till the consistency becomes thick and the figs gets squashed. Cool.

Cold oven tea cake : 
Grease and line 6X3 loaf pan.
In a bowl, combine all pupose flour, cornflour, salt and baking powder.
In a small bowl, mix coconut milk with vanilla and almond extract.
Take butter and sugar in a big bowl and beat till it becomes light and fluffy.
Add egg and beat.
Now add the flour mixture in 3 additions alternating with the coconut milk mixture. 
Add the roasted and chopped almonds to the mixture and drop in little chunks of the fig filling. 
Lightly fold the mixture and pour batter to the prepared baking tin. 
Put the tin in the cold oven and adjust oven temperature to 170 degree Celsius for 30 minutes. Do not open the oven door in between.
Cool.
Garnish with some powdered sugar, fresh fig slices and chopped almonds. 


Notes

  • You may use dried figs instead of the fresh figs I have used for the filling. Just chop dried figs and use them in the batter.
  • Instead of coconut milk, you may use normal milk


Sending this recipe to Kolkata Food Bloggers ongoing event Baking Palooza 2015. Check out the page for some more exciting holiday bakes. 


Happy tea cake enjoying
Amrita

Thursday, 27 August 2015

Chocolate Salami


Raksha Bandhan or Rakhi has been a fairly simple festival in my house while I was growing. Being Sikhs, we have adapted a lot of our customs from Hinduism and therefore we celebrate a simplified version of it which means no tilak and Pooja. I remember seeing my Aunt perform the morning fast before tying the sacred thread on my Father and Uncle's wrist but as children we never had to do that. As children, I would tease my younger brother that being a girl is so lucky as you get 2 gifts in a year, one on birthday and another on Rakhi. At home, Mom would make some bread rolls for breakfast and thus our Rakhi would be over with some sweets. 
This year, Vaanya, my daughter will get to tie a Rakhi on my nephew. I see a part of my childhood in her and am looking forward to see her enjoy the day with her little brother. She is naturally too small to understand the importance of Rakhi but I am sure with time she will cherish these moments just like me. 
This year I wanted to try a rather very simple sweet. Something which does not require much work and is done in a jiffy. Therefore I decided to play with these Chocolate Salami where there is no definite recipe and you can add just about anything that you want. 
Chocolate Salami or Salame di cioccolata or Salame de chocolate is a traditional Italian and Portuguese dessert which is made from dark chocolate, broken bits of biscuits or cookies, butter, eggs and alcohol like rum or port wine.
A misleading name, Chocolate Salami is named because of its appearance where the dessert is shaped like a log and is cut in roundels while serving.
I skipped the eggs and got an intensely rich, rum laden chocolatey goodness in this dessert. For a children's version I used milk chocolate and skipped the nuts and fruits. Instead I added some cake pieces, biscuits of my daughter's choice and some almond powder. 
This dessert has endless variations. Go ahead and enjoy making and relishing it this festive season.


Ingredients : Makes around 7-8 slices of the chocolate salami
  • 200 gms dark chocolate, chopped
  • 1/4 cup cream(I used Amul)
  • 2 tbsp butter
  • 3-4 pieces of Marie biscuits or any digestive biscuits
  • 1/2 cup of assorted nuts and dried fruits(I used almonds, walnuts, cashews, pista and cranberries)
  • 2-3 tbsp rum (optional, may be substituted with orange juice)
Procedure : 
Dry roast the nuts and chop them fine. Mix with the chopped cranberries and keep aside.
Roughly break the biscuits in medium sized chunks and keep aside.
Heat cream in a pan. Be careful not to burn it.
Remove from heat and add the chopped chocolate to it. Mix it well so that the chocolate melts.
Now add the butter and mix. 
Throw in the nuts and biscuits and give it a stir. 
Allow this mixture to cool and thicken for around 4-5 minutes, or more if required.
Put this, now thickened mixture, onto a cling wrap and give it a log shape. Twist both the ends to secure it.
Pop it in the refrigerator for 3-4 hrs. 
In between take it out and roll it to maintain the shape.
Slice it and serve.

Note : For a children's version I used milk chocolate instead of dark one and added digestive biscuits, chocolate biscuits, cake pieces. I also added 1 tbsp of almond powder instead of the chopped nuts. And yes, the rum has been omitted there. 


Happy Raksha Bandhan
Amrita

Saturday, 22 August 2015

Opéra Cake


Birthdays are a special day in my household for more reasons than one. For the baker in me, it is a day to put my hands on a long awaited cake that has been on my list for a long time and that finally gets to see the light of the day. With my husband Vishal's birthday falling on 27th last month, I needed to try a rather special cake. And so it had to be the coveted Opera cake, the French classic cake which I have been scared to try because of the sheer number of elements it has. 
The Opera has an equally amazing history too. Story goes that in 1955 French pastry chef Cyriaque Gavillon, working at the legendary Dalloyau shop in Paris, invented the Opera while wanting to create a cake with complex layers in terms of texture and taste. His wife, Andrée,  told him that it reminded her of the famous Paris Opera house, which eventually was the name given to the cake. 
Another story goes that the cake was invented in the Paris Opera to help people stay awake through the final acts of the lengthy shows being heavy coffee laden. 
An Opera cake consists of thin layers of almond sponge called Jaconde which is moistened with a coffee syrup and is then sandwiched with layers of coffee buttercream and chocolate ganache. The cake is then topped with a chocolate glaze. Traditionally the cake is adorned with a edible gold leaf and has the word 'Opera' piped on it.
This cake was even more special and was the right choice for Vishal's birthday as both me and Vishal are ardent fans of music. We love to spend our time singing songs while Vishal strums his Guitar. Music is the key to our hearts and holds us close together. 
The cake turned out a winner as everyone who got to taste it loved it. Being very critical about my own cakes, I found the sponges a bit over soaked but that was not an issue with anyone else.
My over excited daughter was much more eager about her Papa's birthday and made a very sweet card for him. 


Recipe adapted from : Joe Pastry

Ingredients and Procedure

Jaconde (Sponge cake)
  • 3 egg whites
  • 2 tbsp granulated sugar
  • 1/2 cup almond meal
  • 1/2 cup powdered sugar
  • 3 eggs
  • 1/4 cup all purpose flour
  • 1 tbsp clarified butter, melted
Preheat oven to 200 degree Celsius.
Grease and line a jelly roll pan 28X21 cm with baking paper and then grease it again.
Take egg whites in a bowl and whip till soft peaks. Add granulated sugar and beat again till stiff peaks. Keep aside.
Take whole eggs and almond meal in a bowl and beat till light and foamy for about 3 minutes.
Add flour and mix.
Incorporate the egg whites in 3 additions carefully with gentle mixing. 
Fold in the melted clarified butter.
Pour batter in the prepared pan and spread with a spatula.
Bake 8-10 minutes.
Cool and flip it over baking sheet. Carefully peel the baking sheet and keep aside.
Can be refrigerated for a day. 

Coffee Buttercream
  • 3 egg yolks
  • 1/2 cup powdered sugar
  • 2 tbsp water
  • 1/2 tsp vanilla extract
  • 200 gms butter, at room temperature
  • 1 tbsp instant coffee powder
  • 1 tsp hot water
Dissolve coffee powder in hot water and keep aside.
Take egg yolks in a bowl and whip for 5 minutes.
Prepare sugar syrup by combining sugar and water in a saucepan and allowing the sugar to melt. When the mixture starts bubbling, remove from flame and pour the syrup in a steady stream over the egg yolks while beating continuously. 
Add the butter and vanilla extract and whip together. 
Add the coffee mixture and mix. 
Refrigerate for further use.
Can be made a day in advance.

Chocolate Ganache : 
  • 1 cup chopped dark chocolate
  • 1 cup cream (I used Amul )
Heat cream in a pan. Take care not to scald it.
Remove from heat and add the chopped chocolate. Mix well and keep aside.
Can be refrigerated.

Coffee flavoured cake syrup : 
  • 1/2 cup water
  • 1/4 cup sugar
  • 1 tbsp instant coffee powder
Dissolve sugar in hot water and add coffee powder.
Cool and keep aside.

Chocolate glaze : I made a ganache instead of the traditional tempered chocolate topping
  • 1/2 cup chopped dark chocolate
  • 1/2 cup cream
Heat cream and add chocolate. Stir and mix well.
Keep aside.

Chocolate writing : 
Melt a little chocolate and add few drops of vegetable oil to it. Mix well and put in a piping bag and use. 

Assembly : 
Cut the Jacondes in half(to get 2 rectangles).
So you have 4 layers Jaconde sponge.
Take a layer and apply coffee syrup. 
Apply layer of ganache.
Apply coffee buttercream layer.
Put another sponge and apply coffee syrup.
Repeat with ganache and coffee buttercream with all layers till the top.
Pour the chocolate ganache on top. 
Let it firm up in the fridge.
Trim edges from all sides to show the neat layers.


Happy Opera Relishing
Amrita

Wednesday, 29 July 2015

Tahini Cookies


My bookshelf is full of baking books. But that shouldn't be something surprising to all who know me. The baking bug always makes me end up buying more and more books on baking. The irony is that I hardly try any recipes from them. It is just this fancy, this unexplainable pleasure that I get from collecting baking books. 
This month while cleaning my bookshelf, I took a solemn pledge to at least leaf through one baking book a month. And this month happened to be The Big Book of treats by Pooja Dhingra which I had bought while attending one of her classes held at The Corner Courtyard, Kolkata. The book has easy recipes with simple instructions and I have earlier tried her recipe of Chai cupcakes. 
While leafing through the book, I came across the recipe of Tahini Cookies. Now, we have 2 jars of Tahini sitting pretty in our cupboard which was sent all the way from Israel by Vishal's friends. Having only tried a Tahini Chicken by our friend Vikas, I have been wanting to put the jars to some good use for a long time. So the recipe of Tahini cookies lit a 440 Volt bulb in my head and I was on my toes to make them soon. 
The cookies have a beautiful lingering on taste of the Tahini and the almond adds a lovely crunch to it. 
Pair these irresistible and decadent cookies with a hot cup of tea this Monsoons.  


Adapted from : The Big book of Treats by Pooja Dhingra

Ingredients : Yields around 15 cookies
  • 25 gms butter, softened
  • 1/4 cup powdered sugar
  • 3/4 cup + 2 tbsp all purpose flour
  • 3 tbsp tahini
  • 1/2 tsp lemon juice
  • 1 tbsp milk
  • almonds
Procedure : 
Preheat oven to 170 degree Celsius.
Take a bowl and mix sugar, flour and butter with your fingers till they resemble breadcrumbs in texture. 
Add tahini and lemon juice and mix.
Add milk and knead the mixture to a dough. 
Take a little mixture and shape it into an oval shape with your hands. You can make a round shape too and flatten it from top. My mixture was not very pliable so shape it with a little patience. 
Press half of an almond on top and place the cookies on a baking tray lined with baking paper. 
Bake for 15-20 minutes or till the cookies get a beautiful golden brown colour.
Cool them to get crisp.


Sending this recipe to KFB's Monsoon Celebration event.

Happy Tahini Cookies relishing
Amrita

Saturday, 11 July 2015

Mango Phirni


I strongly believe in food being very inspirational. A sudden thought, a casual discussion, an image or even a remote one-word talk of food can really inspire us. It does to me, atleast. 
This recipe is purely an attempt because of the inspiration I got from my husbands casual visit with his friend who were catching up to devour some Eid delicacies. Vishal called me up to find out if I am interested to cook mutton as he was close to a meat shop waiting to relish on some Phirni. It was just this one word 'Phirni' that kept rolling in my head and for who's sake I refused to hear the word meat too. I kept the phone down and went on thinking of that sweet, earthy smelling, milky thick goodness that my husband and his friend were digging into. I refrained from calling him again and demanding my bowl of the heavenly sweet and thus decided to make my own. This silly little incident, you see, made me wake up from my lazy self and churn up this sweet delicacy. 
Since we still have mangoes lingering all around us, I decided to try a Mango phirni version making it all the more irresistible. I took my mothers help who shared her recipe of this rather simple, quite a cousin of kheer sweet. I fetched these typical earthen bowls meant specially to set Phirni which is easily available in the local markets. This gives that earthy beautiful aroma to the phirni. In case one does not get them, set your phirni in any normal bowl. 
The mango version was quite loved by my Sweet guru-my father who has an unmatched authority over everything sweet. But one bite into that earthy smelling, elaichi flavoured yummy normal Phirni satisfied my craving finally. 
Flavoured or simple, this recipe is super simple and a must if you have never tried. 


Ingredients : Serves 8-10
  • 1 litre full fat milk
  • 3tbsp rice (I used gobindabhog. You can use Basmati too)
  • 3-4 tbsp sugar (depending on your taste)
  • mango pulp from 1 mango, strained
  • almonds, pista, chopped mango for garnishing
Procedure : 
Soak rice in water for half an hour.
Take milk in a heavy bottomed pan and let it come to a boil. Simmer and cook on low heat.
Meanwhile grind the soaked rice in a mixer. It will not become fine so a little coarse is alright. 
Add the ground rice to the milk and stir continuously. 
Slowly you will observe that the milk has thickened.
Add sugar to your liking and cook till it reaches the required thickness to set. 
This is the normal Phirni which can be set at this stage in bowls. Refrigerate and garnish with almonds, pista and elaichi powder.


For mango Phirni, once the thickened milk has cooled a little, add the mango pulp little by little and use as much as required. Too much addition will dilute the phirni consistency. In that case reduce it again on low heat. 
Set this in bowls and refrigerate. Garnish with chopped mango and pista. 


Happy Phirni Indulgence
Amrita

Wednesday, 4 March 2015

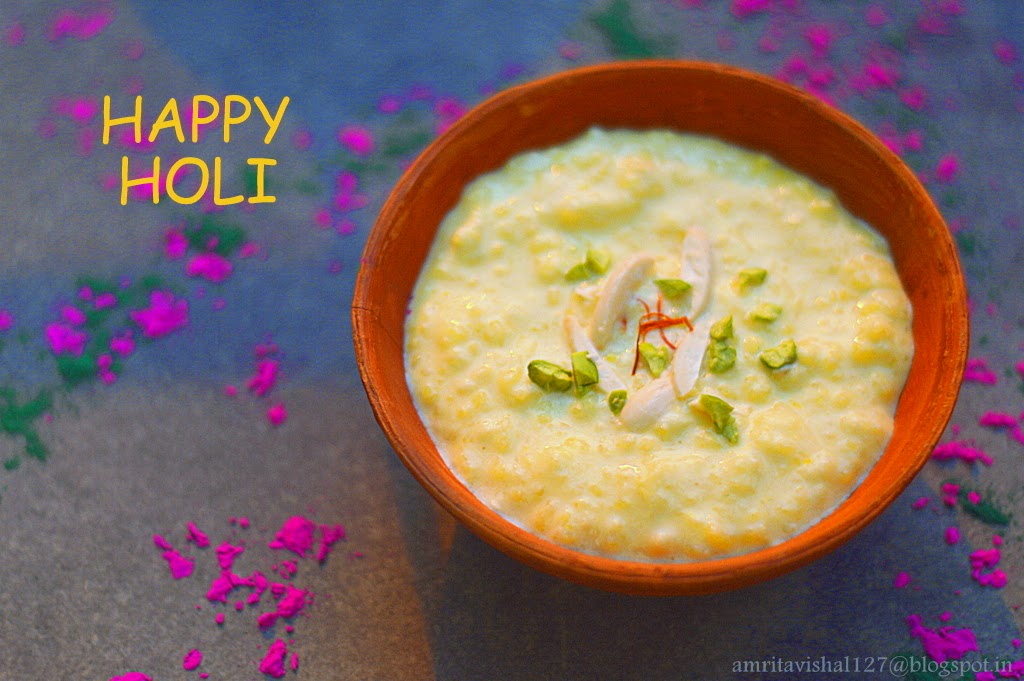
Kesari Kheer


Desserts have always been a part of our daily meals when I was growing up, especially the milk based ones. Being a Sikh, milk has always been present in surplus in our house. I have memories of going along with my Grandmother, my Beji, to the milkman or gwala who would milk the buffaloes in front of us and give us fresh milk. From drinking milk as it is to using it in endless desserts, Beji would ensure her family is fed well with milk along with other things. I guess, there is just some connection with milk and being a Punjabi
Kheer is one of the most common milk based desserts found in most households irrespective of the region. Known with different names, the simple preparation of rice cooked in milk is called payesh in Bengal and is called payasam in the Southern states. Adorned with dry fruits and saffron threads, a simple kheer is made special for occasions. 
With Holi round the corner, I was reminded of this simple kheer preparation that has been part of my growing years. 

Ingredients : For 3-4 servings
  • 500 ml full cream milk
  • 1/2 cup rice (I used Gobindbhog)
  • 1/2 cup or less sugar (according to your taste)
  • cardamom powder
  • saffron threads
  • almonds
  • pista
Procedure : 
Wash and soak rice for half an hour.
Take milk in a heavy bottomed vessel and bring it to a boil.
Add the washed and soaked rice to the milk.
Lower the heat and allow the milk and rice to cook for about 45 minutes or till it thickens to the required consistency. Keep stirring in between.
Meanwhile soak saffron threads in little warm milk. 
Add sugar to the milk-rice mixture and mix well. Adjust sugar to your liking.
Adding sugar will make your kheer a little thin so cook till it thickens again. 
Remove from heat and stir in the saffron threads and cardamom powder.
Allow to cool and garnish with chopped almonds and pista. 
Serve chilled. 


Happy Holi
Amrita

Thursday, 24 April 2014

Fig tarts with pista crumble


24th of the month and it is time for our 'Sweet day' celebration. 
For those who do not know, every 24th I share a sweet creation to celebrate the birth of the little angel in our lives, our munchkin, our daughter Vaanya.
Next month Vaanya will turn 3 years old and we will have a grand family get together in Allahabad.
I love baking with fruits and look forward to seasonal ones to experiment. Having not much opportunity to find figs here in Kolkata, once I did I jumped onto trying 2-3 recipes with it which have been in the folder since months. 
This recipe was first viewed on Masterchef Australia where Gary Mehigan took a masterclass. The combination of pista with fresh figs intrigued me a lot and I was happy to finally out my hands on it. 
As usual I have reduced the recipe to suit our small family. I have modified the procedure to my ease and have used my tried and tested tart shell recipe. 


Recipe from : Adapted from Masterchef Australia

Ingredients : I reduced the recipe to get two 3" tarts 

Shortcrust pastry for tart shells:
  • 1/4 cup all purpose flour
  • 2 tbsp cold butter
  • 1 tbsp powdered sugar
  • cold water for kneading
Pista Crumble :  
  • 5-6 blanched, peeled and finely chopped pista
  • 1 tbsp sugar
  • 1 tbsp all purpose flour
  • 1/2 tbsp chilled butter
Frangipane filling :
  • 2 tbsp unsalted butter, room temperature
  • 2 tbsp sugar
  • 1 small egg
  • 1/4 tsp zest of a lemon
  • 1/4 cup all purpose flour
  • 15 blanched and peeled almonds
  • 20 blanched and peeled pistachios
  • 2 tbsp honey
Garnish : 
  • 1 fig, slices/wedges
  • chopped pista
 

 Procedure

Shortcrust pastry :
Take flour and butter in a bowl and rub the butter cubes with the flour till the mixture resembles breadcrumbs (in texture).
Now add cold water 1 tbsp at a time and knead to get a smooth dough. Do not over knead.
Wrap this dough in a plastic sheet and refrigerate for half an hour.
Take out the dough and roll it with a rolling pin on a floured surface. Roll it roughly to the size of the chosen tart tin with 1/8" thickness.
Gently press the dough down so that it lines the bottom and sides of the tart tin. Trim excess dough.
Line all the tart tins the same way. Make holes on the sides and bottom with a fork and refrigerate for another half an hour.
Preheat the oven to 180 degree Celsius. Bake the tarts for 15-20 mins or till they get a light brown colour.
Take them out and let them cool.
For a detailed step by step illustration refer here

Pista Crumble : 
Take a bowl and mix pista, sugar and flour. Rub butter into this mixture. Leave small lumps of butter in it. Keep aside.

Frangipane Filling :
Grind almonds and pistachios with honey till you get a fine paste. 
Preheat oven to 160 degree Celsius. 
Whisk butter and sugar in a bowl till creamy. 
Add egg, lemon zest, flour and almond-pista paste. Mix well. 
Spoon the mixture in the prepared tart shells till 3/4 full. 
Sprinkle the pista crumble on it.
Press in the fig slices/wedges. 
Bake for 20-25 minutes or till the top browns a little. 
Allow to cool.
Sprinkle chopped pista on top and serve.


Happy Fig tart enjoying
Amrita

Thursday, 13 March 2014

Thandai Cookies


Holi is the festival of colours and is celebrated with lot of  fun and fervour. For me Holi is a sweet remembrance of the non stop fun we had as children colouring each other with the darkest of shades that would not come out for weeks. Holi meant the kitchen smelling heavenly with yummy treats esp Thandai and Gujiya. It meant spending hours in the bathroom afterwards scrubbing ourselves hard to get the colour out of our hair, face and body. Our nails would be invariably painted with a pink or black colour. And we all looked the same!
I remember when I was small, my cousin brothers who are elder to me were the mastermind behind all the mischief. They would fill scores of balloons with coloured water and throw them at their friends. Each year, it was a competition of sorts to paint each other with the toughest of colours that would take weeks to come out. Going next day to school meant meeting my friends in different shades. 
Things thankfully have changed over the years. For better reasons, the culture of playing Holi with those chemicals is slowly reducing. People are realizing the after effects of these meaningless colours and have started opting for Organic colours. I personally prefer Holi now with dry colours or what we call Abeer. 
For Holi this time, I experimented with the very famous Thandai flavour and incorporated it in cookies. Thandai is a popular drink consumed esp during Holi which is made by grinding almonds, rose petals, fennel seeds, melon seeds and black peppercorns and adding to milk. There is a variation called Kesariya Thandai where saffron is added to the mixture but the most famous one is the Bhang Thandai which is basically adding the leaves of cannabis plant whihc has intoxicant properties.


Ingredients : Yields about 15 cookies
  • 4 tbsp all purpose flour (maida)
  • 3 tbsp whole wheat flour (atta)
  • 2 tsp rice flour (chawal ka atta)
  • 1/4 tsp baking powder
  • a pinch of baking soda
  • 6 tbsp powdered sugar
  • 2 tbsp butter, cold
  • 2 1/2 tbsp Thandai spice
  • 1 tbsp rose water
  • 1 tbsp milk
  • almonds, chopped
  • khus khus/posto (Poppy seeds) for sprinkling on top
Thandai spice : This will make a little more than the quantity required in the cookies
  • 1/2 cup dries red rose petals
  • 2 tsp fennel seeds/saunf
  • 2 tsp melon seeds/magaj
  • 4-5 green cardamoms/hari elaichi
  • 15 whole black peppercorns/gol mirch

Procedure :

Thandai spice :
Grind all the ingredients to a fine powder.
Sieve the mixture to get a further fine powder and remove any particles.

Cookie dough :
Add all purpose, whole wheat and rice flour in a bowl and mix with sugar, baking powder and baking soda.  Add cold butter and rub the flour in the butter till it gets incorporated in the flour mixture. 
Add the Thandai spice and mix.
Now add rose water and milk and knead to a smooth dough. If required add a little more of the rose water/milk. 
Cover in a plastic wrap and refrigerate for an hour or overnight. 
Take the dough out to come to room temperature before you begin baking them.
Preheat oven to 180 degree Celsius and line a baking tray with a lightly greased parchment paper/aluminium foil. 
Dust a little flour on your work station and roll the dough to 1/8" thickness. 
Cut out cookie shapes with a round cookie cutter or a round shaped bowl/glass.
Press in the chopped almonds on top of the cookie and sprinkle with khus khus/posto seeds. 
Place the cookies on the baking tray and bake for 20-25 minutes or till they are browned well. 
Allow to cool completely to crisp them.

Notes:
  • Substitute rice flour with corn flour.
  • Be more experimental and add Bhang to the cookie dough.


Wishing all of you a Happy and Colourful Holi
Amrita

Monday, 3 March 2014

Linzer Cookies


Time and again I get into this phase where I do not get the energy or enthusiasm to write on the blog. Do not get me wrong. I do not stop experimenting and clicking pictures of the food that we eat. It is just that, you feel stuck at times and want some time to get out of it and share again. I have several recipes waiting in my drafts that I really want to share, some experiments that went surprisingly well, some grandma recipes that I relish everyday and also some recipes that failed.
So here I am back again sharing a recipe that I tried as part of our monthly challenge at Baking partners. February is the month of romance and the perfect month to put your hands on some warm and fuzzy bakes. I, as usual, reduced the recipe to suit our little family of three. 
Linzer cookies are famous all around the world and are pretty easy to make. All you need to do is make the dough and cut out shapes and bake. It is then sandwiched with jam. 
Let me confess that I have never liked jam in my life. I mean, I am the kind who hates the widely loved butter and jam sandwich. Therefore I bought a small pouch of jam good enough to just sandwich these cookies. To my surprise Vaanya, my almost three year old daughter, loved it immensely. She kept licking the jam so very sweetly and I as a mother was so happy to see it. 


These cookies were a winner at my home. In fact, I had to hide one sandwiched cookie for Vishal, as Vaanya and me were very quick to finish them. Truly a perfect Valentine treat for 14th February which also happened to be our 4th Marriage Anniversary this year.


Recipe source : Swathi Iyer, Adapted from the book by Alice Medrich, Chewy, Gooey, Crispy, Crunchy


Ingredients : I reduced the recipe by ¼ to yield 4 sandwiched cookies.

  • ¼ cup All purpose flour
  • 2 tbsp ground almonds, blanched and powdered (see notes)
  • 3 tsp granulated sugar
  • Pinch of salt
  • ¼ tsp cinnamon powder
  • 1 tbsp butter, room temperature
  • A drop of almond extract(optional)
  • ¼ tsp grated lemon zest
  • Mixed fruit jam (or any other of your choice)
  • Icing sugar for dusting


Procedure:

Combine flour, ground almonds, sugar, salt, cinnamon powder, almond extract, lemon zest in a bowl.

Add butter and mix well till the mixture comes together as a ball. (If required, add little milk)

Flatten the dough ball and wrap it with clingfilm. Refrigerate for 2 hours or overnight. You can even keep it upto 3 days. The dough can be freezed for 3 months.
Before rolling the cookies, allow the dough to come to room temperature. 

Preheat oven to 170 degree Celsius.

Take out the dough and roll it 1/8” thick.

Cut out 8 round shape with a cookie cutter. I used my 2” round cookie cutter.

You can use scraps and roll it again to cut shapes.

Cut out a heart shape in the middle of 4 round cut outs.

Line and grease a baking tray and place the cookie cut outs. Refrigerate for 15 minutes to firm up the cookies.

Bake for 20-25 minutes or till the cookies have browned well.

Allow to cool.

Spread a layer of jam on the round cookie and sandwich with the heart cut out. Sprinkle the icing sugar on top.


Notes
  • Blanch almonds by dropping them in boiling water for 5 minutes. Strain and dry them on a kitchen towel. Dry roast on a pan or in the oven till just about dry, for 3-4 minutes. Do not let them brown.  Then grind them to a powder along with a tsp of sugar. 
  • You can use any other shape of cookie cutter, though round is more traditional. 
  • Try with any other flavour of jam.
Happy cookie making
Amrita

LinkWithin

Related Posts Plugin for WordPress, Blogger...