Showing posts with label red chilli powder. Show all posts

Tuesday, 2 August 2016

Aloo Dum- low calorie version


When I was a school going kid, my tiffin was regularly hauled by my friends. Usually my Mom would pack me Parantha's of all possible fillings. On other days my tiffin beamed of sabzi and plain Parantha and on those fortunate lucky days I carried my treasured tiffin of my Mom's absolute lipsmacking Aloo Dum. My friends would finish it off even before the lunch bell rang, hiding beneath the desks and sneaking it while the teacher explained some boring subject on the blackboard. Yes, that was the magic of tiffin time that we all still cherish. 
I, on the other hand, loved my friends Puri sabzi and that addictive unstoppable fried goodness called Bhujiya. I just loved it so much. I was happy to trade my tiffin with their box of goodness. 
Whenever my friends came home, their was only one collective demand 'Aloo Dum'. My mom loved to plate it with generous dollops of tamarind chutney and some chopped fresh coriander leaves. She would put a toothpick on each making it easier for us to pick our's and relish it. 
With Kolkata Food Bloggers ongoing event on Street Food, I could think of nothing better than my Mom's Aloo Dum. Although now mommy makes a healthier version with the Airfryer so that the deep frying part is avoided. 
Make it and enjoy it as much as my friends always did. 


Ingredients : 
  • 500 gms baby potatoes, parboiled
  • 2 medium sized onions, chopped
  • 2 tsp ginger garlic paste
  • 1 medium sized tomato, chopped
  • 2 tbsp tomato puree
  • 1/2 cup curd
  • salt to taste
  • 1/4 tsp turmeric powder
  • 1 tsp red chilli powder
  • 2 tsp garam masala
  • fresh coriander, chopped
  • green chillies, chopped
  • Tamarind chutney
Procedure : 
Peel potatoes and make holes with a fork in 3-4 places. 
Take a bowl and add salt to taste, a pinch of turmeric powder and little refined oil. Coat the potatoes in it. Put this in the Airfryer for 10 minutes at 200 degree. Remember to turn the potatoes after 5 minute mark.
(If you do not have the Air fryer, deep fry the potatoes)


Take 2 tbsp oil in a deep pan, add chopped onions. Cook for 2 minutes and then add ginger garlic paste (once onions start browning on the edges)
Cook for another 2 minutes or till the mixture leaves oil.
Add the chopped tomatoes and cook them till they are soft and mashed. Add the tomato puree and cook till the mixture leaves oil.
Add salt, turmeric powder and red chilli powder. 
Lower the flame and add the lightly beaten curd. 
Mix the potatoes.
Garnish with coriander leaves and green chillies and top with spoonfuls of tamarind chutney before serving.

This recipe is part of Kolkata Food Bloggers ongoing event Street Food Expedition where Moumita Ghosh is the featured blogger of the week who blogs from Peek'n'Cook


Happy healthy binging
Amrita

Wednesday, 30 December 2015

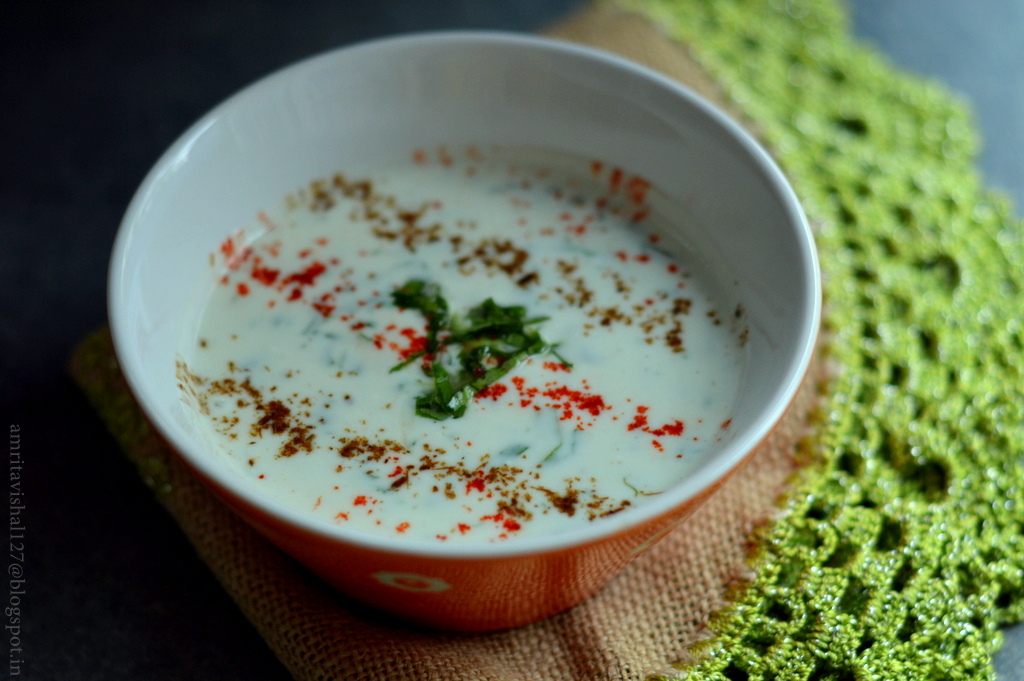
Palak Raita


Come Winter and my list of must have's spring out from my recipe diary. My little kitchen bustles with a variety of bakes with seasonal fruits and dishes with vegetables. I start the long list with one ingredient at a time and think of various ways to use it. The fruits end up in cakes, tarts etc and the vegetables get experimented in a variety of sabzi's, soups or eaten just like that, boiled and sauteed in a little butter.
My favourite way to eat spinach leaves, raw and fresh, is in this recipe of Palak Raita. The idea came from someone who shared a salad recipe on the same lines. Since then, it is a winter ritual to have this raita at least once. 
The sight of fresh bright green Spinach leaves in the vegetable patch of our house in Allahabad made me share this simple and humble recipe. Vanya, my daughter, and me have been enjoying ourselves feasting on fresh produce from the garden.
When making be careful to choose baby spinach leaves, tender and fresh. Wash them well and just roll them, a few at a time, and very finely slice them. Do not skip the roasted cumin powder as it gives a very distinct and important flavour to the humble raita. I like my raita with a little dash of sugar to balance the taste. Skip it if you do not like. 

Spinach leaves/Palak in the vegetable patch

Ingredients : No measurements here. All ingredients are as per your taste and requirement
  • Curd 
  • handful of baby spinach leaves
  • roasted cumin seed/jeera powder
  • red chilly powder
  • rock salt
  • sugar
Procedure : 

Wash spinach leaves well. Take care to choose the small baby leaves. Roll the leaves and slice them as fine as possible.
Beat curd with a fork and add sugar, salt and red chilly powder. If curd is thick add milk/water to thin it.
Add spinach leaves and mix.
Roast cumin seeds on a hot griddle and then grind them. Sprinkle it on curd and mix.
Garnish with some spinach leaves and with a sprinkle of red chilly and roasted cumin powder.

Happy Palak relishing
Amrita

Monday, 15 June 2015

Kache Aam ki Kadhi and memories of my Summer holidays


Summer holidays for me as far as I can remember meant a three day long journey, the majority of which was travelling in sleeper class of Punjab Mail and the rest in the rickety-rackety state buses of Punjab to finally reach my maternal grandparents house in a small town called Kotkapura. 
It used to be such a grand affair. The suitcases very meticulously filled with clothes by my mother and simple delicious food was prepared for us to survive the journey which was always 'aloo di sabji' (potato sabzi), stuffed karela's and the quintessential Parantha's. Few pieces of the homemade 'aam da achaar'(raw mango pickle) would also make our train journey a little more yummier. And how can a Sardar gene swallow all this without some raw onion. Yes, we also carried raw onions which if my Paternal grandfather was travelling with us, would always be smashed with his fist and then torn in pieces and distributed. All this would be like a picnic on the train and an exciting event that I would look forward to while travelling. I still call it 'Train wala khaana'.
Once in Punjab, Summer holidays was all about playing non-stop with my cousins in the scorching heat. Strangely, I have no memory of feeling uneasy or feeling very hot in that heat. Perhaps we had no idea what that was and were anyways too busy enjoying ourselves running around in those wide spread open landscapes. And then there was always Lassi to cool us down. 
After a month of non stop fun, on the day of our departure, it was a ritual for me and my cousin sister to hug each other and cry as if we will never meet each other again. But we did because every single Summer vacation my mother would make sure we visited the land of our roots. 
Summers always bring back these lovely memories. Today all my cousins are living abroad and there are no more Summer vacations for us.
As a Mother, I feel it as a responsible duty now to have my daughter have the same wonderful feeling about Summer vacations.  And so I make sure that Vaanya gets to spend some amazing time with her cousins and build on beautiful memories that will stay with her forever. 
The recipe that I am sharing today is one that I make each Summer for the last 3-4 years and love it for the simplicity. It is very easy to make and is very light except the boondi added on top. I love to pair it with some boiled rice and raw mango chutney and find it an extremely yummy Summer meal. 

Ingredients : Serves 2-3
  • 1 medium sized Raw Mango
  • 1 tbsp panchphoron (equal quantity of jeera, saunf, methidana, kalaunji and sarso seeds)
  • 3-4 tbsp besan
  • 1/4 tsp turmeric powder
  • 1/4 tsp red chilli powder
  • salt to taste
  • sugar to taste
  • 2 glass water
  • a handful or two of plain boondi
Procedure : 
Boil mango with 2 glass of water in a pressure cooker for around 5 minutes.
Allow to cool and then peel off the skin of the mango.
Use your hands to squish out the pulp of the mango. 
Discard the seed inside.
Strain the mixture to remove any mango threads.
Take a bowl and mix the strained mango pulp with besan, salt, turmeric powder and red chilli powder. 
Take a tbsp of oil in a deep pan and add panchphoron to it. 
As it splutters add the mango mixture and stir continuously. 
Let it come to a rolling boil and then cook on low flame for about 5 minutes. 
Add sugar and adjust seasoning according to your taste. 
Add boondi just before serving to keep it crisp.

Relish this light and summery kadhi with boiled rice and raw mango chutney


Sending this recipe to KFB's ongoing event Mango Festival.


Happy Kadhi relishing
Amrita

Wednesday, 26 March 2014

Gajar-mewa-nu-achaar(Carrot and dried fruit sweet pickle)-my Irani connection


It was August 1999.
I remember noticing a thin, short, fair bespectacled girl become the pick of our seniors to rag in hostel.
Yes, ragging in college and hostel was normal in those days and we as dutiful juniors were supposed to sing songs, dance on their tunes, make them laugh and describe embarrassing words that they asked us. 
Now when I think back, we were asked some very silly questions like 'Do you have a boyfriend' or 'What is a chumma'. 
Let me remind you it was 1999 and not like today where such words are commonly spoken by everyone and is not considered any deal at all. In those days (and for my generation even till date) it was nothing short of blasphemy to utter such words in front of elders or share our love lives with them. 
Well as for 'Chumma', we soon learnt that it is a Kannada word for the expression 'just like that'. 
I was asked to sing songs for my seniors every now and then as part of my ragging. No one ever dared say no to the seniors. No one but Afsana K. Meherbani-that same fair Irani girl who was the favourite amongst the seniors because she would lash back at them with her answers. She once threw a seniors plate full of food as retaliation and that really angered everyone. That was true blasphemy in the hostel world.
I remember telling myself never to befriend that girl as it would mean getting in more trouble. 
Ragging soon got over or perhaps the seniors got bored of us. I really do not remember how it happened, but very soon that same Irani girl became an integral part of our group. And in no time Afsana, me and Veena became the best of friends. Years passed and we became more closer, much more than just friends. We were like sisters. We cried while leaving that same hostel, that place we spent four years of our most beautiful and carefree days. 
Our hostel food was usually made palatable by some goodies from home. Afsana used to bring this delectable Gajar-mewa-nu-achaar that was the only way I could relish mess food. Afsana introduced us to this amazing pickle which is usually made in Pasrsi/Irani weddings.
A few days back when I put my hands on this pickle at home, I kept thinking of those wonderful and carefree  hostel days.
Sweet memories with this sweet pickle. 


Recipe source : Parsi cookbook by the very famous Katy Dalal
Ingredients : I reduced the recipe by one fourth
  • 1 cup grated Carrots
  • 1 cup sugar
  • 1/4 tsp garam masala
  • 1 tbsp red chilli powder
  • 1 tsp turmeric powder
  • 1/4 cup Sugarcane vinegar(I used Apple cider vinegar)
  • 1/4 cup raisins
  • 1/4 cup dried dates
  • 1/4 cup dried apricots
  • 2 cloves garlic, chopped
  • salt to taste  
Procedure
Soak raisins, dried dates and dried apricots in 1/4 cup vinegar overnight.
Place carrots in a heavy pan and add sugar. 
Strain the overnight soaked dried fruit and keep aside. Use the same vinegar and pour in the pan over the carrots and sugar. Let it cook on slow fire. 
Add chopped garlic. 
If required add more vinegar to soften the carrots 
(I did not require) 
When carrots have softened in about 4-5 minutes, add the soaked dried fruits and bring the mixture to a boil. 
Add garam masala, turmeric powder,red chilli powder and salt and mix well. 
Remove from heat when the pickle has thickened to required consistency and allow to cool.


Sending this recipe to Kolkata Food Bloggers ongoing event 'East or West, Food is best'.


Happy Pickle relishing
Amrita

Monday, 10 March 2014

Matar ke Chilke ki Subzi aur Pakode-Grandma recipe

Matar ke chilke ki subzi
Matar ke chilke ke pakode
I have beautiful memories of my Grandmother, who we fondly called 'Beji', warming herself in the winter sun while her fingers working non-stop on one thing or the other. Either it was peeling loads of carrot to make her lipsmacking Gajar ka halwa or my favourite Gajar ki kheer, or peeling loads of peas which were used with all sorts of vegetables. She had some amazing recipes under her sleeves which she would love to rustle up for her family. And her mantra was no wastage. Almost everything that could be cooked was put to use. She would walk herself to the market and get vegetables and fruits picking the best with her experienced eyes. Every month, I remember, she would hand wash the wheat grains, cleaning them to be ground to flour for everyday use. I remember she would keep telling us, spend as much as you want when the thing is really important and save as much as you can when that thing is not very significant. Penny by penny, she saved to run her family and tend to it very lovingly. 
It has been about 10 years she left us for her heavenly abode but I still miss her. Miss her warmth, her love, her wise words, her sweet chatter and her amazing recipes. Time heals the pain of losing her but I think of her every now and then and wish I could have spent more time with her. She lives today through her recipes that I keep attempting which are far from mimicking that same flavour and taste. I am sure it was that extra dollop of love that went in each dish which made it so special.
Today I am sharing my Beji's special Matar ke chilke which she would use to make a subji and even make Pakode out of it every winter. 

How to peel the chilke:


Take out the peas from the pods and open it. Break a little tip from the top and pull it down. You will see a thin peel coming off. Try and bring it all the way down. If it breaks in the middle, try peeling from the other end. Throw the thin peels and save the chilke for use.

Chilke ki subzi 

Ingredients : For 2 servings
  • 20 pieces of peas chilka
  • 1 large potato, peeled and cut in bite size
  • 1 medium sized onion, chopped
  • 2-3 garlic pods, chopped
  • 1 mediom sized tomato, chopped
  • 1 green chilly, chopped
  • salt to taste
  • 1/8 tsp turmeric powder
  • 2 tbsp vegetable oil
Procedure
Wash and pat dry matar ke chilke.
Chop them roughly in 1" pieces.


Heat vegetable oil in a deep pan/kadai and add the chopped onions. As they start changing colour add the chopped garlic and green chilly and cook for a minute.
Add chopped tomatoes and cook for 2 minutes. 
As you see the oil separating from the masala, add turmeric powder and salt and stir well.
Add the potatoes and cook for 2-3 minutes.
Add a little water for the potatoes to cook. Cover and cook for another 2 minutes. 
When the potatoes are half done, add the chopped matar ke chilke. 
Cook for about 5 minutes or till well cooked.
Serve with roti or rice and dal.

Chilke ke Pakode

Ingredients : For 2 servings
  • 10-15 Matar ke chilke
  • 1 tbsp besan/chickpea flour
  • 1 tbsp chawal ka atta/rice flour
  • salt to taste
  • 1/4 tsp red chilli powder
  • a pinch of turmeric powder
  • oil for frying
Procedure
Wash and pat dry matar ke chilke.
Cut them in 1 1/2" pieces.
Take besan and chawal ka atta in a bowl. Add salt, turmeric powder and red chilli powder. Mix well.
Add water, little by little to get a dropping consistency of the batter. It should not be too thick or thin. 
Heat oil in a deep pan/kadai.
Drop the batter laden chilke in the hot oil. 
Cook till they get a light brown colour and drain on an absorbent paper.
Serve these crispy yummies with imli/tamarind chutney.

Matar chilka chaat
I experimented with the crispy pakodas and added them to my chaat along with chopped onions, chopped coriander, imli/tamarind chutney, dollops of curd and bhujia sprinkled on top. It was truly amazing.

Happy Chilka experimenting
Amrita

LinkWithin

Related Posts Plugin for WordPress, Blogger...