Showing posts with label green chili. Show all posts

Thursday, 26 January 2017

Sarson da saag with Makai di tart


As Winter comes, all homes in Punjab get geared up to prepare the most important, the most loved and the most respected meal-Sarson da saag and Makai di roti. This is not just another meal for us but is a meal which is synonymous to our culture and our existence. The sight of beautiful yellow flowers on the mustard plant are an invitation to the most coveted and most awaited meal during Winters. 
This hearty and healthy combination is supposed to warm the bodies to fight the bitter cold. The entire process of making Sarson da saag is not just a process but a ritual which is done very religiously. 
On my recent visit to Punjab, I was lucky to have sarson da saag from someones fields which was fresh and organic. The stem of the leaves of sarson da saag is called 'Gandalan' and a saag made using this part is supposed to be the best saag. The stem is first peeled and this is called 'Chirana' to remove any hard fibre and then all the leaves are washed. The leaves are then chopped using a traditional 'Daat' which is very much like a 'Boti' used in Bengal. The leaves are then cooked in the pressure cooker along with ginger-garlic-green chilly paste and then the saag is mashed using a traditional 'Madani' or 'Ghotna'. Makai atta is then added little by little to thicken the saag and give it some body. This is called 'Aalan'. Alternatively, besan or gehun atta can also be used. The saag is then again put to cook the rawness of the atta. 
Usually saag is cooked in more quantity as it stores very well. In fact, the older it gets the more tastier it gets. When required, a tadka of onions and tomato is given to the saag which is then served with a dollop of white butter or 'Chitta Makhan'. 
Since a recipe of Sarson da saag is so common and readily available everywhere on the net, I was more interested to present it in a little different and modern way. The perks of having an amazing Chef friend is that you can discuss your food planning and get incredible ideas and tips. And that is what lead me to attempt my hands on a Makai da tart. The entire innovative credit goes to my friend cum super chef Vikas Puri who very patiently helped me plan the styling. 
The recipe credit goes to my dear Kamal Masi who also very patiently helped me click and document each step of Saag making. The recipe and method shared here is the traditional way we make it at our home. 


Ingredients :


Organic greens-fresh produce from the farms
Sarson da Saag- For 7-8 servings

  • 3 bunch Sarson saag (Mustard leaves)
  • 1 bunch palak (spinach)
  • 1 bunch bathua (chenopodium leaves)
  • 1 bunch methi (fenugreek leaves)
  • 1 bunch methe, optional (a variety of fenugreek leaves)
  • handful of garlic leaves 
  • 2 tbsp ginger-garlic paste
  • 3-4 green chillies (less or more, according to taste)
  • 2 tbsp makai atta (maize flour)
  • salt to taste
  • ghee
Procedure : 

Sarson da saag : 

Peel the ends of the stems of the Sarson saag leaves. The stems are called 'Gandal' and a saag made of these gandals is a delicacy. Popularly saag made of these stems is called 'Gandalan da saag'. 


Wash all the leaves and then chop them. Traditionally it is done with an instrument called 'daat' in Punjabi (also called 'boti' in Bengali).


Heat 3 cups water in a pressure cooker and keep adding the chopped greens to it. Add more water if required. The chopped greens should get just about soaked in the water. 


As the leaves get cooked, they will change colour and settle down. Stir it once in a while. Meanwhile prepare ginger-garlic-green chilly paste by grinding them all together.
Traditionally, it is done in a vessel called 'Kunda-Sota' where an earthen vessel is the 'Kunda' and a wooden stick is the 'Sota'. The masala is pounded in the kunda with the sota.  
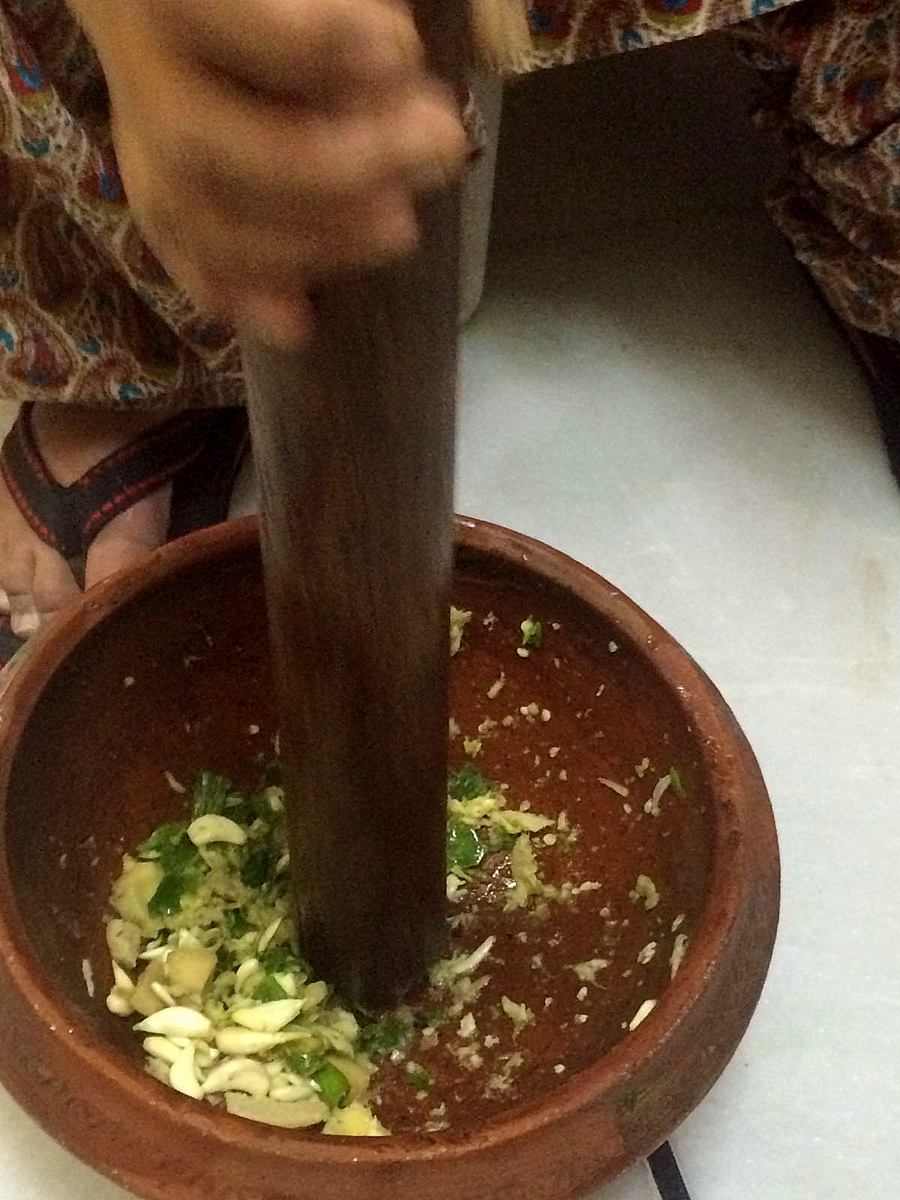

Add the ginger-garlic-green chilly paste in the saag and mix it well. Add salt to taste.


Close the lid of the pressure cooker and allow one whistle on high flame. Thereafter, reduce the flame to minimum and let the saag cook for one hour. 
Let the steam escape and then mix the saag with a hand mixer. Traditionally a 'Madani' is used which is wooden and is popularly used to make Lassi. 
The saag is basically mashed up with the Madani which requires good arm strength. 


Once mashed, little by little makai atta is added to thicken the saag. Keep adding and mixing to reach a required consistency. Put the saag back to heat for about 5 minutes so that the rawness of the makai atta goes away. 


The saag will look something like this pic below-fruit of hard labour and love that goes into making it. 


Saag at this stage can be stored in the fridge for many days. Whatever amount is required is taken out, given a tadka and then eaten.
For Tadka, take ghee/refined oil in a pan and add chopped onions. As they brown a little add chopped tomatoes and then add saag. 
Do not forget to add the most important and coveted ingredient on top of saag before serving-a big dollop of white butter ! 

Sarson da saag with Makai di roti
Sarson da saag with Bajre di roti


Makai di roti : 
  • Makai atta (a handful for each roti required)
  • hot water for kneading
  • ghee for brushing
Procedure : 
Take makai atta in a bowl and add little by little hot water into it. I initially stir it with a spoon as the water is hot but usually women in Punjab are so used to handling the hot water due to extreme winter that they do the entire kneading with hand. 
Knead it to a soft dough and keep aside covered with a wet cloth. 
They say that the makai atta because of its coarse nature yields softer roti's if kneaded with hot water. 
I take a plastic sheet and put the required ball of dough inside, cover again with the plastic sheet and then roll the roti with a rolling pin. Very commonly in Punjab women make it by just placing the ball of dough on a plastic sheet and using wet fingers to make the roti. In earlier days women were expert to make the roti by just using their two hands, no plastic sheet, no rolling pin. 
Heat a tawa and place the roti on it. Let it cook both sides and then add ghee on at least one side to let it cook and get some dark brown spots on it. 

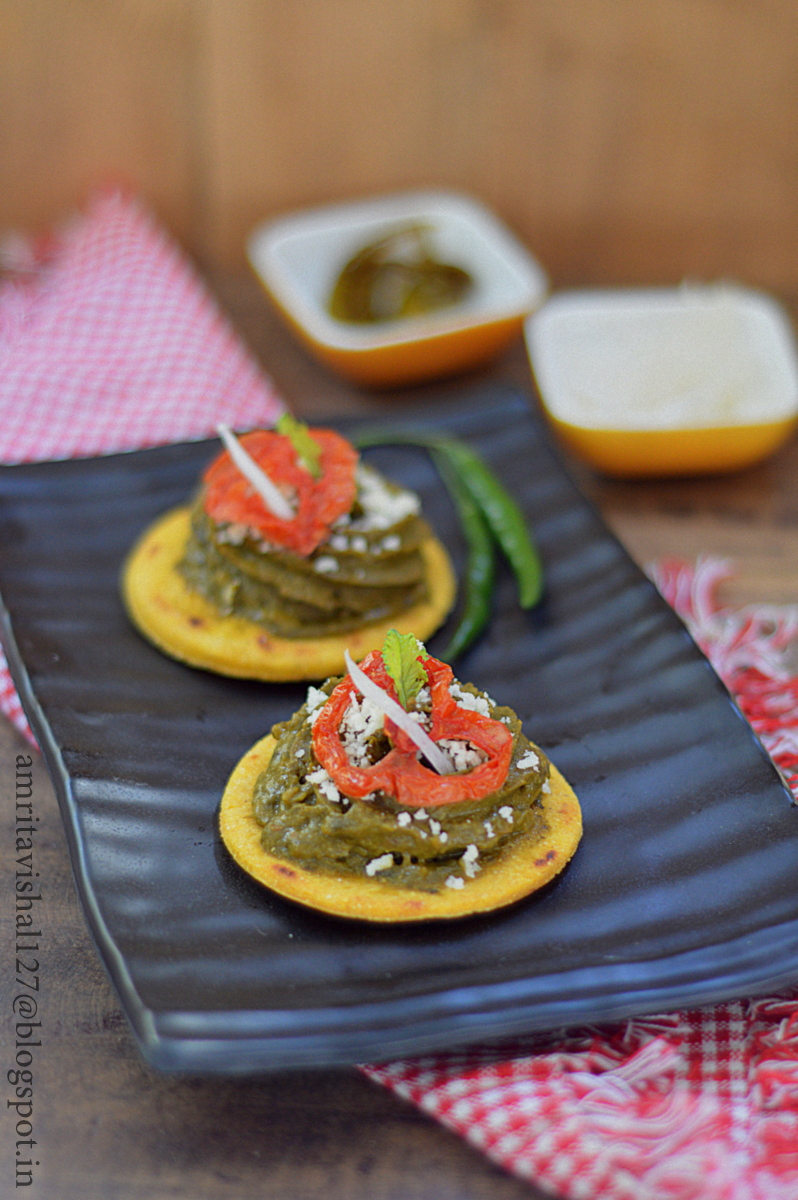
For a modern presentation, you may make small roundels of makai di roti and spoon the saag on it or you may even put saag in a piping bag and pipe on the roti like I did. Remember to keep the saag thick for this presentation. Grate some fresh paneer on top. Oven roast some slices of tomato with a sprinkle of salt and garnish on top. I used juliennes of white radish for garnishing and baby leaf of white radish. 


Makai di Tart : for 2-3 tartlets
  • 3/4 cup makai atta (maize flour)
  • 2-3 tbsp maida (all purpose flour)
  • 40 gms cold butter cut in cubes
  • little cold water for kneading dough
  • a pinch of salt

Procedure : 
Take Makai atta, all purpose flour and salt in a bowl and mix it. Add cold butter cubes in it and then rub the flour with the butter till the mixture resembles breadcrumbs in texture. Add little cold water (as much required) and knead to a dough. Wrap the dough in a cling wrap or a plastic sheet and refrigerate for 30 minutes. 
Preheat oven to 180 degree Celsius. 
Take the dough out from the fridge and leave it for 5-10 mins. Roll it out with a rolling pin and line a mini pie tin with it. Press it in the mould and cut excess from the edges. Take a fork and make few impressions to allow air to escape while baking so that the dough does not puff up. 
Bake for 10-15 minutes or till the tart is done.
Cool it and remove from tin.

Spoon a thick consistency of saag in it or pipe it with a star nozzle, as I have done. Garnish with a sprinkle of grated paneer, oven roasted tomato, julienne of radish and a radish leaf. 


Happy relishing
Amrita

Tuesday, 2 August 2016

Aloo Dum- low calorie version


When I was a school going kid, my tiffin was regularly hauled by my friends. Usually my Mom would pack me Parantha's of all possible fillings. On other days my tiffin beamed of sabzi and plain Parantha and on those fortunate lucky days I carried my treasured tiffin of my Mom's absolute lipsmacking Aloo Dum. My friends would finish it off even before the lunch bell rang, hiding beneath the desks and sneaking it while the teacher explained some boring subject on the blackboard. Yes, that was the magic of tiffin time that we all still cherish. 
I, on the other hand, loved my friends Puri sabzi and that addictive unstoppable fried goodness called Bhujiya. I just loved it so much. I was happy to trade my tiffin with their box of goodness. 
Whenever my friends came home, their was only one collective demand 'Aloo Dum'. My mom loved to plate it with generous dollops of tamarind chutney and some chopped fresh coriander leaves. She would put a toothpick on each making it easier for us to pick our's and relish it. 
With Kolkata Food Bloggers ongoing event on Street Food, I could think of nothing better than my Mom's Aloo Dum. Although now mommy makes a healthier version with the Airfryer so that the deep frying part is avoided. 
Make it and enjoy it as much as my friends always did. 


Ingredients : 
  • 500 gms baby potatoes, parboiled
  • 2 medium sized onions, chopped
  • 2 tsp ginger garlic paste
  • 1 medium sized tomato, chopped
  • 2 tbsp tomato puree
  • 1/2 cup curd
  • salt to taste
  • 1/4 tsp turmeric powder
  • 1 tsp red chilli powder
  • 2 tsp garam masala
  • fresh coriander, chopped
  • green chillies, chopped
  • Tamarind chutney
Procedure : 
Peel potatoes and make holes with a fork in 3-4 places. 
Take a bowl and add salt to taste, a pinch of turmeric powder and little refined oil. Coat the potatoes in it. Put this in the Airfryer for 10 minutes at 200 degree. Remember to turn the potatoes after 5 minute mark.
(If you do not have the Air fryer, deep fry the potatoes)


Take 2 tbsp oil in a deep pan, add chopped onions. Cook for 2 minutes and then add ginger garlic paste (once onions start browning on the edges)
Cook for another 2 minutes or till the mixture leaves oil.
Add the chopped tomatoes and cook them till they are soft and mashed. Add the tomato puree and cook till the mixture leaves oil.
Add salt, turmeric powder and red chilli powder. 
Lower the flame and add the lightly beaten curd. 
Mix the potatoes.
Garnish with coriander leaves and green chillies and top with spoonfuls of tamarind chutney before serving.

This recipe is part of Kolkata Food Bloggers ongoing event Street Food Expedition where Moumita Ghosh is the featured blogger of the week who blogs from Peek'n'Cook


Happy healthy binging
Amrita

Saturday, 7 May 2016

Dal Chawal Chokha - Mummy's recipe


There are recipes that you feel only one particular person can make it that good. For me, there are many such that I associate perfection of that recipe only if its made by that person. The Rajma recipe I shared few posts back is one such. 
When I think of my mom and wonder which recipe of hers I love the best, I actually feel lost. For a child, his/her mother is always the best cook because that's the food we grow up with, that's the food we associate love and care with, that's the food we find comfort in. When I was away at hostel for 4 years, I missed mom's simplest of dishes. I would crave for a bowl of dal with a roti and a piece of mango pickle, just like how I would enjoy at home.
My mum's dal has been famous with my Bitty Mama too who would insist on this lavish meal of dal chawal chokha whenever we would visit them in Punjab. I remember how coyly we would all be seated with our plates relishing the simplest of meals with loads of lemon juice on top. Such simple lovely days. 
I first attempted making Mom like dal after marriage and it was a complete disaster. It was awful and terrible, the dal was overcooked, the tadka wasn't cooked well and I tried cooking in very very less oil. Many attempts later I still do not make it as well as she does and love to relish that simple bowl of mum made dal with my roti and pickle and on some days with the chawal and chokha. I am blessed to be living in the same city as my parents do and often find myself getting pampered with food and love. 
This Mother's day, I want to say a simple I love you to my mom who has always been by my side and, who has loved me for everything that I have done, who has been my partner in a whole lot of maniac things I keep doing. Love you Mummy. 


Ingredients : For 2 servings

Dhuli Moong Masoor dal :
  • 1/4 cup dhuli moong dal (Split Skinned Green Gram)
  • 1/4 cup dhuli masoor dal (Split red lentils)
  • 1 1/2 cups water
  • 1 large onion, chopped
  • 2 tomatoes, grated
  • 5-6 cloves garlic, chopped
  • 1/2 " ginger, chopped
  • 1-2 green chillies, chopped
  • 2 tbsp ghee
  • 1/2 tsp jeera (cumin seeds) 
  • salt to taste
  • 1/4 tsp turmeric powder
  • coriander leaves for garnishing
Aloo Chokha : 
  • 4-5 medium sized potatoes, boiled and mashed
  • 1 onion, chopped
  • salt to taste
  • 1/2 tsp amchur powder
  • 2 tbsp refined oil
  • lemon juice
  • coriander leaves for garnishing
Procedure : 

Dal : 
Wash and drain the dals.
Take a pressure cooker and add water. Add the dals.
Add salt and close the lid. Allow to cook for 2 whistles. 
Take ghee in a pan and add jeera, garlic, onions,  green chillies and ginger one by one. Cook till the onions brown well.
Then add grated tomatoes and cook till the masala leaves oil.
Add haldi powder and cook for a minute.
Now add the boiled dal and stir. 
Adjust salt and garnish with chopped coriander leaves. 

Aloo Chokha :
Take oil in a pan and add onions. Cook till the onions brown well.
Add the boiled and mashed potatoes and stir well. 
Add salt to taste and amchur powder. 
Sprinkle lemon juice and adjust according to your taste. 
Garnish with chopped coriander leaves.

Serve with boiled rice and lots of fresh lemon juice sprinkled on top. 


This recipe is part of Kolkata Food Bloggers ongoing event Comfort Food where Sayantani Mahapatra of A Homemaker's diary is the featured blogger.


Happy Mum's recipe relishing
Amrita

Monday, 5 May 2014

Roasted Beetroot Chaas


Summers is not really my favourite month but Summers have a lot of sweet memory attached to it and remind me of the fun filled and careless childhood days. Summers then meant packing up our bags and traveling by the Sleeper class for 2 nights and reach our heaven haven in Punjab. The Summer vacations was spent running out and playing in the scorching sun and enjoying yummy delicacies made by Nani and Masi's. In those days we had no distraction from the television or the internet and enjoyed our silly games with all cousins. Summer Vacations will truly be the best days of my life!
With Vaanya, my daughter, growing up and soon to join a school, I look forward to give Vaanya a truly wonderful and memorable Summer vacation experience. I hope when she grows up, she will fondly recollect her best days of life with equal enthusiasm.
Summers are also synonymous with cool drinks. Being a Sikh, Lassi was a drink that was always ready at home. My grandmother would ensure that she uses enough milk to set homemade curd which was used generously in Summers. While I always loved my Lassi sweet and thick, others at home loved to gulp down a salty and thin version along with lunch. My grandmothers 'Madhani' was always ready to churn up a yummy cooling Lassi. 
My grandmother also made homemade white butter which now my mother continues to make very diligently. The top layer on milk called 'Malai' collected for a few days was churned to get the pristine white unsalted butter. The water remaining while churning butter was used in her salty lassi which I learnt later is called 'Chaas' in Hindi. Extremely popular esp in the northern part of the country because of its scorching heat in Summers, Chaas is a drink that is not only loved for its taste but for its health benefits too as it cools the body.
This chaas is normally made with boiled beetroot puree but the Baker in me made me experiment with a roasted beetroot version.


Recipe source : Adapted from GoodFood magazine 

Ingredients : For 3-4 servings
  • 1 small beetroot, peeled and quartered
  • 1 tbsp olive oil
  • salt and pepper to taste
  • 1 cup curd (I used homemade)
  • 2 cups water (or more)
  • 1 tsp oil
  • 1/2 tsp mustard seeds
  • few curry leaves 8-10
  • 1/4 tsp grated ginger
  • 1 green chilly chopped (optional)
  • salt to taste

Procedure

Preheat oven to 180 degree Celsius. Take a baking tray and line it with aluminium foil. 
Toss the quartered beetroots with olive oil and season with salt and pepper. 
Place on the baking tray and loosely cover with the foil. Let the beetroots roast for 30 minutes. 
Take them out carefully and allow to cool.
When they have cooled down, pulse them in the mixer to make a smooth paste.
Whisk curd and water in a bowl to make a thin chaas. 
Add the beetroot paste to it and mix it well.
Heat 1 tsp oil in a pan and add the mustard seeds. As they splutter, add curry leaves, grated ginger and chopped green chilly. Cook for a minute and then add this to the chaas.
Refrigerate the chaas and serve chilled. 


Notes
  • You can use buttermilk in place of curd and water.
  • You may boil the beetroot in boiling water or pressure cook it, peel the skin and puree it. 
This recipe is part of the exciting ongoing event at Kolkata Food Bloggers called 'Beat the Heat'.

 Enjoy Summers
Amrita 

Tuesday, 19 November 2013

Bada Memsaheb ka Vegetable Seekh Kebab

Pic courtsey Kamalika Chakrabarty

Kolkata, or Calcutta as we all fondly still call, is a city that has been a host to various religions and nationalities like British, Chinese, Jews, Sikhs, Gujratis, Biharis etc. All these settlers with time have brought in some unique changes to the cuisine of Kolkata. One such famous and irrefutable change in the local cuisine was brought in by The British rule. Usage of local ingredients, restrained use of spices and western techniques gave birth to a unique cuisine which lived especially on a variety of 'Finger food' popularized in the clubs of Kolkata.
We are proud to announce that Kolkata Food Bloggers are working as co-organizers of the annual event Nutrifest, 2013 organized by KPC School of Nutrition and Food, Kolkata. Extensive research has been done by the KPC team to dig out recipes and history from places like Rajbari's to restaurants and clubs. The theme for this year is "Laatsaheb er Bangali Khanshama" which means the influence of British rule on Bengali cuisine. The search was for food which originated in the British era and can still be found in some prestigious clubs of Kolkata. 
The recipe that is shared here today is one of the by-forgotten ones and is uniquely named Burra Memsaheb-er vegetable Seekh Kebab (Bada Memsaheb ka Vegetable Seekh kebab) Along with its unique name, the kebab is supposed to be constructed of three elements each of which gave a Sweet, Spicy and Tangy flavour to it.
I have tried to recreate this famous dish by incorporating all the three flavours into the kebab. For the sweet flavour I have used Raisins and sweet corns, for the spicy flavour I have added green chillies and red chilli powder and for the tangy flavour, I have used chaat masala and lemon juice. 
Kolkata Food Bloggers got together to make a video shoot of this recipe along with some others. The video link shall be uploaded to this blog post as soon as it is released. 

Ingredients : For 5-6 seekhs(as in the picture with 2 kebabs in each)
  • 2 large potatoes, boiled
  • 1/4 cup green peas, boiled
  • 1/4 cup sweet corn, boiled
  • 1 carrot, chopped and boiled
  • 10 french beans, chopped and boiled
  • 1/4 cup cabbage, chopped
  • 2 tbsp roasted gram flour/besan
  • 1 tbsp cashewnut powder
  • 5-6 pieces of raisin/kishmish, chopped
  • 1 tbsp ginger-garlic paste
  • 1 green chilly, chopped (optional)
  • salt to taste
  • 1 tsp red chilli powder
  • 1 1/2 tsp chaat masala
  • 1 tsp roasted cumin/jeera powder
  • Green bell pepper, tomato and onion squares for garnishing

Procedure :
Take 1/2  tbsp oil in a pan and saute the ginger-garlic paste and the chopped green chilly for 2 minutes. Add the chopped cabbage and saute for a minute.  Remove from heat and keep aside.
Take a big bowl and add potatoes. Mash them. 
Add the boiled vegetables like green peas, sweet corn, carrots and french beans and mash them well. 
Now mix in the ginger-garlic, green chilly and cabbage mixture.
Add in salt, red chilli powder, chaat masala and roasted jeera powder.
Now add the cashewnut powder(made by simply grinding 5-6 cashewnuts), roasted gram flour/besan (made by dry roasting gram flour/besan) and chopped raisins. Mix well. 
Soak some wooden skewers in water for 1/2 hour. 
Take a little portion of the vegetable mixture and press it around the wooden skewer shaping it as a cylinder. Make two such shaped cylinders on one skewer.
Preheat oven to 180 degree Celsius. 
Line a baking tray with an aluminium foil and lightly grease it with oil.
Place the skewers on it and bake for 15-20 minutes or till golden brown from all sides. You will require to turn sides in between for uniform browning. 
Take 1/2 tbsp oil in a pan and saute the green bell pepper, tomato and onion squares.
Insert the sauteed garnishing in the skewers and serve with a yogurt-mayonnaise dip where you add equal quantity of hung curd and mayonnaise and adjust seasonings.
Add a dash of lemon juice on top of the kebabs before serving.

Notes
  • You may reduce the spiciness to suit your taste buds by not adding the green chilly.
  • In case, you cannot shape the kebabs on the wooden skewer, shape them into cylinders and bake them and later thread them through the skewers. 
  • In case the vegetables feel hard while mashing, roughly grind them in a mixer and then add to the other ingredients.
A special and heartfelt note of thanks to Kamalika Chakrabarty for providing me these lovely pictures which were taken during the video shoot. 
Check some more interesting recipes from the British era like Deemer devil and Country Captain Chicken on these links. 

Disclaimer : The entire history and recipe has been provided by KPC team. I have just tried recreating the original version with my little changes.
 
Happy By-gone era kebab relishing
Amrita

Sunday, 22 September 2013

Daab Chingri/Prawns cooked in tender coconut


We at Kolkata Food Blogger's have started a new event where we are introducing one blogger per week by choosing a recipe from their blog and recreating it. The idea germinated in my head seeing a number of guest posts on the blogosphere. This event has made us dig deep into each other's blog and thus know more about each other's food journey. 
This week Jayati Saha is our featured blogger who blogs from Jayati and Tito's Food Journey
Jayati is working as a senior project manager in a corporate house and finds cooking as mode of enjoyment and therapy. She started her blog on her son's insistence and assistance and now is hooked onto the enjoyment of creating and sharing recipes on her blog. This event was especially an eye opener for me into her amazing world of food. She cooks from her heart and loves to do so for her beautiful family. It was really hard for me to move away from her list of delectable sweets and bakes. I purposely tried choosing a recipe that is not really my style. The hunt in doing so made me witness scores of amazing, simple and easy everyday recipes. I zeroed on the Daab Chingri as it was on my 'must try' list for some time. 
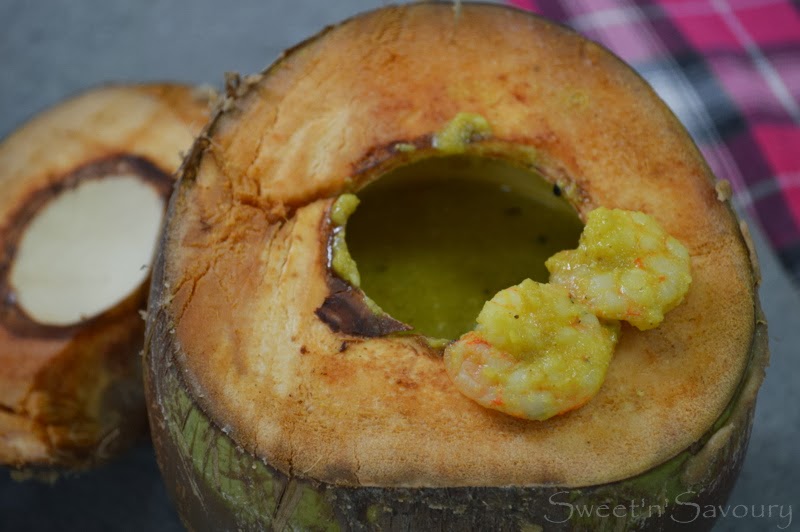
Daab chingri as the name suggests is an amazing Bengali dish where the prawns are cooked in a tender coconut using the water and the soft kernel of it. Otherwise a simple dish, the presentation quotient is sky high with it being served in a coconut shell. The sweetness of the tender coconut kernel and water used in the gravy lends this dish an amazing flavour. Served with hot boiled rice, this dish will win hearts instantly and earn many accolades. 


Ingredients : For 2-3 servings
  • 1 tender young coconut with its water and pulp
  • Prawns (deveined and cleaned) 10-15 
  • 1 medium sized onion
  • 5-6 garlic pods
  • 1" piece ginger
  • 1 green chilly
  • 4-5 cashewnuts
  • 1 tbsp poppy seeds, soaked in some water
  • 1/2 tsp panchphoron
  • 1 tsp sugar
  • salt to taste
  • 1/4 tsp turmeric powder
  • 3 tbsp mustard oil 

Procedure:
Sprinkle salt and turmeric powder over prawns and keep aside for 1/2 hour.
Cut the coconut from top and preserve it to be used as a lid. Cut little from bottom too so that the coconut can be made to stand.

Vishal flaunting his knife skills
Drain the coconut water and reserve. Scoop out the soft kernel and keep aside.


Grind together onion, garlic, ginger, green chilly, poppy seeds and cashews to a fine paste and keep aside. 
Heat mustard oil in a deep pan/kadai and let it reach its burning point. Switch off the heat and allow to cool. 
Meanwhile preheat the oven to 200 degree Celsius.
Heat oil again and add panchphoron. As it splutters, add the ground paste. Let it cook on medium heat till the paste leaves oil on its sides.
Grind the coconut kernel that was obtained from the coconut and add to the pan.
Add sugar and salt. 
Add 1/2 of the coconut water and let it boil. 
Gently lower the prawns and allow to cook for a minute. 
(My gravy had gone too thin for my liking so I scooped the prawns and let the gravy thicken on high flame.)
Transfer the prawns and the gravy into the coconut shell.


Cover with the lid and seal with some atta dough.


Put the sealed coconut in the preheated oven and cook for 15-20 mins.
Alternately, you may cook in the pressure cooker by putting the sealed coconut shell in it and filling it with water reaching halfway. Close lid and cook for 3 whistles and then wait for the vapour to dissipate naturally.
Scoop out the prawns and enjoy with a bowl of hot boiled rice.


Happy Daab Chingri enjoying
Amrita

Wednesday, 4 September 2013

Hari bhari machi/Rui fish in coriander gravy-Know Your Kolkata Food Blogger-Kamalika Chakrabarty


Her sweet melodious voice over the phone was my first tryst with her. I had requested her to pick me up for our very first meet and got so busy baking a Surprise cake that I completely forgot telling her that Vishal had agreed upon leaving me. As a diligent and responsible person (that she is) she called me up to confirm. My cake took longer than expected and I had crossed the meeting time by an hour. I had butterflies in my stomach and was super excited to meet my fellow Kolkata Food bloggers. It was only with her efforts that our group was formed and this was our very first meet.
It gives me immense pleasure to introduce a very dear friend, a fellow food blogger, the creator and visionary of Kolkata Food Bloggers, Kamalika Chakrabarty on our blog.
Kamalika Chakrabarty blogs from Silence Sings. A passionate homemaker who runs a jewellery business, a cake/chocolate business, ardent food blogger, loving mother and a wife, she is  truly a superwoman who wishes there were more hours in a day.
It is with her efforts that Kolkata Food Bloggers Group was formed where food bloggers in Kolkata can connect and come together to share and enrich each other through their years of food blogging experience and have fun.
Kamalika's blog is truly a very pleasing one with her wonderful write ups and awesome photography skills. She strives hard to bring out amazing pictures every single time. From some lip smacking main/side dishes to delectable desserts, her blog has it all.
Today I chose to recreate her Dhone Pata Rui (Rui fish with coriander leaves) I had completely loved her idea of incorporating fish with coriander leaves and decided to achieve the dish with some personal changes. I incorporated a tried and tested Chicken Hara bhara recipe  from my Amma's kitchen and used the same gravy for fish. The fish looked lovely and tasted amazing with all the green coriander gravy. Thanks to Kamalika for the ingenious idea. 
Do check her original version of the dish and her lovely blog. 
You can also check her amazing range of Apparel, jewellery, customized cakes and chocolates here
and here


Ingredients : For 2 servings
  • 300 gms fish (I used Rui fish, peti(abdomen))
  • juice of 1/2 lime
  • 1 tbsp ginger garlic paste
  • 1 green chillies
  • 2 tsp poppy seeds(posto dana), soaked in some water
  • 50 gms fresh coriander leaves
  • salt to taste
  • Mustard oil, to fry the fish +1 tbsp for the gravy
  • 1 tsp cornflour
Procedure:
Wash the fish pieces and marinate with lime juice and salt. 
Roughly chop green chillies and coriander leaves and make a paste with the soaked poppy seeds. I used the traditional Sil-bata. You may do this in a grinder.
Take oil in a deep pan/kadai and heat till it reaches smoking point.
Switch off the heat and let the oil cool.
This helps remove the most pungent elements from the oil resulting in a smoother taste.
Heat the oil again and fry the fish pieces, preferably one at a time, on medium heat. Let one side cook well before turning for the other side to cook.
Drain on an absorbent paper and keep aside.
Remove excess oil, keeping 1 tbsp for the gravy.
Add ginger garlic paste and cook till it gives a nice aroma. Do not let it burn.
Add the green chilli-coriander-poppy seeds paste and mix well. 
Season the gravy with salt to taste.
Add the fried fish pieces, one by one and mix gently.
Dissolve cornflour in little water and pour in the pan. The gravy will thicken slightly and bind well to the fish.
Remove from heat as it might discolour the gravy.
Serve with plain boiled rice teamed with lime slices and a green chilly, if required.

Note :
  • The gravy will thicken if kept for long. Reheat before serving by adding little water.
  • This gravy goes well with chicken as well as vegetables. After adding ginger garlic paste,you can add chicken pieces and add half the green chilli-coriander-poppy seeds paste and let the chicken cook. As the chicken cooks, add the remaining half of the paste with diluted cornflour.
  • Similarly, you can add parboiled and/or sauteed potatoes or other vegetables in this gravy.
Silence Sings
Happy Eating
Amrita

LinkWithin

Related Posts Plugin for WordPress, Blogger...