Showing posts with label whipped cream. Show all posts

Monday, 27 June 2016

Easy Mango Ice cream


Of the few things to love about Summers is the availabilty of the king of fruits-the Majestic Mango. I absolutely adore mangoes and have a little weak heart for the variety which is interestingly called 'Langda' or 'Langra'. The origin of the name is debateful but it is believed that since most of the names are derived from the places of origin, it too could be named after a certain place called so. But, whats in a name. Langda has a distinct taste and even though it has a green skin which might trick you into feeling its not ripe, it is one of the most sweetest mangoes. 
Vaanya, my daughter, is a mango lover too. This season she has been wanting to eat the Langda over another sweet mango called Himsagar and has been relishing her Mango escapades with the oozing nectar and the consequent mess. 
A very ripe Langda in my fridge made me kick my lazy self and turn it into an easy mango ice cream which has been in my list for a long time. This is one super simple recipe, very much like the easy strawberry one I made. It is best to make it a night before and let it set in the freezer overnight and then relish it in the day. 


 Ingredients : 
  • 3-4 tbsp condensed milk (adjust depending on the sweetness of your mangoes)
  • 1 ripe mango, peeled and pureed( I used Langda variety of Mango)
  • 1/2 cup milk
  • 1/2 cup whipped cream(see notes)
Procedure : 
In a bowl, combine milkmaid, mango puree and milk. 
Fold in the whipped cream and pour in a freeze proof tin.
Allow to set in the freezer for 5-6 hours. Best is to leave overnight.
Take out and beat the mixture and allow to set again in the freezer. Repeat this 4-5 times to break the ice crystals. 
Scoop and serve.

Note:

  • Take 1/4 cup of whipping cream and then whip it with a handheld beater till it gets thick and fluffy. 
  • In case, you do not have condensed milk, add powdered sugar to the mango puree.
  • Remember, this is a soft set variety of ice cream and therefore will not be as firm.


Happy Mango relishing
Amrita

Monday, 18 January 2016

Easy Strawberry dessert


The holidays have come to an end and life has started on normal mode once again. An entire month of gorging on yummy goodies can disturb a lot of your body equilibrium but then life is all about enjoying what you like, within limits though. I have been procrastinating the idea of getting back to my exercise schedule which I followed very religiously till my daughter Vaanya was born. Being a Phyical therapist, I very well know how the human mind keeps the idea of exercising at bay. I have had hard days convincing my patients the benefits and joy of exercising. I guess its time to repeat those lines of advice to myself. 
Coming back to the recipe that I am sharing today, it was basically done with left over strawberries and some cream that I had from my Chocolate cloud roll. I crushed some oreos and layered the dessert in no time. Some fancy decorations and you have a yummy and impressive dessert. 


Ingredients : I am not sharing any measurements because frankly speaking I just went with whatever I had
  • 3-4 oreos, crushed
  • 3-4 strawberries, chopped
  • Whipped cream, about 1/2 a cup
  • Strawberry crush, 2-3 spoonful (I used a brand called Mala)
Procedure : 
Take plastic serving cups like the ones I have used or any other serving glass and press some crushed oreos at the bottom.
Mix the strawberry crush with the whipped cream with gentle hands and spoon some on the crushed oreos.
Sprinkle some chopped strawberries and make another layer of oreo, whipped cream and strawberries. 
Dress it up with a dollop of piped whipped cream and a wafer chocolate stick. 


My daughter, Vaanya, enjoyed her favourite flavours, strawberry and chocolate, in the dessert and finished it in no time.

Happy quick dessert relishing
Amrita

Saturday, 26 December 2015

Easy Strawberry Icecream


Vaanya, my four and a half year old daughter, is at a 'I love everything Pink' stage. Pink is not just her favourite colour but the only colour she wants everything around her to be in. Her fetish is not just limited to clothes but even food. She chooses to eat her oreo biscuits in strawberry flavour because it is pink! If she could, she would have painted the entire city pink.
Last month when we got a box of strawberries home, this simple and quick recipe was on my mind for my darling pink daughter. As I thought, the mere all natural pink colour of this ice cream made her eat spoonfuls straight from the container. The super easy recipe worked perfect and I did not have to use any artificial colour. 


Ingredients : 
  • 1 cup whipped cream
  • 1 cup condensed milk
  • strawberries, chopped, as required
Procedure : 
Take a little less than 1/2 cup of whipping cream (to achieve 1 cup of whipped cream) and whip it to stiff peaks. 
Fold in the condensed milk and whip it again.
Fold in chopped strawberries and put the mixture in a freezer proof container and freeze for 3-4 hours. 
Scoop out and enjoy the soft serve type ice cream.


Happy Pink ice cream relishing
Amrita

Monday, 14 December 2015

Chocolate Cloud Roll with Strawberry cream filling


Winter time marketing is so much fun as you get to see and buy such a fresh and colourful range of vegetables and fruits. Fresh strawberries boxes are nowadays seen with every fruit seller and with the prices now reduced to almost  half with what it started off, I decided to do a strawberry recipes marathon. 
My first thought was to simply fill a tried and tested Chocolate cloud roll recipe with whipped cream tossed with strawberries. This particular recipe has been made by me many times but has never been documented in the blog. Amongst all the baking books sitting pretty on my bookshelf, Cake Bible by Rose Levy Beranbaum is my favourite for many reasons than one. Firstly she gives scientific explanations to her bakes and her recipes are very detailed and easy to follow. Her Chocolate Cloud roll recipe is as delicate as it sounds and has a melt in mouth texture.
As Rose mentions, this is more of a flourless souffle than a cake. With no flour to give it a definite texture this cake is very very light and is just about sweet. I have usually filled the cake with a dark chocolate ganache but this time tried a whipped cream and strawberry filling. The cake can have endless fillings from a jam, chocolate ganache, coffee flavoured cream filling or just a plain whipped cream with fruits filling. 
Do not forget to follow the baking tin instruction which mentions a grease, line,  grease and then flour. This is very important as the cake otherwise will stick to your butter/parchment paper. 


Recipe source : Cake Bible by Rose Levy Beranbaum

Ingredients : I have reduced the recipe to 1/2 and baked in a 11X8 " jelly roll pan
  • 3 eggs, separated
  • 3 tbsp and a 1/2 tbsp powdered sugar, separate 
  • 50 gms melted dark chocolate
  • a pinch of cream of tartar (optional)
Strawberry cream : 
  • 1/2 cup whipped cream
  • 4-5 chopped strawberries
Garnish : 
  • melted dark chocolate
  • chopped strawberries
  • icing sugar

Procedure

Preheat oven to 176 degree Celsius.
Grease your jelly roll pan and then line it with butter/parchment paper and then grease it again and lightly flour it. 
Take egg whites in a bowl and beat till foamy. Add cream of tartar and beat again till soft peaks form. Sprinkle 1/2 tbsp sugar and beat again till stiff peaks form. 
In another bowl beat 3 tbsp sugar and egg yolks for about 3-4 minutes till light and fluffy. Add melted chocolate and beat again till incorporated.
With a rubber spatula or a whisk, fold 1/4 of the egg white mixture into the egg yolk-chocolate mixture. Gently fold in the remaining egg white mixture.
Pour batter in the prepared tin and spread with the spatula. Bake for 15 minutes.
Take a piece of butter/parchment paper the size of the tin and sprinkle it with cocoa powder. Invert the cake on it and let it cool. Remove the parchment paper to spread the strawberry filling and roll the cake gently. 
Garnish with a dusting of icing sugar/powdered sugar, melted dark chocolate drizzle and chopped strawberries. 
Slice and serve.


Happy cake relishing
Amrita

Saturday, 23 May 2015

Summer Indulgence-Mango Cheesecake and a fun competition between team KFB and Crossindia

Pic courtesy : Swarnendu De

KolkataFood Bloggers recently had a competition of its kind with Crossindia team which happens to be my husbands dream project. The idea was to get together and have fun over food which is a common passion of both the teams. Team Crossindia has developed this cooking challenges on a monthly basis as their team building and bonding exercise. 
On a scorching May afternoon we all met for a memorable day of fun, food and interaction. The competition had 3 segments of serving for about 20 people with a starter, a main dish and a dessert by both the teams. 
Loads of planning, hard work and dedication went into the competition and some fabulous dishes were churned out by both teams. 
For starters team KFB presented an innovative dish named Vodka Prawn Croquettes which had a unique filling and an outer covering. This was served with a tamarind based relish. 


And team Crossindia presented a classic dish with an amazing presentation called Devilled Crab where crab meat and mushrooms were mixed with a rich white sauce and cheese toppings and was served in crab shells itself. 


The main dish from KFB was a family recipe of Bangladeshi Roast Chicken adorned with boiled eggs and served with pulao which was devoured in no time. 


Team Crossindia served a classic Thai dish called Pla Manao where steamed Bhetki fish was served with a thai sauce flavoured with thai herbs, lemons and palm sugar.


Finally the dessert section had a Summer special in Mango Cheesecake presented by team KFB which had three layers of goodness-a biscuit layer, a mango flavoured cheesecake layer topped with a fresh mango jelly layer garnished with fresh fruits. 


Team Crossindia served and won all hearts with a Thai dessert called Tap Tim Samsee which is coconut cream flavoured with pandana leaves and served with chilled and coloured water chestnuts.  


For each course of meal, people were requested to vote for their favourite dish. Team Crossindia won hearts and votes with their splendid dishes. Team KFB lost by marginal votes but went back with a memorable day. 
Here are some pics of the fun we all had. 
Pic courtsey : Swarnendu De


Dart fun
Chit chats 
Team KFB

Team Crossindia

Hop on to the recipe of the dessert fit for these summers

Ingredients : Yields about 8 individual servings

Biscuit layer : 
  • 6-8 digestive biscuits 
  • 3-4 tbsp melted butter
Cheesecake : 
  • 1 block of Philadelphia cream cheese, room temperature 
  • 1/2 cup powdered sugar
  • 1 cup mango pulp, strained (requires about 2 mangoes)
  • 1 tbsp gelatin
  • 1/4 cup hot water
  • 100 gms whipped cream
Mango jelly layer : 
  • 1 cup mango pulp
  • 1 tbsp gelatin
  • 1/4 cup hot water
Procedure : 

Biscuit layer :
Crush biscuits fine. 
Add melted butter and mix well. 
If the mixture starts clumping together, it is ready to be pressed onto the base of the serving glass. If not, add more butter. 
Refrigerate.


Cheesecake layer :
In a bowl whip the cream cheese well. 
Add sugar and mix.
Add mango pulp.
Dissolve gelatin in hot water and allow it cool a little bit. 
Add to the cream cheese mixture and mix well.
Gently fold in whipped cream.
Spoon the mixture in the serving glasses and refrigerate for an hour.

Mango jelly layer : 
Dissolve gelatin in hot water and allow to cool little bit.
Mix with the mango pulp and pour on top of the serving glasses.


Serve chilled with some fruits as garnish.

Notes : 
  • Replace cream cheese with equal quantity of paneer and hung curd. Blend well in a mixer to get a smooth consistency. 
  • Experiment with other flavours like strawberry, blueberry or lemon.
Sending this recipe to KFB's ongoing event Summer related recipes :  


Happy Cheese-caking
Amrita

Monday, 16 February 2015

Fraisier-French Strawberry Gâteau


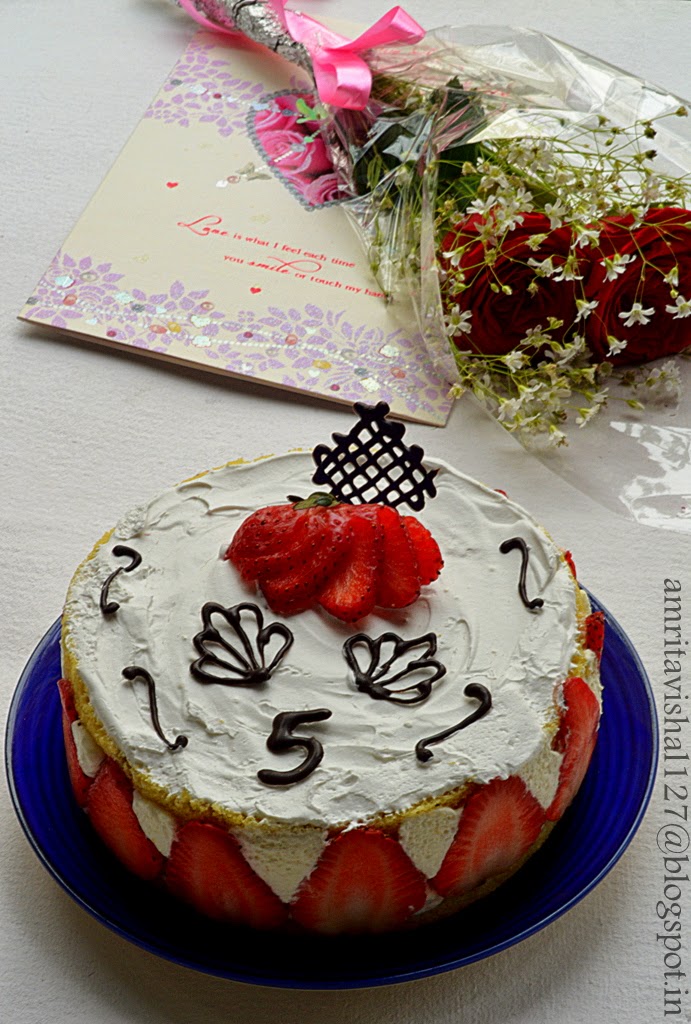
This Valentine's day completed 5 blissful years of my marriage with my best friend, my soulmate Vishal. Time has certainly flown by and it seems like just yesterday that we had limited time to spend with each other. We kept our distant relationship alive on letters and stuck by each others choice even with family's disapproval. It is really amazing to think back of those days and imagine at the conviction we had in each other. I guess that is the reason we were united with our family's blessings. And what better day for that!
Valentine's day is also my in-laws anniversary and therefore the choice of date for our marriage. My parents had no objection to it but since we had a Gurudwara wedding, it was important that it should be a Sunday. Sikh weddings rituals take place in the morning and Sunday being a holiday for all is naturally the most convenient day to invite people. Believe it or not 14 Feb 2010 was a Sunday!
With such a mushy story, I needed a mushy cake for the grand 5 year celebration. This particular cake caught my fancy as it more of the technique in assembly than the bake in itself. A fairly simple method with lovely results, is exactly what I wanted for the anniversary celebrations. Fraisier is a gâteau which has structure made up of strawberries and pastry cream supported by thin layers of sponge. The fraisier gets its name from the french word “fraise” which means strawberry. Traditionally this cake has a marzipan top. The elements can be made few days in advance which makes it easier to just assemble it a day before required. 
My maiden attempt, thankfully, went off well and once the gateau was out on a plate to be photographed, my daughter Vaanya kept pulling me asking for the chocolate decorations. With some hurried pictures, the gateau was all hers. There is no joy comparable to the one you get when you see your tiny one enjoy what you have made. Vaanya was all over the cake licking off the cream, pinching off the chocolate decorations and pulling the strawberry slices from its place. 


Ingredients : For a 6" round gâteau

Genoise cake:
  • 2 eggs
  • 25 gms butter, at room temperature
  • zest of half a lemon
  • 1/2 cup powdered sugar
  • 1/2 cup self raising flour (substitute with 1/2 cup all purpose flour+3/4 tsp baking powder+1/8 tsp salt)
Pastry Cream filling:
  • 1/2 cup milk
  • 1/4 tsp vanilla essence
  • pinch of salt
  • 1 tbsp cornflour
  • 2 tbsp powdered sugar
  • 1/2 egg (beat one egg in a bowl and use half the quantity)
  • 1 tbsp butter
  • 1/2 tsp gelatin
  • 1/2 tbsp water
  • 1/2 cup whipped cream
Sugar syrup :
  • 1/4 cup sugar
  • 1/4 cup water
You will also require:
  • 9-10 strawberries
  • Chocolate decorations
Procedure : 

Genoise : 
Preheat oven to 180 degree Celsius.
Grease and line a 6" round baking tin.
Place sugar, eggs and lemon zest in a bowl and place it over a pan of simmering water as a double boiler. Take care that the water should not touch the bowl of eggs. 
Whisk the mixture over medium heat till it doubles in volume. You will know the right stage once the mixture forms a ribbon trail when the whisk is lifted.
Sift in 1/2 of the flour and gently fold in the whisked mixture with a metal spoon. 
Add the remaining flour and fold again.
Gently fold in the butter. 
Pour the mixture in the prepared tin.
Bake for 15-20 minutes or till a toothpick inserted in the middle comes out clean.
Allow to cool and cut cake in half.

Pastry Cream filling:
Pour milk, vanilla extract and salt in a saucepan.
Place over medium heat and stir. Bring it to a near boiling point.
Add cornstarch and sugar in another bowl and whisk.
When milk is ready, gently and slowly add to the egg mixture and stir simultaneously. 
Pour the mixture back into the saucepan and continue to cook over low heat till it thickens and coats the back of a spoon.
Pass through a fine mesh and allow to cool.
Whisk in the butter. 
Cover cream with a plastic wrap pressing on top of cream to avoid skin formation.
Chill in fridge. 
Can be stored upto 5 days in refrigeration.

Sprinkle gelatin over water and allow to soften for 3-4 minutes.
Take 1/4 cup cream on a double boiler and heat it.
Add gelatin and whisk. Add in the remaining cream.

Mix in the whipped cream well and transfer the pastry cream in a piping bag and store in fridge till  further use. 

Simple Syrup : 
Combine sugar and water in a pan and bring to a boil. 
Allow to cool.
Can be stored in fridge for upto 1 month.
Can be flavoured too. 

Fraisier Assembly : 
Cling wrap the entire inside of the 6" round pan with some extra hanging out. This will be useful to pull out the gateau from the tin. You may also use a springform pan to make it easier in which case you will only need to line the sides of the pan with cling wrap.
Fit bottom cake layer in the pan and moisten with sugar syrup. 


Slice strawberries in arrange around the sides of the pan.


Pipe cream in between the strawberries and a thin layer across the top of cake.


Chop the remaining strawberries and place them in the middle of the cake.


Cover them with the pastry cream and smoothen top.


Place the second layer of cake on top and moisten with sugar syrup. 


Cover top with some remaining pastry cream or whipped cream.
Refrigerate for 4 hours or overnight.
Pull out the gateau carefully from the tin with the help of the overhanging cling wrap.
Place on a plate and decorate with strawberries and chocolate decorations.


Our anniversary celebration was made delicious with Vishal's Chicken biryani which followed by a visit to a newly opened cafe for some coffee and cupcakes. 


Happy Valentine's day
Amrita

Friday, 25 July 2014

Chocolate mousse-2 ingredient recipe


Threshold
We are at the threshold of a new beginning. A new chapter is awaiting to unfold in our lives. Our tiny tot (who is three years now) is about to join school. Vaanya is about to enter a magical world of learning new things everyday, of making new friends and of understanding the things about life. Vishal and I, as any parent, are both very anxious and excited at this stage. Our talks revolve around discussing schools nowadays. A girls or a co-ed, a convent or an international, an ICSE or a CBSE....why is choosing a school so difficult. 
With so much going around nowadays, getting to hear horrific incidents about the things happening in schools, I sit and wonder what exactly am I looking for. Do I put her in a school that thrives on reputation since ages or do I put her in a school which exceeds in the number of extra-curricular activities they engage the child into. Every school has its own positive and negative aspects which naturally makes the whole thing all the more difficult.
We as parents want Vaanya to grow in an environment where she learns the values, the discipline and the true essence of life. We want her to enjoy the wonderful days of school and become a beautiful, sensitive and a caring human being.   
After some years, we will face this same anxiety while choosing a college for her and then after more years while getting her married. Parents and their anxieties...we now understand. Circle of life, they rightly say. 
For my 'Sweet Day' this time, I am sharing an extremely easy and quick eggless chocolate mousse. It just requires 2 ingredients and is as simple as ABC.


Ingredients : Serves 2
  • dark chocolate, roughly chopped to fill 1 cup (I used Morde dark compound)
  • 1 cup whipped cream


Procedure : 
Take some water in a pan boil it. Reduce the heat to medium and let the water simmer. 
Take a bowl big enough to fit on top of the pan in a way that the water should not touch the bowl.
Add the chopped chocolate to the bowl and place it on top of the pan and allow it to melt over the simmering water. Be careful as to not let the chocolate burn.  
Allow the chocolate to cool little bit. 
Keep about 1/4 of the whipped cream aside for garnishing.
Add 1/2 of the whipped cream to the melted chocolate and fold gently. 
Add the remaining half and fold it gently too. 
Once you see no more of the white streaks in the chocolate and the cram has been folded well, divide the mixture in serving glasses/bowls. 
Refrigerate for 2 hours to set.
Garnish with whipped cream piped on top through a star nozzle and some chocolate shavings. 


Notes : 

  • You can alternately melt chocolate in the microwave for about a minute in 10 sec bursts.
  • You may add some brewed coffee to the melted chocolate to intensify flavours. 
  • To make chocolate shavings, simply grate a bar of chocolate. 


Happy Mousse devouring
Amrita

Friday, 18 July 2014

Cherry Shortcake


PhasesWe all get into it. Taking a break from the usual mundane thing that you do. At times even taking a step back from your most favourite thing. Changing the way you think (at least trying to). Looking things in a different light. We all have phases. I have this theory that we keep changing. Not only in our physical appearances but also in our thought processes. We keep running in and out of different phases throughout our lives.  
With all my ranting above, its time to admit that I have been in this phase of ignoring the baking groups that I have been a part of for the last 4-5 months. The basic reason for joining these groups was to bake along with equally passionate bakers and have the opportunity to experience new bakes. And I have learned so many new techniques and such a variety of amazing bakes. 
I finally decided that it was time to come out of my phase and pull up my lazy socks. A great way to start was to bake this month's challenge before anyone else did. Baking Partners challenge for this month was suggested by Reeni of Cinnamon spice and everything nice who encouraged us to try Berry Shortcakes. I noted down the recipe the moment it was shared (yes, I maintain a hand written diary) and decided to use cherries instead of the fancy blueberries, blackberries, raspberries suggested since we do not find them here. You can use any fruit in place of the berries like the way I used cherries. Summery stone fruits like plums, peaches will work great with this recipe. 
The shortcake is a really simple recipe and uses very easily available ingredients. You will require some whipped cream to fancy it up and that all about it. 


 Ingredients : Yields 3-4
  • about 50 gm cherries
  • 2 tsp + 1 tsp sugar
  • 6 tbsp all purpose flour
  • 2 tbsp cornstarch
  • 3/4 tsp baking powder
  • 1/4 cup heavy cream
  • 12 tsp melted butter
  • 1/2 cup whipped cream


Procedure : 
Pit the cherries by removing the seed and then chop in halves. Toss 1 tsp sugar with the cherries and keep aside. 
Preheat oven to 200 degree Celsius. Line a baking tray with aluminium foil.
In a bowl, sift all purpose flour, cornstarch, sugar and baking powder. Stir in the heavy cream a little at a time and moisten the dough. You may not need the entire quantity. 
Gently pat to a circle about 3/4" thick and use round biscuit cutters to cut them out. 
Gather the remaining dough to get some more. 
Dip the rounds in the melted butter and place on the prepared baking tray. Sprinkle sugar and bake for about 15 mins till they become puffy and golden in colour. 
Allow to cool.
Split shortcakes in half and spread whipped cream and prepared cherries. Top with some more. 


Happy Shortcake Indulging
Amrita

LinkWithin

Related Posts Plugin for WordPress, Blogger...