Showing posts with label Baking Partners. Show all posts

Friday, 18 July 2014

Cherry Shortcake


PhasesWe all get into it. Taking a break from the usual mundane thing that you do. At times even taking a step back from your most favourite thing. Changing the way you think (at least trying to). Looking things in a different light. We all have phases. I have this theory that we keep changing. Not only in our physical appearances but also in our thought processes. We keep running in and out of different phases throughout our lives.  
With all my ranting above, its time to admit that I have been in this phase of ignoring the baking groups that I have been a part of for the last 4-5 months. The basic reason for joining these groups was to bake along with equally passionate bakers and have the opportunity to experience new bakes. And I have learned so many new techniques and such a variety of amazing bakes. 
I finally decided that it was time to come out of my phase and pull up my lazy socks. A great way to start was to bake this month's challenge before anyone else did. Baking Partners challenge for this month was suggested by Reeni of Cinnamon spice and everything nice who encouraged us to try Berry Shortcakes. I noted down the recipe the moment it was shared (yes, I maintain a hand written diary) and decided to use cherries instead of the fancy blueberries, blackberries, raspberries suggested since we do not find them here. You can use any fruit in place of the berries like the way I used cherries. Summery stone fruits like plums, peaches will work great with this recipe. 
The shortcake is a really simple recipe and uses very easily available ingredients. You will require some whipped cream to fancy it up and that all about it. 


 Ingredients : Yields 3-4
  • about 50 gm cherries
  • 2 tsp + 1 tsp sugar
  • 6 tbsp all purpose flour
  • 2 tbsp cornstarch
  • 3/4 tsp baking powder
  • 1/4 cup heavy cream
  • 12 tsp melted butter
  • 1/2 cup whipped cream


Procedure : 
Pit the cherries by removing the seed and then chop in halves. Toss 1 tsp sugar with the cherries and keep aside. 
Preheat oven to 200 degree Celsius. Line a baking tray with aluminium foil.
In a bowl, sift all purpose flour, cornstarch, sugar and baking powder. Stir in the heavy cream a little at a time and moisten the dough. You may not need the entire quantity. 
Gently pat to a circle about 3/4" thick and use round biscuit cutters to cut them out. 
Gather the remaining dough to get some more. 
Dip the rounds in the melted butter and place on the prepared baking tray. Sprinkle sugar and bake for about 15 mins till they become puffy and golden in colour. 
Allow to cool.
Split shortcakes in half and spread whipped cream and prepared cherries. Top with some more. 


Happy Shortcake Indulging
Amrita

Monday, 3 March 2014

Linzer Cookies


Time and again I get into this phase where I do not get the energy or enthusiasm to write on the blog. Do not get me wrong. I do not stop experimenting and clicking pictures of the food that we eat. It is just that, you feel stuck at times and want some time to get out of it and share again. I have several recipes waiting in my drafts that I really want to share, some experiments that went surprisingly well, some grandma recipes that I relish everyday and also some recipes that failed.
So here I am back again sharing a recipe that I tried as part of our monthly challenge at Baking partners. February is the month of romance and the perfect month to put your hands on some warm and fuzzy bakes. I, as usual, reduced the recipe to suit our little family of three. 
Linzer cookies are famous all around the world and are pretty easy to make. All you need to do is make the dough and cut out shapes and bake. It is then sandwiched with jam. 
Let me confess that I have never liked jam in my life. I mean, I am the kind who hates the widely loved butter and jam sandwich. Therefore I bought a small pouch of jam good enough to just sandwich these cookies. To my surprise Vaanya, my almost three year old daughter, loved it immensely. She kept licking the jam so very sweetly and I as a mother was so happy to see it. 


These cookies were a winner at my home. In fact, I had to hide one sandwiched cookie for Vishal, as Vaanya and me were very quick to finish them. Truly a perfect Valentine treat for 14th February which also happened to be our 4th Marriage Anniversary this year.


Recipe source : Swathi Iyer, Adapted from the book by Alice Medrich, Chewy, Gooey, Crispy, Crunchy


Ingredients : I reduced the recipe by ¼ to yield 4 sandwiched cookies.

  • ¼ cup All purpose flour
  • 2 tbsp ground almonds, blanched and powdered (see notes)
  • 3 tsp granulated sugar
  • Pinch of salt
  • ¼ tsp cinnamon powder
  • 1 tbsp butter, room temperature
  • A drop of almond extract(optional)
  • ¼ tsp grated lemon zest
  • Mixed fruit jam (or any other of your choice)
  • Icing sugar for dusting


Procedure:

Combine flour, ground almonds, sugar, salt, cinnamon powder, almond extract, lemon zest in a bowl.

Add butter and mix well till the mixture comes together as a ball. (If required, add little milk)

Flatten the dough ball and wrap it with clingfilm. Refrigerate for 2 hours or overnight. You can even keep it upto 3 days. The dough can be freezed for 3 months.
Before rolling the cookies, allow the dough to come to room temperature. 

Preheat oven to 170 degree Celsius.

Take out the dough and roll it 1/8” thick.

Cut out 8 round shape with a cookie cutter. I used my 2” round cookie cutter.

You can use scraps and roll it again to cut shapes.

Cut out a heart shape in the middle of 4 round cut outs.

Line and grease a baking tray and place the cookie cut outs. Refrigerate for 15 minutes to firm up the cookies.

Bake for 20-25 minutes or till the cookies have browned well.

Allow to cool.

Spread a layer of jam on the round cookie and sandwich with the heart cut out. Sprinkle the icing sugar on top.


Notes
  • Blanch almonds by dropping them in boiling water for 5 minutes. Strain and dry them on a kitchen towel. Dry roast on a pan or in the oven till just about dry, for 3-4 minutes. Do not let them brown.  Then grind them to a powder along with a tsp of sugar. 
  • You can use any other shape of cookie cutter, though round is more traditional. 
  • Try with any other flavour of jam.
Happy cookie making
Amrita

Wednesday, 22 January 2014

Kofieebroodje/Dutch Coffeee buns


Time of the month when I am always rushing to finish off the bakes in the challenges that I am a part of. One such event started by Swathi called the Baking partners is one such challenge I always love to attempt, sooner or later. There is so much that I have learnt and experimented in baking just by being part of this incredible group.
Having spent a relaxed holiday in Allahabad, it has been indeed a little difficult to get back to baking and blogging and hence my delay in this month's challenge. This month 2 recipes, a Dutch Apple tart and Dutch Coffee buns which are also called Kofieebroodje were suggested by Kaveri Venkatesh. I was naturally intrigued by the name and expected a good amount of coffee in the bake. To my amazement, there was no mention of it and I very confidently asked Kaveri to rectify the mistake. That is when I was told that these buns are called so as the Dutch love to have them with their cup of Coffee. With Swathi's permission who is always open to experimentation keeping the original recipe spirit in mind, I decided to add some coffee in the  filling. 
Since the original recipe asked for the usage of vanilla pudding which is easily available abroad, many members decided to make their own custard. I went the cheat's way and used the readily available vanilla custard powder in our country and added some coffee to it. 
The outcome was very pleasing and I was happy to create the yummy coffee custard in a jiffy. The original recipe calls for raisins which I have substituted with toasted almonds to go with my Coffee buns. 
This is such a  super simple recipe which yields amazingly   soft buns. Flavour them to your liking, making them sweet or savoury and it will become a keeper recipe for sure.


Recipe Source: The Dutch Table

Ingredients : I used 1/3 of the recipe to yield 10 such buns

  • 1 cup all purpose flour
  • 3/4 tsp instant yeast
  • 1/3 cup lukewarm milk
  • 1 tbsp butter, room temperature
  • 1 1/2 tbsp sugar
  • 1/4 tsp salt
  • 10 almonds, peeled and toasted
  • 2 tsp vanilla custard powder
  • 1 tsp coffee powder
  • 1/2 cup milk (for the custard)
  • 2 tbsp sugar (for the custard)
Procedure : 
In a bowl, add flour, salt, sugar and yeast and mix. 
Add butter and mix.
Add milk little by little and knead the mixture to a smooth dough. If required add a little more milk.
Transfer the dough to an oiled bowl and turn the dough to cover it with oil on all sides. 
Cover with a damp muslin cloth and allow to double in size for an hour or two in a warm place. 
Meanwhile, make the custard which will be used as a filling.
Take 1/2 cup milk and boil it. Add 2 tbsp sugar to it.
Dilute vanilla custard powder with a little cold milk or even water and add to the boiling milk. Stir well to avoid any lumps.
Dilute 1 tsp coffee powder in some warm milk and add to the custard. Mix well and as soon as the mixture thickens, remove it from gas.
Allow to cool.
Prepare the almonds by dropping them in some boiling water for about 4-5 minutes. 
Remove from heat and drain them.
The skin will now come off very easily just by pinching the ends.
Allow the almonds to dry for some time on a kitchen towel.
Dry roast them on a pan or in the oven.
Allow to cool and chop them in pieces.
Once the dough is ready, roll it roughly to a 9x9" square. 
Spread the coffee flavoured custard all over leaving 1/2" on all sides.
Sprinkle the chopped toasted almonds on it. 

Roll it into a cylinder and cut 1" equal pieces out of it.


Cover them and allow to proof for 30 minutes.
Preheat oven to 180 degree Celsius.
Place the rolls on a lined and greased baking tray and brush them with some milk.
Bake for 25-30 minutes or till the buns brown well.
Brush the buns with some butter as soon as they are out of the oven.
Enjoy them warm with a cup of coffee.


Notes:

  • You may use any other flavouring for the custard or simply use the variety of custard powders available in the market.
  • Add your choice of nuts in it or you may even avoid it.
  • For a richer taste, you may make the custard in cream instead of milk.

Happy Coffee buns relishing
Amrita

Monday, 23 December 2013

Bûche de Noël/Yule log


Its Christmas and I am with family in Allahabad. For days together, me and Vishal have been shopping for gifts in Kolkata trying to find suitable ones for each and everyone. The run down to Christmas has been so much fun. Very sadly, the only person not with us on Christmas will be Vishal. He will join us for the New Year cheer but we will miss him terribly at Christmas. Distance makes you realize how much we take each other for granted. Vaanya, our daughter, has been missing her Papa and remembers him from time to time. 
My baking run down to Christmas is the traditional Yule log which also happened to be our December month challenge at Baking partner's suggested by Tanushree Khandai of Ma Niche. With a host of recipes to choose from, I decided to put my hands on the easiest sounding one. I have adapted the recipe to suit availability of ingredients and personal taste. This yule log is a basic sponge cake slathered with dark chocolate ganache and frosted with it too. I tried my hands on the meringue mushrooms for the very first time and completely loved the experience. The cake was a hit at home and got over in no time. 
This recipe is also shared in my 'Sweet day' list to celebrate the most beautiful date of our lives -24, the day Vaanya was born and brought unlimited love and joy to our lives. 
Yule log/Bûche de Noël (BOOSH duh noh EHL) is a traditional cake which signifies the celebration of winter solstice by burning a wooden log in the hearth. This cake is made to look like a piece of bark with meringue mushrooms and marzipan leaves thrown around. 


Ingredients: For 6-7 servings

Sponge cake:
  • 2 eggs, separated
  • 1/4 cup sugar, powdered
  • 1 tsp vanilla extract
  • 1/2 cup all purpose flour

Filling and Frosting:

  • 145 gm chocolate, chopped
  • 1 cup cream (I used Amul)
  • 1 tbsp butter
Meringue Mushroom:

  • 1 egg white
  • 1/4 cup sugar, powdered

Procedure : 

Sponge cake:
Preheat oven to 180 degree Celsius. Grease and line a jelly roll pan. 
Take egg whites in a clean bowl and whip with an electrical beater for 3-5 mins till you get soft peaks. Now add sugar in batches and keep whipping till stiff peaks form(5 mins). 
Take egg yolks in another clean bowl and whip for 5 mins till they are pale coloured. (I used the same electrical beater). Stir in vanilla essence. 
Pour egg yolks over the egg whites and very gently fold them in till just combined. Do not beat vigorously as that will remove all the air bubbles from the eggs.
Fold in flour little by little in the form of rain and gently incorporate in the batter till just combined. 
Pour batter in the prepared pan and bake for 10-15 mins or till a toothpick inserted in the middle come out clean.
Invert the cake on a damp towel and roll the cake immediately(along with the towel). Allow to cool.
  
Filling and frosting:
Take cream in a pan and bring it to a boil. Remove from heat and add chopped chocolate and butter and mix well till the chocolate dissolves. Keep aside.

Meringue Mushroom :
Preheat oven to 100 degree Celsius and line a baking tray with aluminium foil. 
Take egg white in a bowl and beat with an electrical beater. Add a tbsp of sugar at a time and keep beating till soft peaks form when the beater is raised. Beat till all the sugar is added and you get stiff peaks. 
Fill a piping/ziplock/plastic cone with it and snip off the end. Make round shaped as in the mushroom caps with half the quantity and stems with the other half. For the stems, hold piping bag perpendicular to the baking sheet and squeeze 3/4" high cone which is wide at the base and narrow at top.
Bake for 30 mins or till firm and with a sharp knife make a small hole in the underside of each mushroom cap and insert the stem. Place mushrooms caps down and return in the oven for 10 minutes or till dry.
Store in an airtight container.

Assembly
Remove the towel from the rolled cake and spread the cake. Spread the filling generously and re-roll the cake. Do not worry if there are any cracks. 
Cut an angled slice of cake from one end and keep on the side of the cake 
Frost the entire cake and allow to set.  
Using a fork draw lines on the frosting to resemble a bark.
Arrange the meringue mushrooms on sides and top and dust with little cocoa powder to resemble dirt. 


Sending this recipe to 'Kolkata Food Blogger's ongoing baking event 'Baking Palooza 2013'

Merry Christmas
Amrita 

Saturday, 19 October 2013

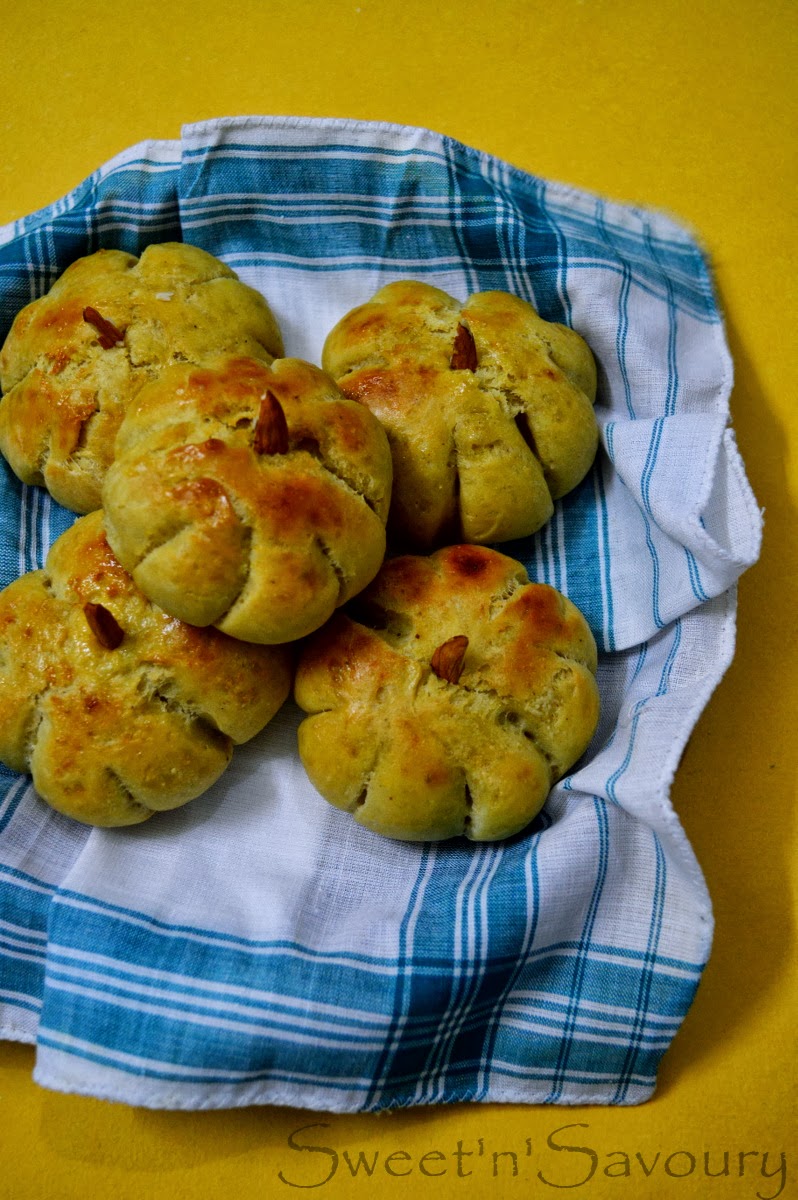
Pumpkin shaped dinner rolls


Baking Partner's challenge for this month was bread bake with pumpkin puree to celebrate the month of Halloween which falls on the 31st of October. 
A famous festival, primarily of the western world, Halloween is synonymous with the use of Pumpkin and is a day dedicated to remembering the dead, including saints (hallows), martyrs, and all the faithful departed believers.
Last year we baked a batch of very yummy Pumpkin choco-chip muffins which to my surprise turned out a complete winner. I was very apprehensive to use puree of the pumpkin we get here in India but to my delight the muffins were soft and delicious.
Therefore, this year, I was very sure to go ahead and use homemade Pumpkin puree which is simply boiling some pieces and then making a paste of it in the grinder. I decided to make little dinner rolls out of it and keeping the spirit of Halloween in my mind, I shaped them as tiny pumpkins. 

Recipe suggested by Tamy of 3 sides Crazy from King Arthur flour
 
Ingredients: I reduced the recipe by 1/4 to get 7 dinner rolls
  • 2 tbsp warm water
  • 1 tbsp warm milk
  • 1/2 tbsp yeast (I used Instant yeast)
  • 1/2 egg, beaten lightly
  • 1/4 cup+2 tbsp pumpkin puree (Boil pumpkin pieces in the pressure cooker with 2-3 whistles and allow to cool. Squeeze out excess water and puree in the grinder)
  • 1/2 tbsp vegetable oil
  • 1 1/2 cup+2 tbsp all purpose flour
  • 2 tbsp brown sugar
  • 1/2 tsp salt
Procedure :
In a large bowl, stir in 1 cup all purpose flour, yeast, salt, brown sugar, pumpkin puree, vegetable oil, egg, milk and water and mix well.
If using active dried yeast, stir in yeast into water and  allow to get rest for 10 mins or till it gets foamy.
Gradually add the remaining flour, a little at a time. Turn the dough on a floured surface and knead till you get a smooth and elastic dough for about 5 minutes. 
Transfer the dough to a well oiled bowl and turn it in the bowl to coat all sides. Allow to double in volume for about 1 hour in a warm place. I usually cover the bowl with a damp muslin cloth and put the bowl in the microwave to allow to rise.
Divide dough into 7 equal portions and roll each to a round.
With a knife make 8 little cuts, not all the way through.
Shape with your hand to plump them up like a pumpkin.
Make an indentation in the middle with your little finger.
Place on an aluminium foil lined baking tray.
Cover with a damp muslin cloth and allow to rise for 20 mins.
Brush the tops with a milk-cream mixture. 
Meanwhile, preheat the oven to 180 degree Celsius. 
Bake for 20 minutes or till the tops brown well.
Apply some butter on top as soon as they are out of the oven.
To complete the pumpkin look, place a slice of almond on top.


Happy Pumkpin shaped dinner roll eating
Amrita

LinkWithin

Related Posts Plugin for WordPress, Blogger...