Showing posts with label Cream. Show all posts

Thursday, 29 September 2016

Doodh wali Tori/Turai/Jhinge/Ridge gourd


While growing up, I had no interest in food. I was too caught up with my love for music, needle work and everything else but food. Therefore, I never entered the kitchen but to seldom chop some onions for my mom. It was perhaps in those rare visits to the kitchen that I subconsciously picked up few recipes and techniques of cooking. Visual learning is pretty mighty, I discovered later in life. When I began my tryst with kitchen affairs, I would recall all of that and put them to experiment.
My Great Grand Father had come to Calcutta from Punjab and had set up his transport business. Living in Calcutta, my Great Grand-mother, my Grand-mother and then my mother adopted the local produce and used them in our typical Punjabi recipes. For example, we put the raw Papaya into our Parantha's and made a new avatar which nobody in Punjab is aware of. The raw banana found its way in our style of Kofta curry and the humble Jhinge/Ridge gourd found itself in a creamy milk and cream gravy.
This week, at Kolkata Food Bloggers the theme of our ongoing series of event is "Family Signature Recipes" where Debjani Chatterjee Alam is the featured blogger who blogs from Debjanir Rannaghar. For this event, I decided to share our family favourite recipe of Doodh wali Tori/Ridge gourd. 
A super simple way of cooking the ridge gourd and then simmering it in milk and finishing up with some cream to give it a delicious creamy avatar. At home, at times, we make this dish with more milk and then dunk in small pieces of Roti and chopped onion to make it into a one bowl dish. 
Do try this rather amusing and simple dish of Tori/Jhinge/Ridge gourd and pair it with your Roti/Parantha and some onions.


Ingredients : For 2 servings
  • 4-5 Tori/Turai/Jhinge/Ridge gourd
  • 1 medium size onion, chopped
  • 3-4 cloves of garlic, chopped
  • 1-2 green chilly, chopped
  • 1 tsp cumin seeds
  • salt to taste
  • 1/4 tsp turmeric powder
  • 1/2 cup milk
  • 2 tbsp cream
  • 1 tbsp oil
Procedure : 
Peel and chop tori/ridge gourd.
Take oil in a pressure cooker and add cumin seeds. As they start spluttering, add chopped garlic, green chilly and onion. Let it cook for 2-3 minutes or till the onion becomes slightly brown. 
Add turmeric powder and salt and stir it well.
Add the chopped tori/ridge gourd and mix again.
Put the lid of the pressure cooker and allow 3-4 whistles on medium heat. 
Let the pressure release on its own.
Take a kadai/deep pan and add the cooked tori/ridge gourd. On medium heat, evaporate the excess water from the cooked tori. 
Now, add milk and let it cook on medium heat for 5-10 minutes or till the milk reduces to a required consistency. 
Finish off the dish by stirring in cream.
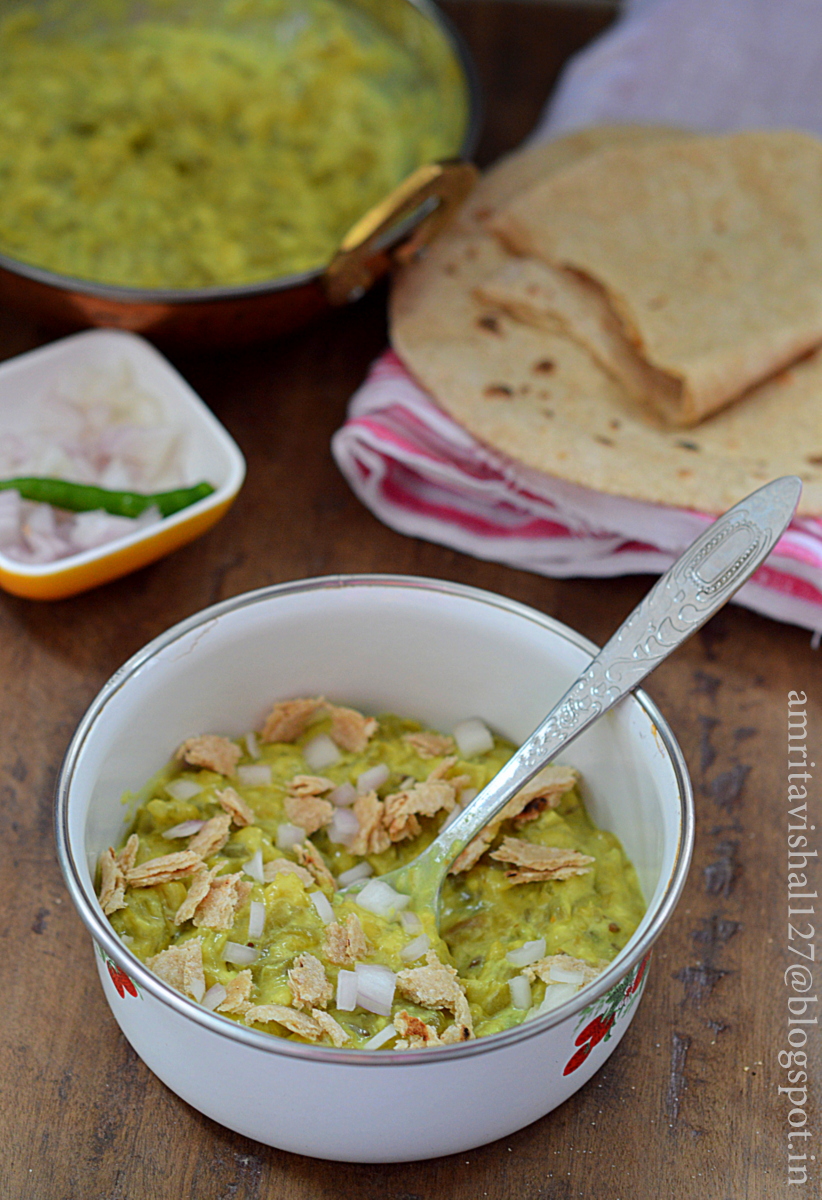
Our family favourite one bowl dish with small pieces of roti and chopped onions in the Doodh wali Tori/ridge gourd 

This recipe is part of KFB's ongoing event where Debjani is the featured blogger who blogs from Debjanir Rannaghar


Happy family recipe enjoying
Amrita

Sunday, 31 July 2016

Chocolate mud cake with SMBC frosting


It was time of the year to bake a cake again and I jumped on the opportunity to try my hands on some techniques I have never tried before. It was my dear Husband's birthday on the 27th of this month and more than us, our daughter Vaanya was super excited about the celebration. The cake was attempted keeping Vaanya and her fetish with pink in mind. And boy, how elated she was to look at it. 
I had seen a similar image of a cake on Pinterest one day and had decided to attempt it. With the D day nearing, I pushed myself out of a lazy slumber and bought the necessary equipments and ingredients. The cakes were baked a night before and while they got baked in batches, I made the icing. The cakes were cooled, stacked with the icing in between and given a crumb coat. Next morning, I gave all the finishing touches to the cake while my daughter was away at school. The cake was dressed up in a pink drip and adorned with buttercream flowers. I knew Vaanya was going to love all the pinkness.  
The day was spent in a long drive to the highway and once we came back home in the evening, Vaanya was eager to have the cake cut. The day came to an end with the cake cutting, eating cheer and laughter. May God bless us with such beautiful moments forever.


Chocolate Mud cake 

Recipe source : Cocawind

My notes : 
  • I halved the recipe and then pour the batter in two 6" round pans.
  • Baked them at 180 degree Celsius for 20-25 mins. 
  • Made other half of the recipe and repeated to yield four 6" round cakes.
  • Trim tops so that all are equal.
Swiss Meringue Buttercream icing (SMBC) 

Recipe source : Here

My notes : 
  • I followed the recipe to the T
  • Separated 3/4 of the icing and kept separate for frosting the cake.
  • Added pink food colour till I achieved the desired colour and frosted each cake layer with it. 
  • Once all the layers were stacked, I frosted the outside and refrigerated to set. I kept mine overnight. You may keep for 3-4 hrs.
  • With a glass of hot water and an offset spatula, give the cake a final frosting finish. Every time dip in the hot water, wipe your spatula and try and give a neat finish to the frosting. 
  • Refrigerate

Pink Drip : 

Take equal quantity of white chocolate and cream. Heat cream and add chopped white chocolate to it. Stir it well. Add little milk to make it a little runny. Add pink food colour. 
Take spoonfuls of the drip and pour on the edge of the frosted cake, all around. Now fill the top of the cake with the drip too. Refrigerate.


Buttercream flowers

To the rest of the SMBC icing, divide into 4. Colour pink to one part, purple to another, green to the third and leave the 4th as it is. 
Pipe pink icing to a piping bag with a Rose petal nozzle and pipe flowers over a piece of butter paper and over a flower nail. Once done, transfer the piece of butter paper to a flat plate and refrigerate.
Repeat same with purple flower.
Watch here 
Pipe some of the icing(not coloured) over the top of the cake, half an inch behind from the outer diameter. 
Peel the flowers from the butter paper and put on the cake. Arrange it the way you want.
Pipe the leaves with a leaf nozzle.
Refrigerate.


Happy Cake decorating
Amrita

Tuesday, 19 July 2016

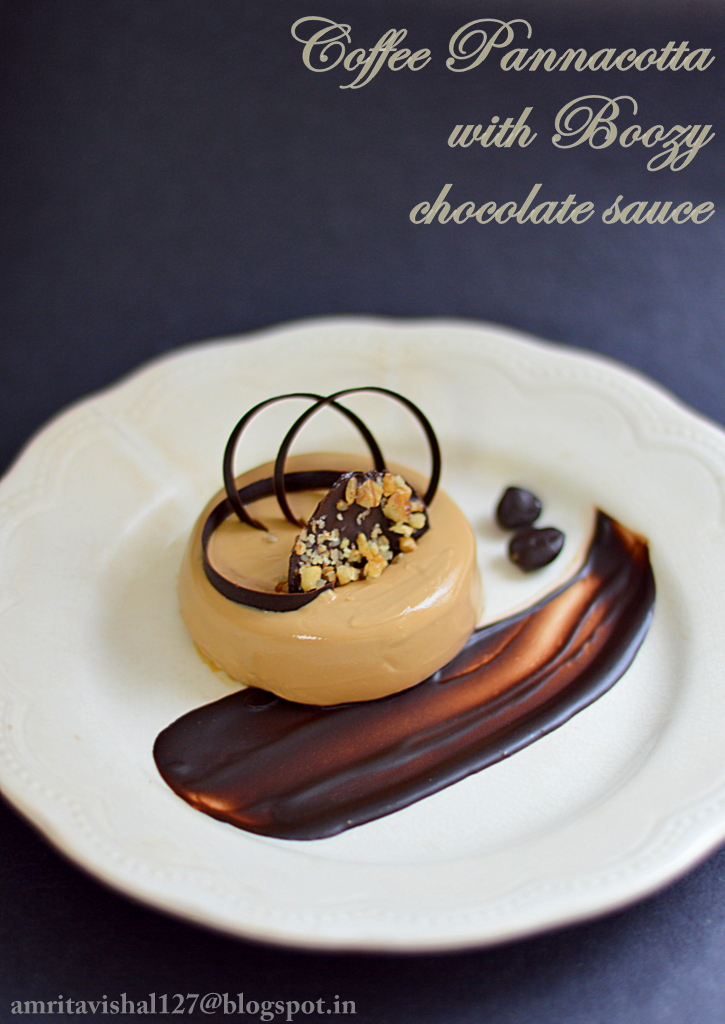
Coffee Pannacotta with Boozy Chocolate sauce


Its our 'Blogger of the week' time and this week features the founder of our group Kamalika Chakrabarty who blogs from Silence sings. Her theme for this week is Chef's Challenge and each member is supposed to make a dish inspired from their favourite chef. 
A little lost in the beginning, I found my answer in Nigella Lawson's Coffee pannacotta with chocolate sauce shown on Masterchef Australia. The moment I saw it, I knew I was making it. And thus I started with making a homemade version of Coffee liqueur (blogpost coming soon next). As usual, I modified the quantity and adjusted it to 2 servings. The original recipe has a more pouring consistency of the chocolate sauce but I have made mine a little thicker for my plating idea. I designed the plate with a little piece of crunch from a chocolate walnut disc and some chocolate rings. 
This dessert is rich, decadent, extremely delicious and a must try for coffee lovers.


Recipe source: Nigella Lawson 

Ingredients : Serves 2
  • 1/2 cream (I used Amul cream)
  • 2 tbsp sugar
  • pinch of salt
  • 1 tbsp instant coffee powder 
  • 2 tbsp water (for dissolving coffee)
  • 3/4 tsp gelatin powder
  • 1 tbsp cold water (for blooming gelatin)
Boozy Chocolate sauce:
  • 50 gms dark chocolate, chopped
  • 2 tbsp coffee liqueur

Procedure : 

Coffee Pannacotta:
Take 1 tbsp cold water in a small bowl and add gelatin powder to it. Mix well and let it bloom for 5 minutes. The gelatin will become spongy. 
Heat 2 tbsp water in a pan and add the coffee powder. Add sugar and stir till it dissolves. 
On low heat, stir in cream. Add salt. Mix well.
Remove from heat and stir in the gelatin. Mix well so that the gelatin dissolves. 
Sieve the mixture to attain a smooth texture and allow it to cool. 
Pour the mixture in desired bowls and refrigerate for 3-4 hrs or till set. 

Boozy Chocolate sauce :
Take coffee liqueur in a pan and boil it. Add chopped chocolate to it and stir well. Remove to a bowl and allow to cool.

Garnish

Chocolate rings : Melt dark chocolate over a double boiler and spread a spoonful on a sheet of acetate with a spatula. Use a pastry comb to make lines through the chocolate. Roll the acetate sheet gently and secure ends with some cello tape. Allow to cool completely. Remove the cello tape gently and take out the curls carefully. 

Chocolate coated coffee beans : Melt some dark chocolate and dip whole coffee beans in it. Remove on a piece of parchment paper and allow to set.

Chocolate walnut disc : Melt some dark chocolate and spread like a circle on a piece of parchment paper. Roughly crush a walnut and sprinkle on the chocolate. Take a small circular cutter and make an impression on the half set chocolate. Allow to cool completely. Remove carefully to get the chocolate disc.

Plating
Take a spoonful of the boozy chocolate sauce and spread it on the plate with the help of a spoon.
Dip the pannacotta mould in little hot water for few seconds and gently remove the pannacotta. Place it on the plate. 
Insert the chocolate walnut disc and the chocolate rings on the pannacotta. 
Place the chocolate coated coffee beans on the plate.

Note : 
  • You can make a chocolate sauce without the liqueur by substituting it with cream. 
  • Taste the pannacotta before setting in the mould for sweetness and add more sugar if required.
This recipe is part of Kolkata Food Bloggers  ongoing event Chef's Challenge where Kamalika Chakrabarty is the featured blogger of the week who blogs from Silence sings


Happy relishing
Amrita

Saturday, 25 June 2016

Lychee pannacotta with Ginger biscuit crumb and Coconut lemon curd


I am back to crazy 'Masterchef Australia' watching days. With the current season going on at number 8, I realized that I have missed many seasons in between my first tryst with the series. It all started with series 2 and I remember those days when Dinner was finished by 9 PM so that I could indulge in some non-stop gastronomic ride. My baby, Vaanya was then just few months old and needed attention all the time. Vishal and me would take turns to look after her while we eagerly watched each episode very religiously. 
This season my interest got rejuvenated and I have been ogling and drooling at all the artistic desserts that have been put up. Plating is the key in making even a simple dish shine and stand out in front of complex ones. With all this in my mind, I decided to try my hands in a simple dessert with different elements and a pretty plating technique. Firstly, I decided to hero the fruit-Lychee and pondered on all the other components which can go along with it. In terms of flavours, I decided to pair my lychee with ginger and coconut. So, the idea of ginger biscuits crumb and a coconut lemon curd came into my mind which sounded like a perfect harmony to my lychee pannacotta. 
I used some thickened grape juice to brush the plate and then very patiently decorated all the components on it. My over excitement led me to try 2 different platings with the same dessert. I am super mighty happy with the outcome. Do share your thoughts on the dessert. Will mean a lot to me. 


Components : 
  • Lychee Pannacotta
  • Ginger biscuit crumb
  • Coconut and lemon curd
  • Reduced grape juice
  • Fresh lychees
  • Mint leaves
Ingredients and Procedure

Lychee Pannacotta : 
  • 1 cup cream (I used Amul)
  • 9-10 lychees, peeled and deseeded
  • 2 tbsp sugar, powdered
  • 1 1/2 tsp gelatin powder
Blend the lychees in a mixer and strain.
Bloom gelatin in 1 tbsp cold water and allow it to get spongy for about 5 minutes.  
Heat cream and sugar on medium heat and add the pureed and strained lychee mixture. Do not let this mixture boil. 
When the mixture is warm enough to touch, add the bloomed gelatin and mix well. 
Pour in moulds of your choice. I chose my small spherical moulds and some silicon cupcake moulds. 
Refrigerate for 4 hours.

Ginger Biscuit : 
  • 1/2 cup all purpose flour
  • 4 tbsp brown sugar, powdered
  • 25 gms butter, room temperature
  • 1/4 tsp baking powder
  • 1/4 tsp baking soda
  • a pinch of salt
  • 2 tsp dry ginger powder
Beat butter and sugar till light and fluffy.
Add baking powder, baking soda, dry ginger powder, salt to all purpose flour. 
Add flour mixture to butter-sugar mixture and mix well.
Knead the mixture to a dough and cling wrap it. 
Refrigerate for 1 hr.
Preheat the oven to 180 degree Celsius.
Roll the dough and cut round shapes from it.
Place on a baking paper lined baking pan and bake for 15-20 minutes. 


Coconut and lemon curd : 
  • 1 egg yolk
  • 2 tbsp powdered sugar
  • 25 gms butter, cut in cubes
  • 1/4 cup coconut milk
  • 1 tbsp lemon juice
Take egg yolk and sugar in a bowl and put on a double boiler on low heat. 
Keep stirring the mixture.
Add butter cubes and mix well.
Add coconut milk and stir till it thickens for about 3-4 minutes.
Finish with adding lemon juice and mix well.
Allow to cool and then transfer to a piping bag. 

Plating : 
Brush your plate with the reduced grape juice which is made by simply putting grape juice in a pan and heating it till it thickens. 
Crumble the ginger biscuits and put them on the plate in a round shape, a little bigger than the pannacotta size.
Demould the Pannacotta and gently put on top of the ginger biscuit crumb. 
Add some fresh peeled and deseeded lychees.
Pipe the coconut lemon curd in intervals and finish with arranging fresh mint leaves. 


Happy Masterchef Inspirations
Amrita

Saturday, 22 August 2015

Opéra Cake


Birthdays are a special day in my household for more reasons than one. For the baker in me, it is a day to put my hands on a long awaited cake that has been on my list for a long time and that finally gets to see the light of the day. With my husband Vishal's birthday falling on 27th last month, I needed to try a rather special cake. And so it had to be the coveted Opera cake, the French classic cake which I have been scared to try because of the sheer number of elements it has. 
The Opera has an equally amazing history too. Story goes that in 1955 French pastry chef Cyriaque Gavillon, working at the legendary Dalloyau shop in Paris, invented the Opera while wanting to create a cake with complex layers in terms of texture and taste. His wife, Andrée,  told him that it reminded her of the famous Paris Opera house, which eventually was the name given to the cake. 
Another story goes that the cake was invented in the Paris Opera to help people stay awake through the final acts of the lengthy shows being heavy coffee laden. 
An Opera cake consists of thin layers of almond sponge called Jaconde which is moistened with a coffee syrup and is then sandwiched with layers of coffee buttercream and chocolate ganache. The cake is then topped with a chocolate glaze. Traditionally the cake is adorned with a edible gold leaf and has the word 'Opera' piped on it.
This cake was even more special and was the right choice for Vishal's birthday as both me and Vishal are ardent fans of music. We love to spend our time singing songs while Vishal strums his Guitar. Music is the key to our hearts and holds us close together. 
The cake turned out a winner as everyone who got to taste it loved it. Being very critical about my own cakes, I found the sponges a bit over soaked but that was not an issue with anyone else.
My over excited daughter was much more eager about her Papa's birthday and made a very sweet card for him. 


Recipe adapted from : Joe Pastry

Ingredients and Procedure

Jaconde (Sponge cake)
  • 3 egg whites
  • 2 tbsp granulated sugar
  • 1/2 cup almond meal
  • 1/2 cup powdered sugar
  • 3 eggs
  • 1/4 cup all purpose flour
  • 1 tbsp clarified butter, melted
Preheat oven to 200 degree Celsius.
Grease and line a jelly roll pan 28X21 cm with baking paper and then grease it again.
Take egg whites in a bowl and whip till soft peaks. Add granulated sugar and beat again till stiff peaks. Keep aside.
Take whole eggs and almond meal in a bowl and beat till light and foamy for about 3 minutes.
Add flour and mix.
Incorporate the egg whites in 3 additions carefully with gentle mixing. 
Fold in the melted clarified butter.
Pour batter in the prepared pan and spread with a spatula.
Bake 8-10 minutes.
Cool and flip it over baking sheet. Carefully peel the baking sheet and keep aside.
Can be refrigerated for a day. 

Coffee Buttercream
  • 3 egg yolks
  • 1/2 cup powdered sugar
  • 2 tbsp water
  • 1/2 tsp vanilla extract
  • 200 gms butter, at room temperature
  • 1 tbsp instant coffee powder
  • 1 tsp hot water
Dissolve coffee powder in hot water and keep aside.
Take egg yolks in a bowl and whip for 5 minutes.
Prepare sugar syrup by combining sugar and water in a saucepan and allowing the sugar to melt. When the mixture starts bubbling, remove from flame and pour the syrup in a steady stream over the egg yolks while beating continuously. 
Add the butter and vanilla extract and whip together. 
Add the coffee mixture and mix. 
Refrigerate for further use.
Can be made a day in advance.

Chocolate Ganache : 
  • 1 cup chopped dark chocolate
  • 1 cup cream (I used Amul )
Heat cream in a pan. Take care not to scald it.
Remove from heat and add the chopped chocolate. Mix well and keep aside.
Can be refrigerated.

Coffee flavoured cake syrup : 
  • 1/2 cup water
  • 1/4 cup sugar
  • 1 tbsp instant coffee powder
Dissolve sugar in hot water and add coffee powder.
Cool and keep aside.

Chocolate glaze : I made a ganache instead of the traditional tempered chocolate topping
  • 1/2 cup chopped dark chocolate
  • 1/2 cup cream
Heat cream and add chocolate. Stir and mix well.
Keep aside.

Chocolate writing : 
Melt a little chocolate and add few drops of vegetable oil to it. Mix well and put in a piping bag and use. 

Assembly : 
Cut the Jacondes in half(to get 2 rectangles).
So you have 4 layers Jaconde sponge.
Take a layer and apply coffee syrup. 
Apply layer of ganache.
Apply coffee buttercream layer.
Put another sponge and apply coffee syrup.
Repeat with ganache and coffee buttercream with all layers till the top.
Pour the chocolate ganache on top. 
Let it firm up in the fridge.
Trim edges from all sides to show the neat layers.


Happy Opera Relishing
Amrita

Friday, 18 July 2014

Cherry Shortcake


PhasesWe all get into it. Taking a break from the usual mundane thing that you do. At times even taking a step back from your most favourite thing. Changing the way you think (at least trying to). Looking things in a different light. We all have phases. I have this theory that we keep changing. Not only in our physical appearances but also in our thought processes. We keep running in and out of different phases throughout our lives.  
With all my ranting above, its time to admit that I have been in this phase of ignoring the baking groups that I have been a part of for the last 4-5 months. The basic reason for joining these groups was to bake along with equally passionate bakers and have the opportunity to experience new bakes. And I have learned so many new techniques and such a variety of amazing bakes. 
I finally decided that it was time to come out of my phase and pull up my lazy socks. A great way to start was to bake this month's challenge before anyone else did. Baking Partners challenge for this month was suggested by Reeni of Cinnamon spice and everything nice who encouraged us to try Berry Shortcakes. I noted down the recipe the moment it was shared (yes, I maintain a hand written diary) and decided to use cherries instead of the fancy blueberries, blackberries, raspberries suggested since we do not find them here. You can use any fruit in place of the berries like the way I used cherries. Summery stone fruits like plums, peaches will work great with this recipe. 
The shortcake is a really simple recipe and uses very easily available ingredients. You will require some whipped cream to fancy it up and that all about it. 


 Ingredients : Yields 3-4
  • about 50 gm cherries
  • 2 tsp + 1 tsp sugar
  • 6 tbsp all purpose flour
  • 2 tbsp cornstarch
  • 3/4 tsp baking powder
  • 1/4 cup heavy cream
  • 12 tsp melted butter
  • 1/2 cup whipped cream


Procedure : 
Pit the cherries by removing the seed and then chop in halves. Toss 1 tsp sugar with the cherries and keep aside. 
Preheat oven to 200 degree Celsius. Line a baking tray with aluminium foil.
In a bowl, sift all purpose flour, cornstarch, sugar and baking powder. Stir in the heavy cream a little at a time and moisten the dough. You may not need the entire quantity. 
Gently pat to a circle about 3/4" thick and use round biscuit cutters to cut them out. 
Gather the remaining dough to get some more. 
Dip the rounds in the melted butter and place on the prepared baking tray. Sprinkle sugar and bake for about 15 mins till they become puffy and golden in colour. 
Allow to cool.
Split shortcakes in half and spread whipped cream and prepared cherries. Top with some more. 


Happy Shortcake Indulging
Amrita

Friday, 23 May 2014

Surprise Mickey Mouse cupcakes


Oh Toodles!
Vaanya, my bundle of joy, my angel, turns three today!
It was on this very day that our family was blessed with her. I can vividly remember her pretty pink face and her tiny cherub fingers and toes which made me wonder how did God create such a beauty. With time she grew all the more adorable and has filled our lives with unaccountable happiness and joy. 
This entire month has been all about mickey mouse because it is Vaanya's current fascination. With a mickey toy tucked in her arm she loves to sing and dance to the Mickey mouse clubhouse tune. So naturally, Mickey mouse had to be the  theme for her birthday celebration. 
With her birthday falling in the Summer vacations, it was decided to celebrate it with family in Allahabad and Lucknow. It has been so much fun to see the entire family gearing up to the theme with everyone putting in their ideas and inputs. From invitation cards to the cake, decorations to gift bags it is going to be all about Mickey mouse clubhouse.  
While I was doing my bit of research on the theme, I found these very attractive Mickey mouse cupcakes here. The surprise element in the cupcake with a mickey mouse inside it was fascinating enough to attempt. Though mine did not come out as neat as in the original, it was so much in the spirit of the birthday theme. The free download printables-mickey mouse cupcake wrappers and toppers have made them look all the more adorable. 
More about the birthday celebration in another post. 


Ingredients : For 5 cupcakes

Vanilla part:
  • 1 egg
  • 1/2 cup all purpose flour
  • 1/2 cup powdered sugar
  • 1/2 tsp baking powder
  • 40 gms butter, room temperature (I used Amul)
  • 1/4 tsp vanilla essence
Chocolate part: to make the inside mickey mouse
  • 1 egg
  • 3/4 cup all purpose flour
  • 1/2 cup powdered sugar
  • 1/4 cup +2 tbsp cocoa powder
  • 1/4 tsp baking powder
  • 1/4 tsp instant coffee powder (I used Bru)
  • 40 gms butter
Chocolate ganache icing:
  • 1/2 cup grated dark chocolate
  • 1/2 cup cream (I used Amul)


 Procedure : 

Mickey mouse chocolate part:
Preheat oven to 180 degree Celsius.
Prepare a small baking pan by greasing and flouring it. 
Melt butter in a pan over low heat. Add sugar and mix well.
Remove from heat and allow to cool.
Add egg and mix well.
Sift flour with cocoa powder, coffee powder and baking powder.
Add this to the butter mixture and mix well. 
Pour batter in the prepared pan and bake for 20-25 minutes or till a toothpick inserted in the middle comes out clean.
Allow to cool completely and keep aside for further use.

Vanilla part : 
Preheat oven to 180 degree Celsius.
Prepare cupcake tins by lining them with cupcake liners or just grease and flour them.
Take butter and sugar in a bowl and beat it well it it turns pale and creamy.
Add egg and beat well.
Sift flour with baking powder and mix with the butter mixture. Add vanilla essence and mix. 

Assembly : 
Take half of the prepared chocolate part and crumble it well. (Enjoy the other half with a cup of tea/coffee)
Mix 1 tbsp of the vanilla part with it along with 2 tbsp water.
Ensure that the mixture is of the consistency of a dough. 
Spoon a tbsp of the vanilla part in the prepared cupcake tins.
Now make a small round shape with the chocolate mixture and place it int eh middle, over the vanilla part.
Repeat for all 5 tins.
Make a 2" long cylinder with the chocolate part, join the ends and make it into a circle and place it over the round shape. Repeat the same for remaining tins. 
Top the tins with equal quantity of the vanilla cake batter. 
For more details, please see the video here
Bake for 20-25 minutes or till a toothpick inserted in the middle comes out clean.
Allow to cool. 

Chocolate Ganache icing
Gently heat the cream in a pan over low heat.
Remove from heat and add the chopped chocolate, and stir well.
Allow to cool.
As it cools it will, thicken.
Fill this in a patry bag with a star nozzle fitted and pipe over the cupcakes.
Serve, and surprise.
You will be able to see a mickey mouse from any angle.


Oh Toodles!
Amrita

Sunday, 20 April 2014

Chocolate Vermicelli nests for Easter


Easter is a time for children and adults to indulge in chocolate eggs and other yummy goodies. The custom of giving eggs on Easter is to celebrate new life. The egg is seen as a  symbol of Jesus's resurrection when he rose from the dead. The eggs are thought to be special as they have life within them and are now synonymous with Easter celebrations.
My fascination for festival special sweets is known to everyone with a number of posts on festivity celebrations. Be it Diwali, Holi or Christmas, I love to whip up and create goodies with local ingredients.
I have been wanting to try my hands on these famous chocolate nests which is usually made with noodles or crushed cornflakes. I wanted to Indianize them and present them as an Indian sweet therefore I chose to use roasted vermicelli or sewaiyan for the nests and mould sandesh as little eggs.
After some trials I came up with the baked version which gives a crunchy texture to the nests very much like the vermicelli baklava.
Wishing all our readers a very Happy and Blessed Easter.


Ingredients : For 5 such chocolate nests
  • 60 gms roasted vermicelli/sewaiyan (roughly 3/4 cup of broken vermicelli)
  • 1 tbsp melted butter
  • 1/4 cup melted dark chocolate
  • 2 tbsp cream (I used fresh cream that sets as top layer of boiled milk, you may use Amul)
  • 2 tbsp warm milk
Easter eggs : 
  • 1 cup milk 
  • a pinch of citric acid/1 tsp lemon juice
  • 2 tsp powdered sugar
  • a drop of red, yellow and blue edible food colouring
Garnish:
  • grated milk chocolate


Procedure :

Chocolate Nests
Preheat oven to 180 degree Celsius.
Take roasted vermicelli/sewaiyan in a bowl and crush them.
Add melted butter and mix well with the vermicelli.
Grease a muffin pan or individual muffin tins and spread the vermicelli in the pan.


Put the muffin pan in the preheated oven and bake for 10-15 mins or till you see them brown a little.
Allow to cool.
Take melted chocolate in a bowl and add the cream and milk. Mix it well. 
Dip the vermicelli nests in the chocolate mixture and keep on a plate. Refrigerate for the chocolate to set well. 

Easter eggs
Take milk in a pan and bring it to a boil.
Mix in the lime juice or citric acid and stir till you see the milk curdling and the whey separating.
Turn off the flame and let it stand for 2 mins. Meanwhile prepare a vessel by placing a muslin cloth or use a colander.
Strain the mixture into the muslin cloth. I usually save the whey to use it to knead my dough for roti or use it while boiling dal.
Bring the sides of the muslin cloth together and hang it to drain excess liquid for 20 mins. This is the Chenna.
Take the chenna in a plate and knead it with the heel of your palm for 5-10 mins till you get a smooth and doughy texture. Mix in the powdered sugar and make it into a ball.

Divide into four and add a drop of the red, yellow and blue food colouring to each. 
Mix it well and form small balls out of each colour and then shape into an egg. 
I made red, yellow, blue and white eggs. 

Sprinkle the grated milk chocolate over the nests and place the colourful eggs in the chocolate nests.
  
 
Notes
  • I used readymade roasted vermicelli. You may dry roast the unroasted ones and use. 
  • If you do not want to add chocolate to the nests, add some powdered sugar along with melted butter and then bake. 
  • You may melt the chocolate on a double boiler or in the microwave for about  a minute with 15 seconds bursts.
  • I made a little runny chocolate mixture to coat the vermicelli nests. If you want a thicker coat of chocolate skip the milk and substitute with cream. 
  • If you do not want to add food colours, keep them plain white or add a drop of any fruit crush to get some colour and flavour.
Happy Easter
Amrita

    LinkWithin

    Related Posts Plugin for WordPress, Blogger...