Wednesday, 27 February 2013

Caramelized Onion Tarts

The Pudgy little hands that stole my tart!!
Family time is the best vacation!
A sudden vacation is not exactly what I had planned especially having to travel with a 20 month old baby but the incentive of having to spend some great time with family(and an extra nudge from hubby) made me pack my bags and leave for Punjab and Allahabad. I had a wonderful time in Punjab being pampered by Nani and Masi's, gorged on fresh produce of vegetables and dollops of homemade white butter  on yummy paranthas. Vaanya had a super time bonding with everyone and running around in the extra spacious houses. 

The next part of our vacation was homecoming to Allahabad. Our house is a 'Heaven Haven' for me. A place where I can leave behind all my worries and just soak myself in the luxury of the palatial house and the most beautiful garden. An amazing vegetable patch adds to the charm with fresh and unadulterated veggies being enjoyed everyday. The house was full on our arrival and we had the loveliest time with everyone except Vishal(hubby) who was missed terribly. One of the things I love and look forward to do here apart from relaxing and enjoying the yummiest food made by Amma(mother-in-law) is to bake!! My Baker's fingers jumped on to the recipe that I am sharing today to get warmed up and carry on my love to bake. 
I chose tarts as I love making and eating them and the best part is that once the shell is prepared you can play around with the filling to your liking, making it sweet or savoury.

Ingredients: 

For 6 tarts
  • 1/2 cup all purpose flour 
  • 30 gms butter(cold)
  • A little cold water for kneading
For Filling
  • 2 medium sized onions, sliced
  • 1 tbsp vinegar
  • 1/4 tsp dark soy sauce
  • 1/4 tsp green chilli sauce
  • a pinch of sugar
  • a pinch of salt
For Garnishing
  • tomato slices/pieces
  • coriander sprigs
  • fresh cream/mayonnaise


Procedure:

Tarts:
Take flour and butter in a bowl and rub the butter cubes with the flour till the mixture resembles breadcrumbs (in texture).
Now add cold water 1 tbsp at a time and knead to get a smooth dough. Do not over knead.
Wrap this dough in a plastic sheet and refrigerate for half an hour.
Take out the dough and roll it with a rolling pin on a floured surface. Roll it roughly to the size of the chosen tart tin with 1/8" thickness.

Gently press the dough down so that it lines the bottom and sides of the tart tin. Trim excess dough.
Line all the tart tins the same way. Make holes on the sides and bottom with a fork and refrigerate for another half an hour.
Preheat the oven to 180 degree Celsius. Bake the tarts for 15-20 mins or till they get a light brown colour.
Take them out and let them cool.
 
For a detailed step by step illustration refer here


Filling:
Heat 2 tbsp oil in a pan and add the sliced onions with a pinch of salt. Lower the flame and let the onions cook stirring occasionally till they attain a brown colour. This is called Caramelization where the sugar in the onions oxidizes resulting in a golden brown colour.
Add vinegar, soy sauce, chilli sauce and sugar and stir well.
Remove from heat and let it cool.
  
Assembly:
Take a spoonful of the caramelized onions and fill in the tarts.
Garnish with a drop of fresh cream/mayonnaise, a small piece of tomato and coriander leaf.


The most difficult part in the entire process was taking pictures!! The moment I would try and take a pic, my daughter Vaanya would come to pick one up!!  It was such a difficult task, keeping her chubby pudgy fingers away. Here she is, caught in the act.


Sending this recipe to  Bake fest #16
and Blogoversary event

blogoversary
Happy Tart eating
Amrita

Sunday, 3 February 2013

Green Peas and Sweet Corn soup-quick, simple and zero oil

"It [soup] breathes reassurance, it offers consolation; after a weary day it promotes sociability...There is nothing like a bowl of hot soup, it's wisp of aromatic steam teasing the nostrils into quivering anticipation." 
Louis P. DeGouy, Waldorf-Astoria chef, The Soup Book (1949) 

What is about winter that makes you want good food, comfort and a cozy chatty time with your loved ones? Winter exuberates warmth. Winter makes you want to come back home soon for that lovely bowl of soup. A bowl of soup that is like a kind friend who soothes your cold body and nourishes you.
I spent most of the winter scared of trying my cold hands on making soup though I had planned and bookmarked many. In fact, I took the timid way out and had packet soups!! Can you believe, a food blogger having ready made soups!! Only after you make your first bowl of soup, will you understand how easy, fresh and yummy a homemade soup can be. I must admit that I had another greedy excuse...Sayantani who blogs from the very famous blog A Homemaker's Diary is holding an amazing giveaway. For sharing a winter warmer recipe, a winner will be randomly chosen and will receive a gift voucher of Rs 1500 from Cuponation. 
This soup was a very hurried attempt and may I say turned out amazingly well. It is one of the easiest, no fuss, healthy and no oil soup. It combines winters two most amazing produce-green peas and sweet corns. Another great bit about this soup is the use of whole wheat flour used to combine and thicken the soup.


Recipe Source: adapted from Tarla Dalal
Ingredients: serves 2
  • 1 cup green peas
  • 1/4 cup boiled sweet corn, crushed coarsely
  • 1/2 medium sized onion, roughly chopped
  • 3-4 garlic pods, roughly chopped
  • 1 small green chilly, roughly chopped
  • 1/2 tbsp whole wheat flour/atta
  • salt to taste
  • black pepper powder to taste


Procedure:
Take peas, onion, garlic, green chilly and whole wheat flour in a pressure cooker. Add salt and pepper to taste and add 1/2 cup water. Let it cook for two whistles and remove from heat. Allow steam to escape on its own. 
Meanwhile, crush the sweet corns roughly in a mixer.
With a hand blender, blend the peas mixture in the pressure cooker. Strain the mixture to get a smooth consistency.
Take a deep pan and add the pea mixture. Cook on medium flame for few minutes. Add the crushed sweet corns and mix well. Add water to adjust the consistency of the soup. Bring the soup to a boil and adjust the seasoning to your liking.
Serve with a small dollop of cream and a sprinkle of red chilli and black pepper powder.


Sending this recipe to A homemaker's diary giveaway sponsored by Cuponation  
to Food corner-cook like a celebrity 
and Winter food in 30 mins

Happy Soup making and enjoying
Amrita

Thursday, 31 January 2013

Vadakari-my first for SNC challenge


Challenges!!
Challenges make you re-discover yourself and help you to grow irrespective of succeeding or failing.  Challenges make us realize our own strengths and weaknesses, our likes and dislikes. They help and make us try things beyond our area of comfort. And they certainly are a true test and an eye-opener of our capabilities. 
No wonder you are seeing me soaked in all sorts of food challenges nowadays !! There is a different sense of exhilaration in being able to participate and complete them. The SNC challenge is the newest on my repertoire!! Brainchild of Divya who blogs from you too can cook food, this is quite a novel challenge where we have teams divided into northern and southern. I naturally belonged to the northern team being a Sikh and hailing from the city of joy, Kolkata. Teams are challenged with region specific food and are given a month to complete. This months challenge was given by Ramya who blogs from lemonkurry.
Vadakari was never heard by me lest try it. But being a challenge, it was finally attempted and was such a hit at home. We all unanimously loved the vadas. My husband loved the vadakari which was these same vadas crumbled and put in gravy. My darling daughter all of 20 months munched away to these vadas in glory. 


Ingredients:
Vadas:

  • 100 gms Bengal gram/chana dal
  • 1/2 tbsp fennel seeds/saunf
  • 2 dried red chillies
  • 3 garlic pods
  • 1/2 small sized onion, chopped
  • salt to taste
  • oil for frying
Gravy:

  • 1 1/2 tbsp oil
  • 1/2 tbsp mustard seeds
  • 1/2 tbsp fennel seeds/saunf
  • 1/2" cinnamon stick
  • 1 small onion, chopped
  • 1 small tomato, chopped
  • 1/4 tsp red chilli powder
  • a pinch of turmeric powder
  • a pinch of garam masala powder
  • salt to taste

Procedure:
Vadas:
Soak bengal gram for around an hour. Grind it along with the listed ingredients to a coarse paste. Add water as required but not too much.
Heat oil for frying.
Shape the vada batter into thin small roundels and fry them till they get a nice brown colour.
Eat them as a lovely snack with tea leaving some for the gravy. 


Gravy:
Heat oil in a pan, add fennel seeds, mustard seeds and cinnamon. Add chopped onions and saute for few minutes. Add tomatoes and cook till it leaves oil. Now add turmeric powder, red chilli powder, garam masala and salt. Add some water to get the required consistency of gravy. 
Add the crumbled vadas and adjust the consistency of the gravy as vadas absorb water.
Serve garnished with chopped fresh coriander.
Served usually with rice, idlis, dosa or chapatis. 


Linking this dish to Kolkata Food Bloggers ongoing event 'Kashmir to Kanyakumari'.


Happy Vada/Vadakari eating
Amrita

Tuesday, 29 January 2013

Lasagna Pull Apart Bread - I 'Knead' to Bake!!

“The smell of good bread baking, like the sound of lightly flowing water, is indescribable in its evocation of innocence and delight"
M.F.K. Fisher

Breadmaking is one of those almost hypnotic businesses, like a dance from some ancient ceremony. It leaves you filled with one of the world's sweetest smells... there is no chiropractic treatment, no Yoga exercise, no hour of
meditation in a music-throbbing chapel that will leave you emptier of bad thoughts than this homely ceremony of making bread.... 
To me these lines written by M.F.K. Fisher, exactly and perfectly describe the joy of breadbaking. You have to bake a bread and be a witness to that intoxicating aroma in your kitchen to understand the above said. The smell of freshly baked bread can truly lift any spirit.
So you can well understand my plight when I learnt that a new breadbaking group has formed who will be baking 12 amazing breads for 12 months!! Aparna of My diverse kitchen, the mastermind, christened the group "We Knead To Bake'!! (We so badly do!!) I fell in love with the name instantly and requested to get joined in the fun. And I am so pleased to be part of this amazing bread baking group.
Our kickstart bake is this pull apart bread which to me is a very new method. Cutting the dough in squares and stacking them gives a unique pull-apart to this bread. The filling choices are immense. While the original recipe calls for a herb and cheese filling, you may very conveniently change it to your liking. You may even make it a sweet bread with a sweet filling.
My very first thought was to try two sauces, the red and the white, which I love to use in my Lasagna. The layers of bread worked as sheets of lasagna and the entire combination was a treat to remember and surely repeat! The bread was super soft and together with the oozing sauces, it gave an incredible 'Modern Lasagna eating' experience.


Ingredients:

For the dough

  • 3 cups all purpose flour
  • 2 tsp yeast
  • 1/2 cup warm milk
  • 1 tsp sugar
  • 25 gms butter, softened
  • 1 tsp salt
  • 3/4 cup milk, for kneading
Filling:

For Red sauce:

  • 2 tbsp Olive oil
  • 3-4 pods garlic, chopped
  • 1 medium sized onion, chopped
  • 2 medium sized tomato, chopped
  • 2 tbsp tomato puree
  • salt to taste
  • 1/4 tsp red chilli powder
  • 1 tbsp tomato ketchup
  • 1 tbsp oregano
For White sauce:

  • 1 tbsp yellow butter
  • 1 tbsp all purpose flour
  • 3/4 cup warm milk
  • salt to taste
  • 1/4 tsp black pepper powder
  • 3-4 tbsp grated cheese(I used processed cheese)
  • 2 tbsp finely chopped coriander leaves

Procedure:

Dough:
Take 1/2 cup warm milk in a small bowl and add sugar and sprinkle yeast. Leave it for 5-10 mins and let it rise.
Take flour, salt and softened butter in a large bowl. Add the yeast mixture and knead with milk using little by little. You may require upto 3/4 milk. Knead well for 4-5 mins and shape the dough in a ball. Place it in a well oiled bowl and cover with a damp muslin cloth. Let it rise in a warm place for 1-2 hours or till it doubles in size.

Red sauce:
Take oil in a pan and add garlic. As it begins to get brown add onions. After a little while add chopped tomatoes. Add tomato puree and let it cook for a while. Add salt, red chilli powder and tomato ketchup. Mix well. Sprinkle oregano and remove from heat to cool.

White sauce:
Take yellow butter in a pan over low heat and add all purpose flour. Cook till it turns brown and then add warm milk(to avoid lumps) When the sauce thickens add salt and black pepper powder. Sprinkle half of the grated cheese(saving half to sprinkle on the dough) and the corinader and remove from flame to cool.

Assembling:
Dust your work surface with little flour and roll the dough into a square 12x12".
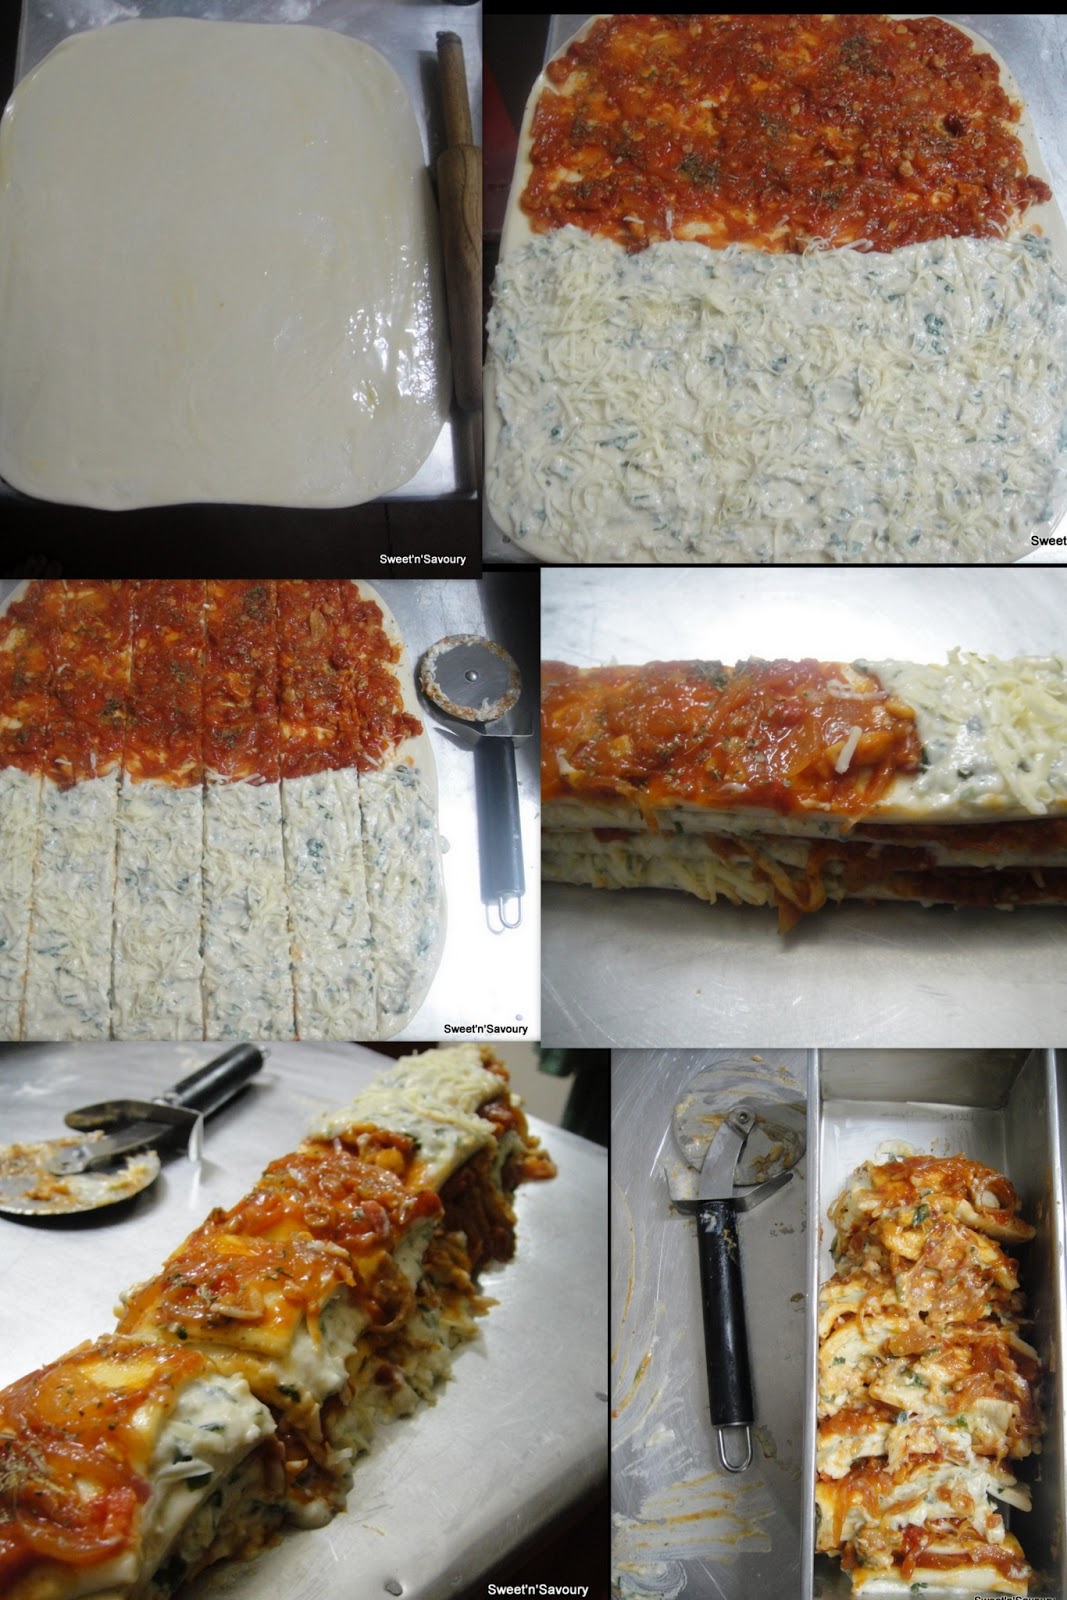
Brush the area with some melted butter. Spread the red sauce in one half of the square and white sauce on the other half. Sprinkle the remaining cheese on the white sauce and some oregano on the red sauce.
Using a pizza cutter, divide the dough in six long and even strips. Stack them together. I stacked the strips so that the red and white sauce area of dough is alternately arranged. Use the side strips in the middle to get a neat look.
Now cut this stack further in 6 squares with a pizza cutter.
Grease a 9x5" loaf tin and stack these squares in it. Cover with a damp muslin cloth and allow to rise for an hour. 
Preheat oven to 180 degree Celsius and bake the bread for 35-40 mins. 


Step wise pics

I am so glad to be able to bake for this month though I joined very late. It was the most satisfying bread baking experience, all thanks to Aparna. So looking forward to the next challenge. 


This bread is being Yeastspotted and sent to Bake fest#15

Happy Pull-apart Bread Baking
Amrita

Sunday, 27 January 2013

Gevulde Speculaas-Traditional Dutch Pastry for DB


This month the daring baker's were challenged by Francijn, who blogs from koken in de brouweri, with a traditional dutch pastry called Gevulde Speculaas which literally means Stuffed Speculaas. To me it was almost like a stuffed pie. The stuffing is an almond paste and the dough is seasoned with aromatic spices. We were challenged to prepare the spice mix, the almond paste and the dough. Sounds like a tough challenge?? Well, to tell you the truth, it was pretty simple and very satisfying. It is a delicious pastry with a simple almond paste and is something you have never tasted before. The uniqueness is in the array of the spices used, very traditional. For once, I did not change any part of the challenge to chocolate!!! And I am so happy about it. To me the dough was almost like a pie dough, the only difference being the spices used in it. 
The traditional recipe calls for the use of egg in the almond paste for binding. I skipped it and added some curd and fresh breadcrumbs for binding. The recipe also called for an egg wash but I found a simple milk wash working equally good for me. I also reduced the quantity of butter and used as much required for the dough.
So here it is, the traditional taste of Holland. This is the best part of being a Daring baker..being challenged with amazing recipes from different countries. I am so loving it!! Hope you do too.

My mini pie Gevulde Speculaas
Ingredients: I halved the recipe

Speculaas Spice mix:Yields 1 tbsp
  • 3-4 cloves
  • small piece of mace
  • 4-5 white peppercorn
  • 1 green cardamom
  • 4-5 coriander seeds
  • small piece of star anise
  • small piece of nutmeg
  • small piece of dry ginger
  • 2-3 1"pieces of cinnamon/ 1 tsp cinnamon powder 
Procedure:
Dry roast all spices (except cinnamon)in a pan over low heat. Grind them to a powder and sieve them to make it fine.
Dry roast cinnamon and grind (if not using powdered form)
Mix all the spices and keep aside.


Almond paste:
  • 60 gms raw almonds
  • 60 gms sugar
  • 1/2 tsp lemon zest
  • 1 tbsp curd
  • fresh breadcrumbs(as required)
Procedure:
Boil some water in a pan and put the almonds for a minute. Drain and cool and peel the skin. Dry them well. Dry roast in  a pan over low heat to remove any moisture. Be careful not to burn. 
Grind them in a mixer with  sugar, lemon zest and curd. Mix them well. Add breadcrumbs as required to get a sticky paste. Refrigerate till required.


Speculaas dough:
  • 125 gms all purpose flour
  • 60 gms unsalted butter,cold
  • 75 gms brown sugar(powdered)
  • 1/2 tsp baking powder
  • 1 tbsp speculaas spice mix
  • Little milk 
Procedure:
Put flour, baking powder, sugar and spice mix in a bowl. Cut butter in dices and add to the flour mixture. Rub butter with the flour until it resembles breadcrumbs in texture. Add some milk to knead the dough into a smooth ball. Cover with clingwrap or a plastic cover and refrigerate for 1/2 hour.


Assembling:
Preheat the oven to 180 degree Celsius.
Grease your chosen pan. I chose my flower shaped pan and a mini pie pan. This quantity will be good for a 9" pie pan.
Divide the dough into two portions.(I made four portions as I used 2 pans) Roll out both on a lightly floured surface till as big as your chosen pan. 
Put one layer in the pan and press lightly. Spread the almond paste with the help of a greased spoon over the layer of dough. 
Cover with the remaining layer of dough. Decorate almonds on top and brush some milk on top.
Bake for 30-35 mins or till the tops are browned well. 
Cool completely and cut in pieces. 
It was a delightful treat to everyone that I served, very different and yummy.


Happy Tasting Holland
Amrita

LinkWithin

Related Posts Plugin for WordPress, Blogger...