Showing posts with label Sweet Day. Show all posts

Monday, 24 November 2014

Sachertorte


I have been missing on daring the challenges at the Daring Bakers but have never failed to check on them every month. For the month of October we were challenged to put our hands on an Austrian Sachertorte by Korena. The moment I saw the challenge I knew I had to kick my off late lazy self and make this beauty. After all who can ever say a no to a chocolate cake.
Sachertorte is one elegant cake which is filled with apricot jam and is covered with a fudge like chocolate glaze and has the word 'Sacher' written across it. Ideally served with a generous dollop of schlag (unsweetened whipped cream), this cake is on every baker's must-try list. 
The Sachertorte was first created in Austria when Prince Metternich requested for a fancy dessert for his guests. With the pastry chef being ill that night, the task fell on an apprentice called Franz Sacher who created the historical cake. Franz's son later opened the Sacher hotel in Vienna where the closely guarded secret recipe of the cake is served to this day. 
With its amazing history and world wide repertoire, there was no way I could miss attempting this cake in my humble kitchen and there was no other occasion befitting for it than my Sweet day today. Vaanya turns 3 1/2 years today. This month had also blessed us with a baby boy in my brothers house. There is someone smaller than Vaanya now :) It is such a joy to relive those moments and cherish the time when she was this small and would fit in our arms. A time when every piece of clothing was still big for her. A time when she had no hair on her head and I would wait for them to grow. A time when I would wait for her to speak to me and demand little things from me. 
Time flies and today I have a new set of wishes for her. Parenting is such a never ending thing and such a joy. 


Recipe source : Korena from Korena in the kitchen

Ingredients : 

Cake : 
  • 60 gms butter, softened
  • 1/2 cup powdered sugar
  • 3 eggs, separated
  • 1/4 cup granulated sugar
  • 90 gms dark chocolate, chopped
  • 1/2 tsp vanilla extract
  • 1/2 cup all purpose flour
Apricot glaze : 
  • 15 dried apricots, soaked in water overnight
  • 3 tbsp sugar
Chocolate glaze : 
  • 1/2 cup granulated sugar
  • 1/4 cup water
  • 50 gms chopped dark chocolate
Writing chocolate : 
  • 2 tbsp chopped chocolate
  • 1/2 tsp vegetable oil
Procedure : 

Cake : 
Preheat oven to 190 degree Celsius.
Grease and line a 7" square baking tray.
Melt chocolate on a double boiler or in the microwave and set aside to cool.
Take butter in a large bowl and beat till creamy and light.
Add powdered sugar and beat.
Beat in the egg yolks, one at a time.
Add in the cooled chocolate and vanilla extract.
In another clean bowl, beat the egg whites with a tbsp of granulated sugar. Gradually add in the rest of the sugar and continue beating till they form shiny peaks. 
Now stir in 1/3 of the egg whites mixture into the chocolate mixture. Gradually mix in the remaining. 
Sift flour and add in the mixture in two additions with gentle hands.
Spread the batter in the prepared pan and bake for 35-45 minutes or till a toothpick inserted in the middle comes out clean.
Cool completely and cut in two even layers.

Apricot glaze : 
Deseed the apricots that have plumped with overnight soaking and reserve the flesh.
Put the apricots in a pan and cook over medium heat with sugar till it thickens. 
Keep mashing the mixture with a spoon and add a little water in between. 
In about 20-25 minutes you will have a thick jam consistency.
Remove from heat and cool.
Strain the mixture through a sieve to achieve a smooth consistency.

Spread this glaze in between the cake layer and spread on top and sides too.

Chocolate glaze : 
Place sugar and water in a heavy bottomed pan over medium heat and bring to a boil, stirring occasionally. Cook for 5 minutes or till you get a one string consistency i.e. when you take a drop of the sugar in between your thumb and index finger and pull apart, it should make a single thread.
Remove from heat and whisk in the chopped chocolate.
Pour immediately over the cake which should be placed on a wire mesh to collect all the excess chocolate glaze.
Allow to set.

Writing chocolate : 
Melt chocolate and mix in the vegetable oil.
Put in a piping bag and snip of the end.
Write the word Sacher on the cake or decorate as you like.

Slice and serve.


Notes : 
  • If you have apricot jam or preserve, boil 1 cup of it with 2 tbsp of rum or water over medium heat and cook till mixture thickens for about 2-3 minutes.
  • You may use a round shaped pan which is how ideally this cake is served.
  • You can substitute this recipe of chocolate glaze with a simple chocolate ganache recipe if you do not like very sweet frostings. 


Thursday, 23 October 2014

Eggless Choco lava cupcakes


I have been wanting to try my hands on the eggless version of a cake/cupcake for the longest time but being an egg eater I have never gathered enough courage or reason to try one. I mean after all a cake is meant to have eggs. How can any substitute work as good as eggs. Therefore I have been procrastinating the entire idea again and again.
With my recent jump in baking professionally, I realized the need to experiment with eggless baking.
I personally am not fond of the eggless milkmaid cakes so I jumped upon this eggless chocolate cake recipe which uses vinegar and baking soda to react and make the cake rise. 
With Diwali as an occasion where people like to indulge in eggless bakes, I realized the perfect opportunity and the required push. I decided to go chocolate all the way and made the easy batter which went into the cute mini cupcakes and got baked. All through I had my fingers crossed and had several questions in the head. When I finally saw them rise and baked, I was happy and surprised to see the softness of it. It tasted more clumpy to me as I am not used to eggless cakes but once I filled them with some runny chocolate ganache and dressed them with some whipped chocolate cream, they looked adorable and tasted yum. 
These mini cupcakes were placed on little diyas to match the festivity.
With my Sweet day falling tomorrow, I add this recipe to the list celebrating another month of the endless joy that our daughter brings into our lives. 


Ingredients : Yields 6-7 mini cupcakes
  • 1/2 cup all purpose flour
  • 1 tbsp cocoa powder
  • 1/4 cup sugar, powdered
  • 1/4 tsp baking powder
  • 1/8 tsp baking soda
  • pinch of salt
  • 3 tbsp melted butter
  • 1/2 tsp vanilla essence
  • 1/2 tbsp vinegar
  • 1/2 cup boiling water
Chocolate Ganache : 
  • 1/4 cup chopped dark chocolate
  • 2-3 tbsp cream (I used Amul)
Procedure : 
Preheat oven at 180 degree Celsius
In a bowl, mix all purpose flour, sugar, baking powder, baking soda and salt. 
Make a well in the center and add melted butter, vanilla essence, vinegar. Mix well.
Add boiling water little by little and keep mixing till you get a cake batter like consistency. You might not need the entire quantity of water.
Pour the batter till 3/4 into the cupcake liners and bake for 20 minutes or till a toothpick inserted in the middle comes out clean
Allow to cool.
With the help of a knife make holes in the cupcake and fill them with chocolate ganache which can be made by melting chocolate on a double boiler and adding cream to it and mixing it well. 


Decorate with some chocolate whipped cream and chocolate rice. 


Wishing all our readers a very Happy and joyous Diwali. May the festival of light bring you luck, prosperity and happiness.


Happy Diwali
Amrita

Thursday, 2 October 2014

Rose sandesh


Its time of the year when Calcutta gets transformed big time and gets illuminated with lights and adorned with beautiful & intricate pandals to worship Ma Durga who descends from heaven on Earth. 
Its the perfect time of the year to see the zest and enthusiasm in the inhabitants of this city irrespective of any religion. I remember as children we would visit pandals from the south of Calcutta to the north often walking for hours together. Eating out is a big part of the Pujas and we would indulge in everything from Biryanis, rolls, chaats to mishti. 
Growing up in Calcutta is perhaps synonymous to having a sweet tooth, at least for me. I have seen my Sikh family gorge on sandesh, rasagullas and mishti doi on most occasions. 
For us Indians, any festival means sweets so for this Puja, I decided to try my hands on some simple Rose sandesh. I wanted to try and achieve an ombre effect and thus the layering in this sandesh. Well, the effect is not prominent and this gives me another chance to experiment on an ombre sandesh. How cool that sounds, right?
Since we have been busy lately with the Zee Khana Khazana episode, I have missed on sharing a recipe for my Sweet day dedicated for my sweetheart and therefore this one gets added there. 


Ingredients : Yields 4 pieces
  • 500 ml cow's milk (or full cream milk)
  • 1 tbsp lemon juice/a pinch of citric acid
  • 2 tbsp powdered sugar (or more as per taste)
  • a drop of red food colour
  • a drop of rose essence 
  • rose petals for garnish
Procedure : 
Take milk in a pan and bring it to a rolling boil. 
Add lemon juice/citric acid and stir in the milk.
The milk will start curdling soon. Switch off the flame and wait till the milk curdles and the whey has separated well. 
Strain this through a muslin cloth into a bowl to collect the chenna. 
Reserve the whey to use in dal, curries or for kneading chapati dough. 
Tie the muslin cloth for the remaining water to drain for about 20-30 minutes.
Take the chenna in a plate and start kneading it with the heel of your palm. Keep spreading it with your palm till it becomes soft and comes together like a dough. This can take about 10 minutes. 
Divide the dough in two parts.
To one add 1 tbsp sugar and mix it well.
Take a plate and spread this part in the shape of a square. 
To the other part add a drop of the red colour and the rose essence and mix well. 
Spread this part on top of the white layer.
Take little water on a finger and spread on top of the pink layer and start arranging the rose petals on top.
Refrigerate for 15-20 minutes for the sandesh to set.
Cut in squares and serve.  


Happy Sandesh indulging
Amrita

Wednesday, 27 August 2014

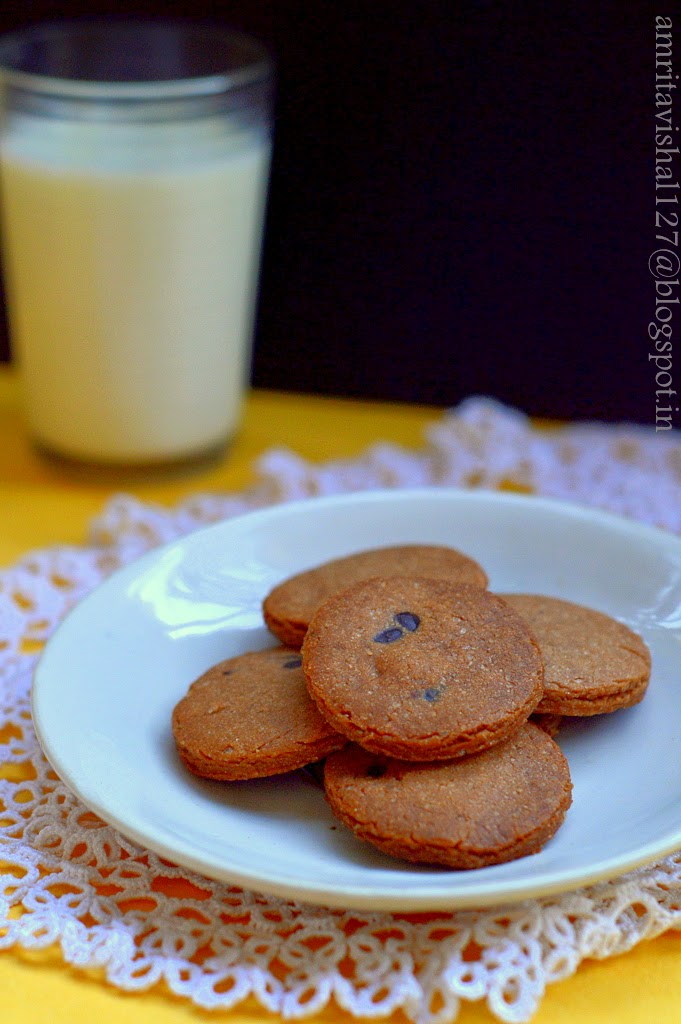
Cookie glass & some choco-chip cookies


Every now and then I am on a break from our blog. I guess with everything that you are passionate about there comes a time when you want to take a break.. relax..take a backseat and just wait for the right moment to get back on your feet and start again....that is if you are still passionate about it. 
Thankfully my passion to cook and click is still alive and hence here I am sharing a little overdued 'Sweet day' post. 
Choco chip cookies is not something new to the world of baking. In fact they were invented accidentally by Ruth Graves Wakefield of Toll House Inn who replaced baker's chocolate with chopped pieces of semisweet chocolate bar from Nestle which did not melt and only softened giving birth to the famous Chocochip cookies.
As famous as the chocochip cookies itself is its pairing with a glass of milk. There is certainly something about dunking your cookie in a glass of milk and eating it which is loved by all. 
Recently I chanced upon the Cronut Guru Dominique Ansel's newest invention-The Cookie shots where he has given a new dimension to the timeless pairing of cookies and milk. He made cookies shaped in glasses which can hold the milk and therefore you can drink your milk and eat your cookie at the same time. The cookie shots are lined with a layer of melted chocolate to avoid the milk seeping in the cookie and breaking it. 
I decided to try them at home but struggled with any pan of that shape. Found on the net about using stainless steel for baking and chose some glasses for my experiment which turned out pretty good. Stainless steel can get very very hot and hence you need to be very very careful while dealing with it for baking. Another important thing is greasing the glasses really really well. I regretted not trying one batch by lining the glass with butter paper/parchment paper. I overbaked one batch and had the toughest time of my life trying to get the cookie out from the glass. Well, it finally crumbled and came out a mess. Thankfully one cookie glass came out good enough for my experiment and I loved pouring my milk into it and enjoyed the experience of having my milk in a cookie glass! 
This sweet recipe definitely had to be on my Sweet day recipe list. Vaanya, my daughter enjoyed the cookies more than the cookie glass. I guess the traditional did beat the modern here. 


Recipe : Adapted from here 

Ingredients : Yields about 15 small cookies (2" round) and 2 cookie glasses (3" height)
  • 1/2 cup butter, room temperature
  • 3 tbsp sugar, powdered
  • 4 tbsp brown sugar, powdered
  • 1/4 tsp baking powder
  • 1 1/4 cup all purpose flour
  • 1 tbsp cocoa powder
  • 1/4 tsp salt
  • 1/4 cup choco-chips
  • 1/4 cup melted dark chocolate


Procedure : 
Take butter and both sugars in a bowl and whisk till light and fluffy.
Add all purpose flour, cocoa powder, baking powder and salt and knead to a smooth dough.
Knead in the choco chips. 
Refrigerate the dough wrapped in cling film for 30 minutes. 
Preheat the oven to 180 degree Celsius.
Take Stainless steel glasses and brush inside with butter liberally. Take little portions of the dough and press against the steel glass and smoothen it. 
Refrigerate the glass for 15 minutes for the dough to set.


Roll the leftover dough to 1/4 " thickness and cut out round shapes with a cutter. 
Place them on an aluminium lined baking tray. 


Bake the cookies for 10 minutes and allow them to cool.
Put the steel glasses in the oven and bake for 15-17 minutes.
Allow to cool completely as the steel glass will be very hot.
When completely cool tap the cookie glass out of the stainless steel glass. 
Coat the inside with melted chocolate and let it dry.


Pour milk in the cookie glasses and serve. 
Enjoy a sip from the cookie glass and take a bite from the cookie glass or just enjoy the choco chip cookies classic style by dunking them in a glass of milk.


Notes:
  • You can use deep muffin pans to make the cookie glasses instead of the stainless steel glass
  • Melted white chocolate can also be used to coat the inside of the cookie glass
  • You may omit the cocoa powder in the dough for the more classic Choco-chip cookies

Happy Chocochip cookies devouring
Amrita

Friday, 25 July 2014

Chocolate mousse-2 ingredient recipe


Threshold
We are at the threshold of a new beginning. A new chapter is awaiting to unfold in our lives. Our tiny tot (who is three years now) is about to join school. Vaanya is about to enter a magical world of learning new things everyday, of making new friends and of understanding the things about life. Vishal and I, as any parent, are both very anxious and excited at this stage. Our talks revolve around discussing schools nowadays. A girls or a co-ed, a convent or an international, an ICSE or a CBSE....why is choosing a school so difficult. 
With so much going around nowadays, getting to hear horrific incidents about the things happening in schools, I sit and wonder what exactly am I looking for. Do I put her in a school that thrives on reputation since ages or do I put her in a school which exceeds in the number of extra-curricular activities they engage the child into. Every school has its own positive and negative aspects which naturally makes the whole thing all the more difficult.
We as parents want Vaanya to grow in an environment where she learns the values, the discipline and the true essence of life. We want her to enjoy the wonderful days of school and become a beautiful, sensitive and a caring human being.   
After some years, we will face this same anxiety while choosing a college for her and then after more years while getting her married. Parents and their anxieties...we now understand. Circle of life, they rightly say. 
For my 'Sweet Day' this time, I am sharing an extremely easy and quick eggless chocolate mousse. It just requires 2 ingredients and is as simple as ABC.


Ingredients : Serves 2
  • dark chocolate, roughly chopped to fill 1 cup (I used Morde dark compound)
  • 1 cup whipped cream


Procedure : 
Take some water in a pan boil it. Reduce the heat to medium and let the water simmer. 
Take a bowl big enough to fit on top of the pan in a way that the water should not touch the bowl.
Add the chopped chocolate to the bowl and place it on top of the pan and allow it to melt over the simmering water. Be careful as to not let the chocolate burn.  
Allow the chocolate to cool little bit. 
Keep about 1/4 of the whipped cream aside for garnishing.
Add 1/2 of the whipped cream to the melted chocolate and fold gently. 
Add the remaining half and fold it gently too. 
Once you see no more of the white streaks in the chocolate and the cram has been folded well, divide the mixture in serving glasses/bowls. 
Refrigerate for 2 hours to set.
Garnish with whipped cream piped on top through a star nozzle and some chocolate shavings. 


Notes : 

  • You can alternately melt chocolate in the microwave for about a minute in 10 sec bursts.
  • You may add some brewed coffee to the melted chocolate to intensify flavours. 
  • To make chocolate shavings, simply grate a bar of chocolate. 


Happy Mousse devouring
Amrita

Tuesday, 24 June 2014

Profiteroles-my affair with the French pastry


A month has flown by and its time to share a sweet something for my 'Sweet day'. 
Vaanya has turned 3 years and 1 month old. We had the most amazing birthday celebration for her 3rd birthday in Lucknow with family. The theme was Mickey mouse clubhouse as it is her new fetish. Kids and adults of the family joined in to decorate the house and have a Clubhouse party. From the food to the games, every little detail was planned collectively a month back. I tried my hands on a Surprise Mickey mouse cupcake and shared here for my last Sweet day. You can view the fun we had through some pictures that I shared here. 
Today I planned to share something that I have attempted various times for family and simply love the texture of this unique pastry called Choux pastry(pronounced shoo pastry) This is a classic french pastry which is first made on the stove and then baked in the oven. The pastry has an amazing crispy,buttery and extremely light texture. The Choux pastry can be used to make Cream puffs, Profiteroles or even Eclairs where the basic mixture is piped in different shapes and baked. 
Having tried this recipe several times, I have realized the importance of technique which is solely responsible for success in this pastry. It is a very simple pastry but only if you follow the instructions carefully otherwise you can end up with a flat disc of baked dough. The pastry is supposed to puff up in the first few minutes of baking getting the quintessential crinkles on top and then it is given further time in the oven to get cooked from inside. 
Once mastered, this pastry will become your favourite and will win many weak 'sweet' hearts. In the past I have also tries a Savoury variation in this pastry with some savoury fillings. 


Ingredients : Makes about 10-12 profiteroles
  • 1/4 cup +2 tbsp water
  • 1/4 cup unsalted butter, room temperature 
  • 2 egg, room temperature
  • 1/4 cup +2 tbsp all purpose flour
  • 2 tbsp powdered sugar
  • a pinch of salt
Procedure :
First things first : 
  • Preheat oven to 200 degree Celsius
  • Sift all purpose flour, salt and sugar and keep aside
  • Beat the eggs lightly and keep aside
  • Line the baking tray with an aluminium foil, lightly greased and keep aside
Now take butter and water in a pan and bring it to a rolling boil. Remember to use butter at room temperature otherwise the butter will take longer to melt and by then the required quantity of water will reduce due to evaporation. 
As soon as it starts to boil, take it off heat and dump the flour,salt and sugar mixture into it. Mix well. 
Put it back on low heat and let the mixture attain a dough like consistency, mixing all along. Do not let the flour mixture scald. 
Take it off heat and allow to cool. Keep checking, when you can touch the bottom of the pan with your finger you are ready for the next step. 
Add a tbsp of the beated egg and mix. Keep adding a spoonful or two and mix. Do not dump in the entire quantity of egg as the size varies which can change the consistency.
You need to achieve a consistency where when lifted with a spatula, the mixture falls off in 3-5 secs in a 'V' shape. Do not add any more egg , once this stage is achieved.
Put the mixture in a ziplock bag or a piping bag and snip off one end. 
Make rough round shapes around 2" diameter on the prepared baking tray(lined with aluminium foil)
If there are any pointy ends, smoothen with a wet finger. 
Put the baking try in the oven and bake on the same temperature(200 degree Celsius) for 10 mins. DO NOT OPEN THE OVEN. This is because in the first ten minutes the pastry puffs up in the hot oven and opening the oven door in between can prevent a good rise of the pastry.
Check if your pastry has risen well otherwise give a little more time. 
Now reduce the oven temperature to 176 degree Celsius and let the pastry cook for 15-20 minutes. The oven temperature is reduced to ensure that the pastry gets well cooked from inside. 
Take them out and allow to cool. But while they are still warm make horizontal slits on the sides for hot air to escape.
You can also cut the pastry in half to make room for any filling. 
Your pastry is ready for infinite number of fillings. I have used a whipped cream filling which I have just piped in with a star nozzle. 
Drizzle or spread a generous amount of melted chocolate on top for an amazing french pastry experience. 


Happy French pastry indulgence
Amrita

Friday, 23 May 2014

Surprise Mickey Mouse cupcakes


Oh Toodles!
Vaanya, my bundle of joy, my angel, turns three today!
It was on this very day that our family was blessed with her. I can vividly remember her pretty pink face and her tiny cherub fingers and toes which made me wonder how did God create such a beauty. With time she grew all the more adorable and has filled our lives with unaccountable happiness and joy. 
This entire month has been all about mickey mouse because it is Vaanya's current fascination. With a mickey toy tucked in her arm she loves to sing and dance to the Mickey mouse clubhouse tune. So naturally, Mickey mouse had to be the  theme for her birthday celebration. 
With her birthday falling in the Summer vacations, it was decided to celebrate it with family in Allahabad and Lucknow. It has been so much fun to see the entire family gearing up to the theme with everyone putting in their ideas and inputs. From invitation cards to the cake, decorations to gift bags it is going to be all about Mickey mouse clubhouse.  
While I was doing my bit of research on the theme, I found these very attractive Mickey mouse cupcakes here. The surprise element in the cupcake with a mickey mouse inside it was fascinating enough to attempt. Though mine did not come out as neat as in the original, it was so much in the spirit of the birthday theme. The free download printables-mickey mouse cupcake wrappers and toppers have made them look all the more adorable. 
More about the birthday celebration in another post. 


Ingredients : For 5 cupcakes

Vanilla part:
  • 1 egg
  • 1/2 cup all purpose flour
  • 1/2 cup powdered sugar
  • 1/2 tsp baking powder
  • 40 gms butter, room temperature (I used Amul)
  • 1/4 tsp vanilla essence
Chocolate part: to make the inside mickey mouse
  • 1 egg
  • 3/4 cup all purpose flour
  • 1/2 cup powdered sugar
  • 1/4 cup +2 tbsp cocoa powder
  • 1/4 tsp baking powder
  • 1/4 tsp instant coffee powder (I used Bru)
  • 40 gms butter
Chocolate ganache icing:
  • 1/2 cup grated dark chocolate
  • 1/2 cup cream (I used Amul)


 Procedure : 

Mickey mouse chocolate part:
Preheat oven to 180 degree Celsius.
Prepare a small baking pan by greasing and flouring it. 
Melt butter in a pan over low heat. Add sugar and mix well.
Remove from heat and allow to cool.
Add egg and mix well.
Sift flour with cocoa powder, coffee powder and baking powder.
Add this to the butter mixture and mix well. 
Pour batter in the prepared pan and bake for 20-25 minutes or till a toothpick inserted in the middle comes out clean.
Allow to cool completely and keep aside for further use.

Vanilla part : 
Preheat oven to 180 degree Celsius.
Prepare cupcake tins by lining them with cupcake liners or just grease and flour them.
Take butter and sugar in a bowl and beat it well it it turns pale and creamy.
Add egg and beat well.
Sift flour with baking powder and mix with the butter mixture. Add vanilla essence and mix. 

Assembly : 
Take half of the prepared chocolate part and crumble it well. (Enjoy the other half with a cup of tea/coffee)
Mix 1 tbsp of the vanilla part with it along with 2 tbsp water.
Ensure that the mixture is of the consistency of a dough. 
Spoon a tbsp of the vanilla part in the prepared cupcake tins.
Now make a small round shape with the chocolate mixture and place it int eh middle, over the vanilla part.
Repeat for all 5 tins.
Make a 2" long cylinder with the chocolate part, join the ends and make it into a circle and place it over the round shape. Repeat the same for remaining tins. 
Top the tins with equal quantity of the vanilla cake batter. 
For more details, please see the video here. 
Bake for 20-25 minutes or till a toothpick inserted in the middle comes out clean.
Allow to cool. 

Chocolate Ganache icing : 
Gently heat the cream in a pan over low heat.
Remove from heat and add the chopped chocolate, and stir well.
Allow to cool.
As it cools it will, thicken.
Fill this in a patry bag with a star nozzle fitted and pipe over the cupcakes.
Serve, and surprise.
You will be able to see a mickey mouse from any angle.


Oh Toodles!
Amrita

Thursday, 24 April 2014

Fig tarts with pista crumble


24th of the month and it is time for our 'Sweet day' celebration. 
For those who do not know, every 24th I share a sweet creation to celebrate the birth of the little angel in our lives, our munchkin, our daughter Vaanya.
Next month Vaanya will turn 3 years old and we will have a grand family get together in Allahabad.
I love baking with fruits and look forward to seasonal ones to experiment. Having not much opportunity to find figs here in Kolkata, once I did I jumped onto trying 2-3 recipes with it which have been in the folder since months. 
This recipe was first viewed on Masterchef Australia where Gary Mehigan took a masterclass. The combination of pista with fresh figs intrigued me a lot and I was happy to finally out my hands on it. 
As usual I have reduced the recipe to suit our small family. I have modified the procedure to my ease and have used my tried and tested tart shell recipe. 


Recipe from : Adapted from Masterchef Australia

Ingredients : I reduced the recipe to get two 3" tarts 

Shortcrust pastry for tart shells:
  • 1/4 cup all purpose flour
  • 2 tbsp cold butter
  • 1 tbsp powdered sugar
  • cold water for kneading
Pista Crumble :  
  • 5-6 blanched, peeled and finely chopped pista
  • 1 tbsp sugar
  • 1 tbsp all purpose flour
  • 1/2 tbsp chilled butter
Frangipane filling :
  • 2 tbsp unsalted butter, room temperature
  • 2 tbsp sugar
  • 1 small egg
  • 1/4 tsp zest of a lemon
  • 1/4 cup all purpose flour
  • 15 blanched and peeled almonds
  • 20 blanched and peeled pistachios
  • 2 tbsp honey
Garnish : 
  • 1 fig, slices/wedges
  • chopped pista
 

 Procedure : 

Shortcrust pastry :
Take flour and butter in a bowl and rub the butter cubes with the flour till the mixture resembles breadcrumbs (in texture).
Now add cold water 1 tbsp at a time and knead to get a smooth dough. Do not over knead.
Wrap this dough in a plastic sheet and refrigerate for half an hour.
Take out the dough and roll it with a rolling pin on a floured surface. Roll it roughly to the size of the chosen tart tin with 1/8" thickness.
Gently press the dough down so that it lines the bottom and sides of the tart tin. Trim excess dough.
Line all the tart tins the same way. Make holes on the sides and bottom with a fork and refrigerate for another half an hour.
Preheat the oven to 180 degree Celsius. Bake the tarts for 15-20 mins or till they get a light brown colour.
Take them out and let them cool.
For a detailed step by step illustration refer here

Pista Crumble : 
Take a bowl and mix pista, sugar and flour. Rub butter into this mixture. Leave small lumps of butter in it. Keep aside.

Frangipane Filling :
Grind almonds and pistachios with honey till you get a fine paste. 
Preheat oven to 160 degree Celsius. 
Whisk butter and sugar in a bowl till creamy. 
Add egg, lemon zest, flour and almond-pista paste. Mix well. 
Spoon the mixture in the prepared tart shells till 3/4 full. 
Sprinkle the pista crumble on it.
Press in the fig slices/wedges. 
Bake for 20-25 minutes or till the top browns a little. 
Allow to cool.
Sprinkle chopped pista on top and serve.


Happy Fig tart enjoying
Amrita

LinkWithin

Related Posts Plugin for WordPress, Blogger...