Showing posts with label Chocolate. Show all posts

Sunday, 31 July 2016

Chocolate mud cake with SMBC frosting


It was time of the year to bake a cake again and I jumped on the opportunity to try my hands on some techniques I have never tried before. It was my dear Husband's birthday on the 27th of this month and more than us, our daughter Vaanya was super excited about the celebration. The cake was attempted keeping Vaanya and her fetish with pink in mind. And boy, how elated she was to look at it. 
I had seen a similar image of a cake on Pinterest one day and had decided to attempt it. With the D day nearing, I pushed myself out of a lazy slumber and bought the necessary equipments and ingredients. The cakes were baked a night before and while they got baked in batches, I made the icing. The cakes were cooled, stacked with the icing in between and given a crumb coat. Next morning, I gave all the finishing touches to the cake while my daughter was away at school. The cake was dressed up in a pink drip and adorned with buttercream flowers. I knew Vaanya was going to love all the pinkness.  
The day was spent in a long drive to the highway and once we came back home in the evening, Vaanya was eager to have the cake cut. The day came to an end with the cake cutting, eating cheer and laughter. May God bless us with such beautiful moments forever.


Chocolate Mud cake 

Recipe source : Cocawind

My notes : 
  • I halved the recipe and then pour the batter in two 6" round pans.
  • Baked them at 180 degree Celsius for 20-25 mins. 
  • Made other half of the recipe and repeated to yield four 6" round cakes.
  • Trim tops so that all are equal.
Swiss Meringue Buttercream icing (SMBC) 

Recipe source : Here

My notes : 
  • I followed the recipe to the T
  • Separated 3/4 of the icing and kept separate for frosting the cake.
  • Added pink food colour till I achieved the desired colour and frosted each cake layer with it. 
  • Once all the layers were stacked, I frosted the outside and refrigerated to set. I kept mine overnight. You may keep for 3-4 hrs.
  • With a glass of hot water and an offset spatula, give the cake a final frosting finish. Every time dip in the hot water, wipe your spatula and try and give a neat finish to the frosting. 
  • Refrigerate

Pink Drip : 

Take equal quantity of white chocolate and cream. Heat cream and add chopped white chocolate to it. Stir it well. Add little milk to make it a little runny. Add pink food colour. 
Take spoonfuls of the drip and pour on the edge of the frosted cake, all around. Now fill the top of the cake with the drip too. Refrigerate.


Buttercream flowers

To the rest of the SMBC icing, divide into 4. Colour pink to one part, purple to another, green to the third and leave the 4th as it is. 
Pipe pink icing to a piping bag with a Rose petal nozzle and pipe flowers over a piece of butter paper and over a flower nail. Once done, transfer the piece of butter paper to a flat plate and refrigerate.
Repeat same with purple flower.
Watch here 
Pipe some of the icing(not coloured) over the top of the cake, half an inch behind from the outer diameter. 
Peel the flowers from the butter paper and put on the cake. Arrange it the way you want.
Pipe the leaves with a leaf nozzle.
Refrigerate.


Happy Cake decorating
Amrita

Friday, 12 February 2016

'Struck by an arrow' Heart shaped Boozy Cake-pops


Sometimes experiments can take you for a ride, I mean the good way. The little cake hearts I made were so little in quantity that they got over in no time. So I had to kick my 'nowadays laziest' self and make something on similar lines. With just 2 days to go to our Anniversary, I thought these cute 'Struck by an arrow' heart shaped cake pops that I had eyed on Pinterest shall be a good idea. A perfect treat for the 2 Valentine's of my life, my husband Vishal and our darling daughter, Vaanya. 
For me and Vishal, I decided to go the boozy way and added some dark rum to the cake crumbs. And for our daughter, I made some non alcoholic cake pops in her favourite colour Pink. 
Cake pops have been a rage in the world of confection for some years now. In simple words, it is cake shaped as lollipops. The credit goes to Angie Dudley, a food blogger who runs a blog called Bakerella. On February 1, 2008, she posted something on her blog that literally changed her life. She posted these cupcake pops 

Image from Bakerella
These cupcake pops became so popular that they paved her way to a new chapter of life. A month after she posted these adorable treats , she was invited to the Martha Stewart show. She went on to write a book and is recognized worldwide as the inventor of cake pops. For more details about her journey read here


Ingredients : No particular measurements here. I made my favourite Comfort Chocolate cake  with a little more cocoa powder and used it. You may use any cake recipe. 
  • about 1 1/2 cups cake crumbs (just crumble the cake with hands)
  • 1-2 tbsp dark rum (you may use vodka,wine or make them non boozy with some orange juice) I made half batch boozy and another non alcoholic for my daughter
  • about 1/2 cup Melted white chocolate(done on a double boiler)
  • red food colouring
Procedure
Take cake crumbs in a bowl and mix rum/vodka/wine a little at a time. Take a little mixture in your fingers and see if you can bind it. 
If apprehensive to use alcohol, leave it altogether and use some melted butter, chocolate ganache, some cream or orange juice for binding. Remember to use a little at a time because you just need to bind the cake crumbs together and not make a gloopy glue :)
Take a little mixture at a time and shape them in hearts. Keep them on a greased plate and refrigerate.
Take melted chocolate and dip one end of the lollipop sticks (you can use the wooden ones like I did or stick to the plastic ones) Insert that end to the cake hearts from one side and leave it to set. If you want, you may also insert the lollipop stick at the bottom of the cake heart.
Dip half of the hearts in the white melted chocolate and keep aside to set. Remember to keep them on a piece of parchment/butter paper. Once set, you will need to dip them again to give a second coating as the chocolate cake will see through white chocolate coating. Once done keep a spoonful of the melted white chocolate in a piping bag.
To the remaining white chocolate, add a drop of the red food colour. Ideally gel based, but I did mine with the regular liquid food colour. Add drops and mix till you get the desired pink colour.
Now dip the remaining cake pops in the pink coloured chocolate and repeat the same process as done with white chocolate coated cake pops. After the second coating is dried, take a spoonful of pink coloured melted chocolate in a piping bag. 
At any point of time if the chocolate gets hard, put it back on double boiler.
Now just drizzle randomly pink coloured chocolate on the white cake pops and white one on the pink cake pops. 
Allow to set.


Vaanya, my daughter, enjoyed the non alcoholic heart shaped cake pops I made with half the batch. Her thumbs up to my bakes is my biggest reward. 


Happy Cake pop eating
and Happy Anniversary to us :)
Amrita
Monday, 9 November 2015

Besan Ladoo


Its the season of festivals in India. The nip in the air is the indicator of a month long list of festivals falling one after the other. After all the fun and frolic and major binging during Durga Puja, we start afresh with the Diwali celebrations. 
Staying in Kolkata, we had the privilege as children to enjoy a month long holiday which started with the Durga Puja and ended with Diwali. Pre-Diwali preprations meant cleaning up every nook and corner of the house with great zeal by every member in the family. I remember as a kid I would love to scrub floors and feel elated at the tiny help I would provide my mother. Alongside, Grandma and mum would prepare all the Diwali goodies which ranged from sweet to savoury. I would love the job of making tiny cuts on the savoury 'Mathri'. By Diwali eve, our house smelled heavenly with Gulabjamuns, Balushahi's, Gujiya's, Mathri's etc and my personal favourite Besan ladoos. I remember relishing on these ghee laden balls of sweetmeat. 
Diwali nowadays is not the kind of Diwali I have grown up into. Its no more about making all the yummy sinful stuff and distributing it to all the neighbours. It is no more about the joy of hopping into all the neighbourhood houses and eating all the homemade yummies at their place. People have become lazy with time and prefer buying instead of enjoying the fun of making things at home. 
This Diwali, I attempted to bring back a slice of my childhood fun with these Besan ladoos. I have tried to give it a contemporary look with a little drizzle of chocolate. The pat on my back was my husbands question when he returned back from his trip to the Sunderbans, "Who gave these?" 


Ingredients : Makes 6 medium sized ladoos

  • 3/4 cup besan/gram flour
  • 1/4 cup powdered sugar 
  • 3 tbsp melted ghee (or a little more if the mixture does not bind)
  • 1/4 tsp elaichi/cardamom powder
  • Silver warq for  garnishing
  • melted chocolate compound for drizzling
Procedure : 

Take a heavy bottomed pan and dry roast the besan on low heat for about 10 minutes or till the raw smell goes away. Keep stirring all along as it can easily get burnt. 
Add melted ghee and stir well. Keep stirring and cooking on low heat till you see the mixture binding well and leaving ghee. 
Remove from heat and add the powdered sugar and cardamom powder and mix well.
Allow to cool completely.
Shape them in round balls and place them in an individual wrapper or place them on a greased plate. 
Garnish with silver warq and drizzle the melted chocolate on top. 


After some major convincing my 'now camera shy' daughter agreed on getting some pics clicked while she enjoyed the ladoo just like I would do when I was her age. Circle of life, they say. 


This recipe is part of Kolkata Food Bloggers ongoing event "Dessert/Festive Dessert" where Sarani Tarafder is the featured blogger who blogs from Cocawind


Wishing you all a happy and safe Diwali
Amrita

Thursday, 27 August 2015

Chocolate Salami


Raksha Bandhan or Rakhi has been a fairly simple festival in my house while I was growing. Being Sikhs, we have adapted a lot of our customs from Hinduism and therefore we celebrate a simplified version of it which means no tilak and Pooja. I remember seeing my Aunt perform the morning fast before tying the sacred thread on my Father and Uncle's wrist but as children we never had to do that. As children, I would tease my younger brother that being a girl is so lucky as you get 2 gifts in a year, one on birthday and another on Rakhi. At home, Mom would make some bread rolls for breakfast and thus our Rakhi would be over with some sweets. 
This year, Vaanya, my daughter will get to tie a Rakhi on my nephew. I see a part of my childhood in her and am looking forward to see her enjoy the day with her little brother. She is naturally too small to understand the importance of Rakhi but I am sure with time she will cherish these moments just like me. 
This year I wanted to try a rather very simple sweet. Something which does not require much work and is done in a jiffy. Therefore I decided to play with these Chocolate Salami where there is no definite recipe and you can add just about anything that you want. 
Chocolate Salami or Salame di cioccolata or Salame de chocolate is a traditional Italian and Portuguese dessert which is made from dark chocolate, broken bits of biscuits or cookies, butter, eggs and alcohol like rum or port wine.
A misleading name, Chocolate Salami is named because of its appearance where the dessert is shaped like a log and is cut in roundels while serving.
I skipped the eggs and got an intensely rich, rum laden chocolatey goodness in this dessert. For a children's version I used milk chocolate and skipped the nuts and fruits. Instead I added some cake pieces, biscuits of my daughter's choice and some almond powder. 
This dessert has endless variations. Go ahead and enjoy making and relishing it this festive season.


Ingredients : Makes around 7-8 slices of the chocolate salami
  • 200 gms dark chocolate, chopped
  • 1/4 cup cream(I used Amul)
  • 2 tbsp butter
  • 3-4 pieces of Marie biscuits or any digestive biscuits
  • 1/2 cup of assorted nuts and dried fruits(I used almonds, walnuts, cashews, pista and cranberries)
  • 2-3 tbsp rum (optional, may be substituted with orange juice)
Procedure : 
Dry roast the nuts and chop them fine. Mix with the chopped cranberries and keep aside.
Roughly break the biscuits in medium sized chunks and keep aside.
Heat cream in a pan. Be careful not to burn it.
Remove from heat and add the chopped chocolate to it. Mix it well so that the chocolate melts.
Now add the butter and mix. 
Throw in the nuts and biscuits and give it a stir. 
Allow this mixture to cool and thicken for around 4-5 minutes, or more if required.
Put this, now thickened mixture, onto a cling wrap and give it a log shape. Twist both the ends to secure it.
Pop it in the refrigerator for 3-4 hrs. 
In between take it out and roll it to maintain the shape.
Slice it and serve.

Note : For a children's version I used milk chocolate instead of dark one and added digestive biscuits, chocolate biscuits, cake pieces. I also added 1 tbsp of almond powder instead of the chopped nuts. And yes, the rum has been omitted there. 


Happy Raksha Bandhan
Amrita

Monday, 16 February 2015

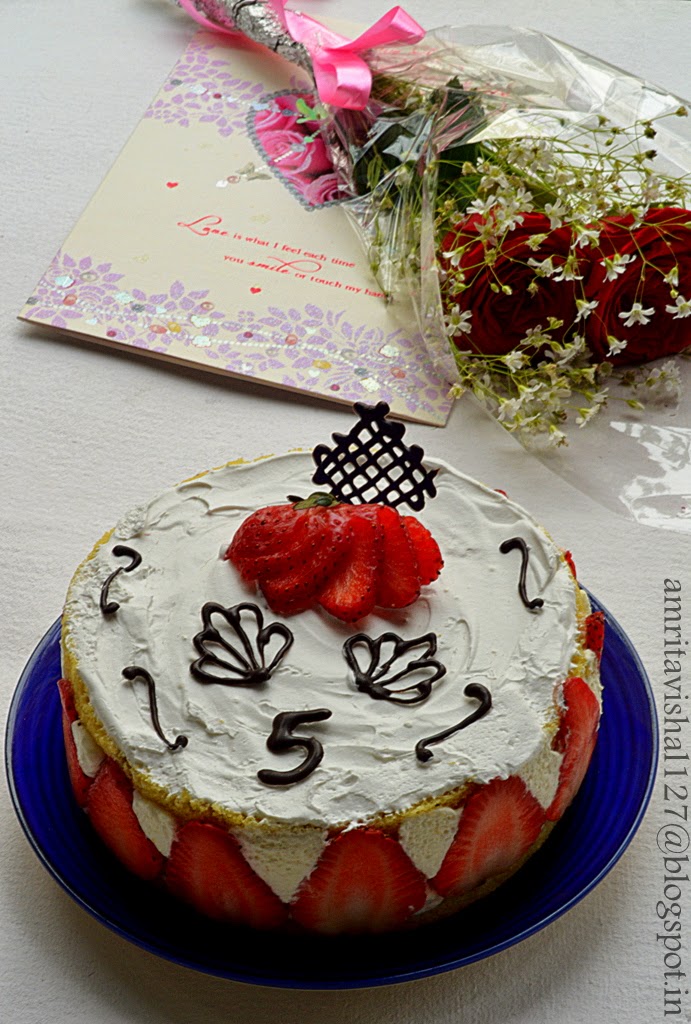
Fraisier-French Strawberry Gâteau


This Valentine's day completed 5 blissful years of my marriage with my best friend, my soulmate Vishal. Time has certainly flown by and it seems like just yesterday that we had limited time to spend with each other. We kept our distant relationship alive on letters and stuck by each others choice even with family's disapproval. It is really amazing to think back of those days and imagine at the conviction we had in each other. I guess that is the reason we were united with our family's blessings. And what better day for that!
Valentine's day is also my in-laws anniversary and therefore the choice of date for our marriage. My parents had no objection to it but since we had a Gurudwara wedding, it was important that it should be a Sunday. Sikh weddings rituals take place in the morning and Sunday being a holiday for all is naturally the most convenient day to invite people. Believe it or not 14 Feb 2010 was a Sunday!
With such a mushy story, I needed a mushy cake for the grand 5 year celebration. This particular cake caught my fancy as it more of the technique in assembly than the bake in itself. A fairly simple method with lovely results, is exactly what I wanted for the anniversary celebrations. Fraisier is a gâteau which has structure made up of strawberries and pastry cream supported by thin layers of sponge. The fraisier gets its name from the french word “fraise” which means strawberry. Traditionally this cake has a marzipan top. The elements can be made few days in advance which makes it easier to just assemble it a day before required. 
My maiden attempt, thankfully, went off well and once the gateau was out on a plate to be photographed, my daughter Vaanya kept pulling me asking for the chocolate decorations. With some hurried pictures, the gateau was all hers. There is no joy comparable to the one you get when you see your tiny one enjoy what you have made. Vaanya was all over the cake licking off the cream, pinching off the chocolate decorations and pulling the strawberry slices from its place. 


Ingredients : For a 6" round gâteau

Genoise cake:
  • 2 eggs
  • 25 gms butter, at room temperature
  • zest of half a lemon
  • 1/2 cup powdered sugar
  • 1/2 cup self raising flour (substitute with 1/2 cup all purpose flour+3/4 tsp baking powder+1/8 tsp salt)
Pastry Cream filling:
  • 1/2 cup milk
  • 1/4 tsp vanilla essence
  • pinch of salt
  • 1 tbsp cornflour
  • 2 tbsp powdered sugar
  • 1/2 egg (beat one egg in a bowl and use half the quantity)
  • 1 tbsp butter
  • 1/2 tsp gelatin
  • 1/2 tbsp water
  • 1/2 cup whipped cream
Sugar syrup :
  • 1/4 cup sugar
  • 1/4 cup water
You will also require:
  • 9-10 strawberries
  • Chocolate decorations
Procedure : 

Genoise : 
Preheat oven to 180 degree Celsius.
Grease and line a 6" round baking tin.
Place sugar, eggs and lemon zest in a bowl and place it over a pan of simmering water as a double boiler. Take care that the water should not touch the bowl of eggs. 
Whisk the mixture over medium heat till it doubles in volume. You will know the right stage once the mixture forms a ribbon trail when the whisk is lifted.
Sift in 1/2 of the flour and gently fold in the whisked mixture with a metal spoon. 
Add the remaining flour and fold again.
Gently fold in the butter. 
Pour the mixture in the prepared tin.
Bake for 15-20 minutes or till a toothpick inserted in the middle comes out clean.
Allow to cool and cut cake in half.

Pastry Cream filling:
Pour milk, vanilla extract and salt in a saucepan.
Place over medium heat and stir. Bring it to a near boiling point.
Add cornstarch and sugar in another bowl and whisk.
When milk is ready, gently and slowly add to the egg mixture and stir simultaneously. 
Pour the mixture back into the saucepan and continue to cook over low heat till it thickens and coats the back of a spoon.
Pass through a fine mesh and allow to cool.
Whisk in the butter. 
Cover cream with a plastic wrap pressing on top of cream to avoid skin formation.
Chill in fridge. 
Can be stored upto 5 days in refrigeration.

Sprinkle gelatin over water and allow to soften for 3-4 minutes.
Take 1/4 cup cream on a double boiler and heat it.
Add gelatin and whisk. Add in the remaining cream.

Mix in the whipped cream well and transfer the pastry cream in a piping bag and store in fridge till  further use. 

Simple Syrup : 
Combine sugar and water in a pan and bring to a boil. 
Allow to cool.
Can be stored in fridge for upto 1 month.
Can be flavoured too. 

Fraisier Assembly : 
Cling wrap the entire inside of the 6" round pan with some extra hanging out. This will be useful to pull out the gateau from the tin. You may also use a springform pan to make it easier in which case you will only need to line the sides of the pan with cling wrap.
Fit bottom cake layer in the pan and moisten with sugar syrup. 


Slice strawberries in arrange around the sides of the pan.


Pipe cream in between the strawberries and a thin layer across the top of cake.


Chop the remaining strawberries and place them in the middle of the cake.


Cover them with the pastry cream and smoothen top.


Place the second layer of cake on top and moisten with sugar syrup. 


Cover top with some remaining pastry cream or whipped cream.
Refrigerate for 4 hours or overnight.
Pull out the gateau carefully from the tin with the help of the overhanging cling wrap.
Place on a plate and decorate with strawberries and chocolate decorations.


Our anniversary celebration was made delicious with Vishal's Chicken biryani which followed by a visit to a newly opened cafe for some coffee and cupcakes. 


Happy Valentine's day
Amrita

Wednesday, 27 August 2014

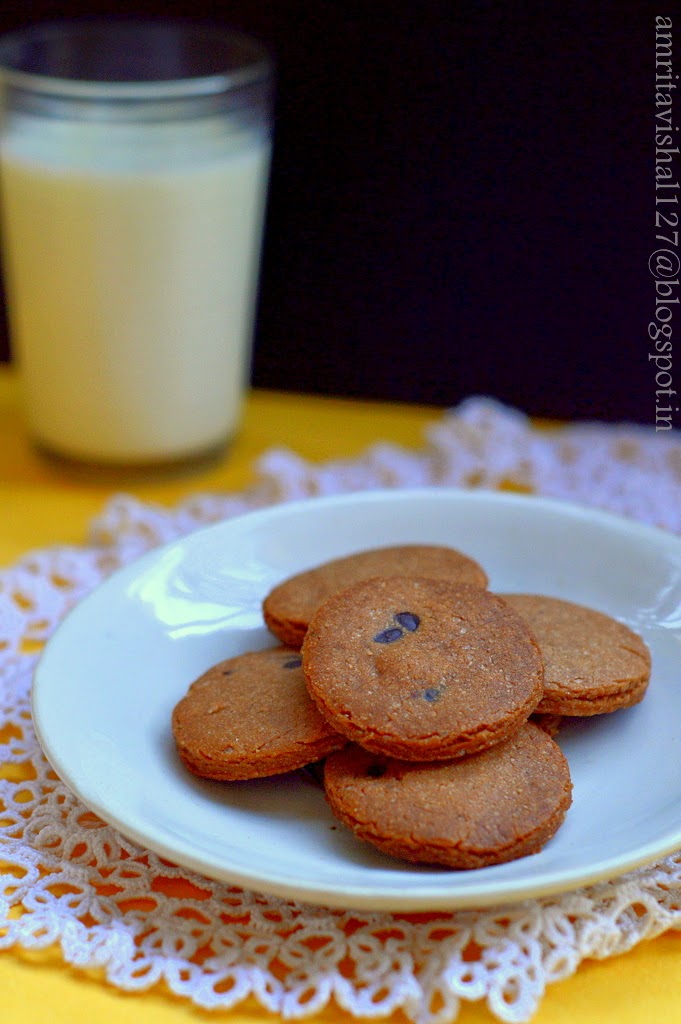
Cookie glass & some choco-chip cookies


Every now and then I am on a break from our blog. I guess with everything that you are passionate about there comes a time when you want to take a break.. relax..take a backseat and just wait for the right moment to get back on your feet and start again....that is if you are still passionate about it. 
Thankfully my passion to cook and click is still alive and hence here I am sharing a little overdued 'Sweet day' post. 
Choco chip cookies is not something new to the world of baking. In fact they were invented accidentally by Ruth Graves Wakefield of Toll House Inn who replaced baker's chocolate with chopped pieces of semisweet chocolate bar from Nestle which did not melt and only softened giving birth to the famous Chocochip cookies.
As famous as the chocochip cookies itself is its pairing with a glass of milk. There is certainly something about dunking your cookie in a glass of milk and eating it which is loved by all. 
Recently I chanced upon the Cronut Guru Dominique Ansel's newest invention-The Cookie shots where he has given a new dimension to the timeless pairing of cookies and milk. He made cookies shaped in glasses which can hold the milk and therefore you can drink your milk and eat your cookie at the same time. The cookie shots are lined with a layer of melted chocolate to avoid the milk seeping in the cookie and breaking it. 
I decided to try them at home but struggled with any pan of that shape. Found on the net about using stainless steel for baking and chose some glasses for my experiment which turned out pretty good. Stainless steel can get very very hot and hence you need to be very very careful while dealing with it for baking. Another important thing is greasing the glasses really really well. I regretted not trying one batch by lining the glass with butter paper/parchment paper. I overbaked one batch and had the toughest time of my life trying to get the cookie out from the glass. Well, it finally crumbled and came out a mess. Thankfully one cookie glass came out good enough for my experiment and I loved pouring my milk into it and enjoyed the experience of having my milk in a cookie glass! 
This sweet recipe definitely had to be on my Sweet day recipe list. Vaanya, my daughter enjoyed the cookies more than the cookie glass. I guess the traditional did beat the modern here. 


Recipe : Adapted from here 

Ingredients : Yields about 15 small cookies (2" round) and 2 cookie glasses (3" height)
  • 1/2 cup butter, room temperature
  • 3 tbsp sugar, powdered
  • 4 tbsp brown sugar, powdered
  • 1/4 tsp baking powder
  • 1 1/4 cup all purpose flour
  • 1 tbsp cocoa powder
  • 1/4 tsp salt
  • 1/4 cup choco-chips
  • 1/4 cup melted dark chocolate


Procedure : 
Take butter and both sugars in a bowl and whisk till light and fluffy.
Add all purpose flour, cocoa powder, baking powder and salt and knead to a smooth dough.
Knead in the choco chips. 
Refrigerate the dough wrapped in cling film for 30 minutes. 
Preheat the oven to 180 degree Celsius.
Take Stainless steel glasses and brush inside with butter liberally. Take little portions of the dough and press against the steel glass and smoothen it. 
Refrigerate the glass for 15 minutes for the dough to set.


Roll the leftover dough to 1/4 " thickness and cut out round shapes with a cutter. 
Place them on an aluminium lined baking tray. 


Bake the cookies for 10 minutes and allow them to cool.
Put the steel glasses in the oven and bake for 15-17 minutes.
Allow to cool completely as the steel glass will be very hot.
When completely cool tap the cookie glass out of the stainless steel glass. 
Coat the inside with melted chocolate and let it dry.


Pour milk in the cookie glasses and serve. 
Enjoy a sip from the cookie glass and take a bite from the cookie glass or just enjoy the choco chip cookies classic style by dunking them in a glass of milk.


Notes:
  • You can use deep muffin pans to make the cookie glasses instead of the stainless steel glass
  • Melted white chocolate can also be used to coat the inside of the cookie glass
  • You may omit the cocoa powder in the dough for the more classic Choco-chip cookies

Happy Chocochip cookies devouring
Amrita

Tuesday, 24 June 2014

Profiteroles-my affair with the French pastry


A month has flown by and its time to share a sweet something for my 'Sweet day'. 
Vaanya has turned 3 years and 1 month old. We had the most amazing birthday celebration for her 3rd birthday in Lucknow with family. The theme was Mickey mouse clubhouse as it is her new fetish. Kids and adults of the family joined in to decorate the house and have a Clubhouse party. From the food to the games, every little detail was planned collectively a month back. I tried my hands on a Surprise Mickey mouse cupcake and shared here for my last Sweet day. You can view the fun we had through some pictures that I shared here
Today I planned to share something that I have attempted various times for family and simply love the texture of this unique pastry called Choux pastry(pronounced shoo pastry) This is a classic french pastry which is first made on the stove and then baked in the oven. The pastry has an amazing crispy,buttery and extremely light texture. The Choux pastry can be used to make Cream puffs, Profiteroles or even Eclairs where the basic mixture is piped in different shapes and baked. 
Having tried this recipe several times, I have realized the importance of technique which is solely responsible for success in this pastry. It is a very simple pastry but only if you follow the instructions carefully otherwise you can end up with a flat disc of baked dough. The pastry is supposed to puff up in the first few minutes of baking getting the quintessential crinkles on top and then it is given further time in the oven to get cooked from inside. 
Once mastered, this pastry will become your favourite and will win many weak 'sweet' hearts. In the past I have also tries a Savoury variation in this pastry with some savoury fillings. 


Ingredients : Makes about 10-12 profiteroles
  • 1/4 cup +2 tbsp water
  • 1/4 cup unsalted butter, room temperature 
  • 2 egg, room temperature
  • 1/4 cup +2 tbsp all purpose flour
  • 2 tbsp powdered sugar
  • a pinch of salt
Procedure :
First things first : 
  • Preheat oven to 200 degree Celsius
  • Sift all purpose flour, salt and sugar and keep aside
  • Beat the eggs lightly and keep aside
  • Line the baking tray with an aluminium foil, lightly greased and keep aside
Now take butter and water in a pan and bring it to a rolling boil. Remember to use butter at room temperature otherwise the butter will take longer to melt and by then the required quantity of water will reduce due to evaporation. 
As soon as it starts to boil, take it off heat and dump the flour,salt and sugar mixture into it. Mix well. 
Put it back on low heat and let the mixture attain a dough like consistency, mixing all along. Do not let the flour mixture scald. 
Take it off heat and allow to cool. Keep checking, when you can touch the bottom of the pan with your finger you are ready for the next step. 
Add a tbsp of the beated egg and mix. Keep adding a spoonful or two and mix. Do not dump in the entire quantity of egg as the size varies which can change the consistency.
You need to achieve a consistency where when lifted with a spatula, the mixture falls off in 3-5 secs in a 'V' shape. Do not add any more egg , once this stage is achieved.
Put the mixture in a ziplock bag or a piping bag and snip off one end. 
Make rough round shapes around 2" diameter on the prepared baking tray(lined with aluminium foil)
If there are any pointy ends, smoothen with a wet finger. 
Put the baking try in the oven and bake on the same temperature(200 degree Celsius) for 10 mins. DO NOT OPEN THE OVEN. This is because in the first ten minutes the pastry puffs up in the hot oven and opening the oven door in between can prevent a good rise of the pastry.
Check if your pastry has risen well otherwise give a little more time. 
Now reduce the oven temperature to 176 degree Celsius and let the pastry cook for 15-20 minutes. The oven temperature is reduced to ensure that the pastry gets well cooked from inside. 
Take them out and allow to cool. But while they are still warm make horizontal slits on the sides for hot air to escape.
You can also cut the pastry in half to make room for any filling. 
Your pastry is ready for infinite number of fillings. I have used a whipped cream filling which I have just piped in with a star nozzle. 
Drizzle or spread a generous amount of melted chocolate on top for an amazing french pastry experience. 


Happy French pastry indulgence
Amrita

Friday, 16 May 2014

Coffee cupcakes-the best ever


I have been having this utter coffee craving for a few days. I have unsuccessfully in the past attempted to pair coffee in my bakes where the quantity of coffee was not enough to bring in the required flavour. Since then I have been wanting to experiment with the quantities and find that perfect coffee cake. 
Fortunately I get such crazy experimental opportunities on my vacation. So after the amazing and very satisfying Swiss Black Forest cake experiment, it was time to conquer the coffee devil. 
I used my time and tested, always a winner, butter cake recipe and added a good quantity of dissolved coffee and a little cocoa powder. This tip was inspired by a dear friend Sarani who loves to add coffee to her chocolate cakes to intensify the flavour. I used the reverse and added some cocoa powder to balance the coffee flavour. 
As critical as I am about my own bakes, I was mighty surprised at the perfect balance of flavours and that hit of coffee in the cupcake. This definitely is a keeper recipe for me and was enjoyed thoroughly by my little daughter (apart from everyone else)


Ingredients : For 5 medium sized cupcakes
  • 1/2 cup all purpose flour
  • 1/2 cup powdered sugar
  • 1 egg
  • 40 gms butter, at room temperature
  • 1/2 tsp baking powder
  • 1/2 tbsp cocoa powder
  • 1 tbsp coffee powder (I used Bru)
  • 1 tbsp hot water
For icing:
  • 1/4 cup whipped cream
  • 1/2 tbsp coffee powder
  • 1/2 tbsp hot water
  • melted dark chocolate
Procedure : 
Preheat oven to 180 degree Celsius.
Dissolve coffee powder in hot water and keep aside to cool till further use.
Take butter and sugar in a bowl and beat it till creamy. I used my muscle power. You may use an electric beater. 
Sift flour, cocoa powder and baking powder.
Add egg to the butter-sugar mixture and mix. 
Add the flour mixture and mix till incorporated well.
Now add in the cooled diluted coffee. Mix well. 
Line muffin tins with liners or grease and flour it.
Pour batter equally to 3/4 the quantity of the muffin tin and bake for 20-25 minutes or till a toothpick inserted in the middle comes out clean.
Allow to cool. 

Icing:
Dissolve coffee powder in hot water and allow to cool. Gently add to the whipped cream without mixing too much. For more on whipping cream read here.
Fill this in a piping bag fitted a star nozzle.
Pipe on the cupcakes.
Take melted chocolate (cooled) in another piping bag or a plastic cone and snip off the end to make a very small hole. 
Pipe random lines on the whipped cream. 
I also made some rough hand motifs with chocolate on  a tracing paper and allowed it to cool for 4-5 minutes. Then peeled them off and put on the cupcakes for decoration. 


Notes : 
  • You may enjoy the cupcake without the icing on top. 
  • If using a stronger coffee, reduce the quantity as it will make the cupcakes bitter. 
  • You can make a coffee cake with the same recipe doubled. Here is one I tried.

Happy Coffee Indulgence
Amrita 

LinkWithin

Related Posts Plugin for WordPress, Blogger...