Pages

Tuesday, 30 July 2013

Triple layer Chocolate Cake-for Vishal's Birthday

Birthdays are nature's way of telling us to eat more cake. – Edward Morykwas

Birthday is such a beautiful day to spend quality time with family and friends, enjoy the non-stop attention through phone calls & messages and receiving wonderful cards & gifts. As a child our expectation from a birthday is a big celebration with pretty decoration, amusing games with friends and lots of gifts. But as we grow older, it becomes a normal day made special with the love of our near and dear ones, to spend time eating and having fun with close knit people. All said and done, a Birthday is always a special day irrespective of any age!

For me though, a mad baker, it is the perfect excuse to bake a cake!! 27th July was one such beautiful day to bake a long awaited bookmarked cake. Triple chocolate mousse cake swooned me the moment I saw it on Pastrypal. The perfectly neat, beautiful and chocolatey layers had me wanting to put my hands on this cake and Vishals birthday was the perfect occassion.

I baked this cake a day before and the bottom layer was made in a breeze. I kept my cake layer a little thicker and cut into 5" round. This was the base. The next two layers supposed to be mousse layers met with disaster as I simply forgot to buy whipping cream. I had even forgotten to carry my electrical beater to my mum's place where this cake was baked to surprise Vishal. I rammed my head for a long time and wished I had read the recipe properly before jumping onto making it. I was literally left with no choice but to skip the mousse idea. I decided to make Panna cotta layers and cross my fingers for it to work. Having made Panna cotta before, my concern was whether they will stay on the cake base or slip off.
Thankfully, the cake came out intact and the Panna cotta layers did not slide off. It was one delicious cake with the creaminess and smoothness of the panna cotta and the softness of the chocolatey cake.


Recipe Source: Adapted from Pastrypal

Ingredients : I modified the recipe to yield a 5" round cake and used a 5" round cutter to set the cake.

Bottom Cake layer
  • 40 gm unsalted butter
  • 1/2 cup+3 tbsp sugar, powdered
  • 2 tbsp cocoa powder
  • 1 egg
  • 20 gm dark chocolate
  • 3/4 cup+2 tbsp all purpose flour
  • 1 tsp baking powder
  • a pinch of salt
  • 1/4 cup water
  • 1/4 cup milk
Dark Chocolate layer(Middle)
  • 1 tsp powdered Gelatin
  • 1 tbsp  cold water
  • 1/4 cup milk
  • 1/2 cup cream(I used Amul)
  • 25 gms dark chocolate, chopped
White Chocolate layer(Top) 
  • 1 tsp powdered Gelatin
  • 1 tbsp cold water
  • 1/4 cup milk
  • 1/2 cup cream(I used Amul)
  • 25 gms white chocolate, chopped

Procedure:

Cake :
Preheat oven to 170 degree Celsius.
Grease and a 9" round cake tin.
Melt chocolate on a double boiler or microwave for 1 minute with 30 sec interval or till melted. Be careful chocolate melted in the microwave can burn easily.
Beat butter, sugar and cocoa powder.
Add egg and mix well.
Pour the melted chocolate, which should have cooled enough by now. 
In another bowl, stir together flour, baking powder and salt.
Combine milk and water and microwave for 45 secs or heat it up in a pan. The mixture will be hot.
Pour this hot milk/water mixture over the butter-egg mixture and stir well till combined well.
Pour in the prepared cake pan and bake for 20-25 mins or till a toothpick inserted in the middle comes out clean.
Allow to cool.
With a 5" round cutter, cut out the cake and leave it  inside the cutter. The next two layers will be set in this cutter.

Dark Chocolate layer :
Chop dark chocolate.
Bloom Gelatin by sprinkling it over the cold water. Allow to stand for 5 mins till it gets spongy and soaks up the water.
Heat up milk and cream to a simmer. Do not boil.
Pour over the chopped chocolate and whisk till smooth. 
Add the bloomed gelatin and mix well till dissolved in the warm mixture.
Pour this over the cake layer and refrigerate for 1-2 hours to set.

White Chocolate layer :
Chop white chocolate.
Bloom gelatin as above.
Heat up milk and cream and pour over chopped chocolate.
Add gelatin and mix well.
Pour over the set dark chocolate layer and refrigerate for 1-2 hours to set.

I refrigerated the cake overnight.
Slide a knife all round the edges to loosen the cake and very gently remove it from the round cutter.
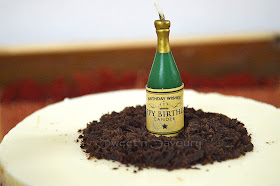
Garnish with some dark chocolate shavings.


Here's wishing a lifetime of happiness and togetherness to my best friend, my soul mate Vishal. You are the best thing that happened to me.

Linking to Bake Fest#21 brainchild of Vardhini
Happy Chocolate cake indulging
Amrita

Saturday, 27 July 2013

Teatime Cherry cake


The summers are officially over with the monsoons having arrived in a big way. The season of rains has been extra generous over most parts of India. With all the good things that the rainy season brings, like relief from the torturous summer's heat and rainfall for the crops, it also brings along a host of diseases. It is considered to be one of the worst time of the year to eat out, especially, from the roadside stalls because of the fear of receiving germs from contaminated water they usually use. Pools of water are the best place for viruses to thrive which kick starts the rounds of the dreadful viral sickness. 

Do not get me wrong, I personally love the season of rains and love all the yummy, warm and spicy food associated with it. This is the perfect time of the year to make fries at home and devour on hot soups and comforting Khichdis.

24th of every month is the day we celebrate as 'Sweet day' to remember the beautiful and joyous presence of our daughter Vaanya who was born on this date. Till she turned 1 year, we celebrated every 24 with either a homemade or a store bought cake. Since then, it has become a ritual for us to celebrate the day with something sweet. 
This 24 th however, our darling angel caught on the dreadful virus and had fever with a runny nose. It is one of the most helpless and miserable feeling to see your little one lying still in bed and having no strength to do her usual round of mischief. Thankfully the sickness was shortlived and she was back to her naughty self very soon.

This very simple cake uses the same recipe as my Comfort food-chocolate cake. This is an all time tried and tested recipe which is a family favourite. I made it in into a vanilla cake and added whole pitted cherries in the batter. The cake, as expected, was super soft and yummy. The addition of fresh cherries added that amazing zing to an otherwise normal vanilla cake. It is a perfect tea time cake being super easy and quick to make.


Ingredients : Makes a 9x4" loaf shaped cake

  • 1 cup all purpose flour
  • 100 gms unsalted butter, at room temperature
  • 2 eggs
  • 1/2 cup sugar, powdered
  • 1 tsp baking powder
  • 1/2 tsp vanilla essence
  • fresh cherries, pitted


Procedure :
Preheat oven to 180 degree Celsius.
Grease and line a 9x4 loaf tin.
Mix butter and powdered sugar in a bowl and beat it with a spoon till it becomes creamy.  
Sieve refined flour and baking powder and keep aside.
Beat the eggs lightly in a small bowl.
Now mix the flour mixture, beaten eggs and vanilla essence to the bowl of butter and sugar mixture. Mix it well so that no lumps are formed.
Pour 1/3 of the batter in the prepared baking tin. 
Add whole pitted cherries on top of the cake batter.
Pour another 1/3 of the cake batter and top with some more cherries. Finally pour the remaining batter.
Bake for 30-35 mins or till a toothpick inserted in the middle comes out clean.
Allow to cool and slice this lovely cake.


This is a basic cake recipe where you may substitute the fresh cherries with Glacéd cherries or Tutti frutti or may leave it altogether.


Linking this recipe to Bake Fest #21 brainchild of Vardhini

Happy Cherry cake Eating
Amrita

Friday, 19 July 2013

The Ocean Platter for 100th post


As children we always loved to paint and let loose the imagination of our own colourful world. As we grow, often life’s experiences turn those vibrant colours into the various shades of grey. Things were no different when we were children than what they are now. The only difference is the conditioning mindset that has evolved over time to develop a certain perspective or attitude that has made us the way we are today. The good news is that God has given us the ability and power to choose how colourful and vibrant we would want our life to be or become.

Marking the 100th post of Sweet’n’Savoury’s food blogging journey we let our imagination loose to create, like a painting on canvas, a vibrant and colourful Savoury dish ‘The Ocean Platter’.

Amrita and I had conceptualized this food painting idea many days ago and were working out each element one by one. The dish had to be a colourful savoury with everything on the platter to be natural and edible.  The enormous task in our hand was creating the blue ocean without using any food colour and one that had to be savoury in nature. For many days we just could not think of anything in this world that would give us a blue extract. No food, vegetable or fruits we could think of could come even close. Moreover, the blue colour in the culinary world is considered to be an appetite depressant. This blue didn’t just have to be vibrant to represent the ocean but it had to be savoury enough to give an appetizing outlook to it.

After much brainstorming my Dessert-Queen, Amrita, found out an ingenious way to create the blue savoury sea. Contrary to our assumption, creating the blue ocean was one of the simplest elements in the Ocean Platter.

The Ocean Platter surely does require more refinement and we are hoping to enhance and inculcate more flavours and techniques into it. We hope that our innovation inspire more food enthusiast in the culinary world to experiment an out of the box thinking food grammar and push the food imagination envelope even further.  

For Amrita and me, it has been an incredible food journey on Sweet’n’Savoury where our lives has been so much enriched by the experience, friendship and passion shared by fellow bloggers.   
 

Procedure:
The Ocean Platter can be as versatile as possible as the accompliments can be served outside the presentation.

Try not to disintegrate or de-shell the sea food as the rich red colour that comes from it is absolutely important for presentation. However it is very important to try to slit the shell at the back of the prawns to devein it. You may also just cut off the head of the prawn but leave the overall body and shell intact.

Likewise, you can have the crab cleaned the usual way except for leaving the whole body intact rather than breaking it up. Ensure to reserve the hood of the crab just for presentation.

You may include an assortment of as many sea fishes as you like. Since this was just an experiment I decided to try only three.

You may cook the sea food the way you want. Throwing it in seasoned boiling water is a great way to cook them through and through specially when their entire body in intact. You may season the water with strong spices such as bay leaf, black peppercorns, garlic, etc and herbs such as parsley and chopped onion with salt. Alternately you can also marinate the sea food and pan fry it. 

The sea bed and the sands are crushed bread toast. Using real bread crumbs is more advisable as you can inculcate all types of flavours. 

The tree is the side crust of a regular sliced bread and its branches is the parsley herb. 

The sun ofcourse is the yolk of an egg. 
The green weeds are combo of any salad leaves. I used one called water Ipomia. 


Now for the blue colour- Amrita found an amazing blog by Jojo at http://eyecandy.nanakaze.net where they shared how to extract the savoury blue. It comes from boiling the purple cabbage. and adding baking soda, The amazing thing was the purple cabbage that we boiled directly gave us the blue extract. I did season it with salt but on a test batch I tried to mix in the cornflower to increase the consistency of it. However the brilliant blue became pale blue. On the platter I have reduced the liquid but it still remains a bit running. We shall be working on it to get the right consistency.


Happy Relishing and Seafooding
Vishal & Amrita 

Wednesday, 17 July 2013

Russian Honey Cake/Medovik

The only reason for being a bee that I know of is to make honey.... And the only reason for making honey, is so as I can eat it. - Winnie the Pooh  
Baking Partners, a baking group started one year back, was started as an effort to learn and experiment different bakes each month. We have baked amazing cakes, melt-in-your-mouth chocolate cookies, the softest bread, ageold favourite Apple pie, and yummy Pumpkin muffins, just to name a few. It has been so much fun baking some amazing recipes and learning new techniques.
This month, as a celebration of completing one year, we decided to bake cakes. After all, how can a celebration be complete without a cake!! As usual, we were given 2 awesome recipes. It is always hard to decide on one recipe. Humi who blogs from  Gheza-e-shiriin suggested a Russian Honey cake called Medovik. Since I had never heard of this cake and the technique looked very different from a normal cake, I decided to try this unusual cake.  
Medovik is one of the most popular cakes in Russia.  It is also known as Honey cake. Basically it is a honey torte with layers of baked cookie with each layer soaked with a creamy filling which is kept overnight to absorb the cream and gives the cake its soft texture. Traditionally, the scraps from the baked cookie is pulsed to get crumbs which is then sprinkled all over the cake.
I used my flower shaped tin to give the cookie a different look than the traditional round shape. Since the cake was given a flower shape, it was but natural to pipe a bee with some melted chocolate!


Recipe Source : AZcook

Ingredients: I used 1/3 of the recipe to get a 4" cake 
  • 1 egg
  • 1/3 cup sugar
  • 1 tbsp honey
  • 30 gm unsalted butter
  • 1/3 tsp baking soda
  • 1 cup all purpose flour+more if required
Filling:
  • 100 gms paneer
  • 100 ml cream
  • 25 gm white butter 
  • 1 tbsp sugar
  • 1 tbsp honey
Procedure:
Preheat oven to 190 degree Celsius.
To make the dough, you will need a double boiler. Take water in a pan over medium heat and place a bowl over it so that it does not touch the water.
Add egg and sugar in the bowl and mix.
Add honey and butter. Cook the mixture until it is well blended and smooth, for about 5 minutes.
Add baking soda and cook stirring continuously for another 1/2 minute.
Remove the bowl from heat and add flour to it gradually. Add more flour if required to get a sticky dough like a Play dough.
Divide into 5 equal balls.
Prepare baking tray by lining it with aluminium foil lightly buttered.
Spread the dough using your fingers and flatten it. 
I used my flower shaped cutter to get the desired shape. You may try any shape. Leave the scraps to be cooked along with the shaped dough.
Since I baked, a smaller version I baked 2 at a go.
Bake for 5-10 mins till it gets light brown in colour.
Remove from tray and keep aside.
Bake the rest of the dough similarly to get 5 layers.
Grind the trim offs to get crumbs.

Filling :
Churn all the ingredients in a mixer to get a smooth consistency.

Assembly :
Spread a generous amount of cream on each cookie and stack them together. 
Cover the top and sides with the cream too.
Leave it overnight in the fridge to absorb all the cream and become soft.
Serve with a sprinkle of the crumbs.
I piped a bee on top with some melted chocolate.
 
 
Sending this recipe to Bakefest#21, brainchild of Vardhini

Happy Honey Cake Eating
Amrita

Friday, 12 July 2013

Baked Doughnuts with Double Glaze


Doughnuts/Donuts are ubiquitous in the United States of America and are referred to as a Fried dough confectionery. They are typically either ring shaped or round without a hole and use a variety of toppings and flavourings. The filled doughnuts commonly have fruit preserves, cream, custard or other sweet fillings. The doughnuts are glazed with different types of sugar glazing such as Chocolate, vanilla, strawberry etc.
Though traditionally fried, doughnuts are also Baked for a low fat version. However, the baked ones do not stand the test of Taste compared with the Fried ones.
My tryst with these sinful yummies was while staying in a hostel during college days. A doughnut was bought to satisfy the usual  hunger pangs which would take care of the tummy and the pocket. The chocolate dipped fried piece of goodness  never went wrong!
Last year I attempted some Doughnuts while staying in Allahabad and wasn't very happy with the bready doughy taste. Perhaps the sugar in the dough was less and so even the generous chocolate glaze did not help my taste buds. Though ironically, the same doughnut was thought to be bought from a bakery and was loved by all. 
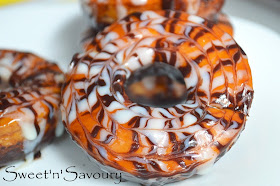
We Knead to Bake for the month of June was Baked doughnuts and though initially I was apprehensive, I tried 1/4 of the recipe to check the baked cousin. My new doughnut pan also needed a trial and so they were made and glazed generously with Caramel and Chocolate. Personally, I loved this doughnut recipe as the dough had the right amount of sweetness and the doughnuts turned out to be a very yummy treat.
The Half and Half Glaze-Caramel and Dark Chocolate


Recipe sourceAdapted from Lara Ferroni’s Book-'Doughnuts'

Ingredients : I used 1/4 of the recipe to yield 4 doughnuts
  • 1 tbsp sugar, superfine or powdered
  • 1/4 cup warm milk (45C/115F)
  • 3/4 tsp instant yeast
  • 1/2 tsp vanilla extract
  • Cake Flour-1/4 cup all purpose flour+1 tsp cornstarch
  • 1/4 cup all-purpose flour+ more if required
  • 25 gm cold butter, cut into 1 inch cubes
Topping :
Glaze of choice-I used Caramel sauce, Dark Chocolate and White Chocolate


Procedure : 
Put the sugar, milk, yeast and vanilla in a bowl and mix well. 
Add the cake flour and 1/4 cup of all-purpose flour and mix, adding a little more of the flour as necessary till the dough is thick and pulls away from the sides of the bowl.
Now add the butter pieces one at a time and mix.
Knead till the dough is soft, pliable and elastic but not overly sticky.
Shape the dough into a ball and place in a lightly greased large mixing bowl, turning it to coat well. Cover with a damp muslin cloth/towel and let it rise till double in volume for about an hour.
Punch down the dough and roll out to a thickness of 1/2". Cut out doughnuts using a doughnut cutter or an other round thing eg glass to cut out 3” diameter with 1” diameter holes. I used my doughnut pan. Place the doughnuts and the holes on parchment lined or lightly greased baking sheets, leaving at least 1” space between them.
Let them rise for about 20 minutes or till almost double in size and then bake them at 200C (400F) for about 5 to 10 minutes till they’re done and golden brown. Do not over bake them.
Allow to cool completely.

Topping
Prepare Caramel sauce from the recipe here
Melt some dark and white chocolate separately and add cream to it to make the respective glaze.

Dip one side of the doughnut in the Caramel glaze and the other end in the Dark chocolate glaze.This can get messy so you may place them on a wire rack to set.
I piped some thin lines on the Caramel glaze side top of the doughnuts with dark and white chocolate and made concentric circles with a toothpick on it for the effect. 


Linking this recipe to Bake Fest# 21, brainchild of Vardhini

Happy Doughnut Eating
Amrita

Monday, 8 July 2013

The Four Seasons Structured Wine Trail Event

Pic Courtsey: Kamalika Chakraborty

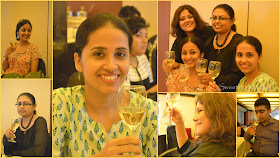
The run up to the much awaited Four Seasons Structured Wine Trail in Kolkata was a mix of suspense, anticipation and ignorance towards the mystery of wine, much like the larger novice non wine drinking Indian crowd at large. The Four Season Wine Trail was held in Kolkata at the Conclave, Rose Room. Being a food blogger along with my wife, Amrita, at Sweet’n’Savoury we had the opportunity to attend it with our fellow Kolkata Food Bloggers group, through Ginger Claps.

For us, The Four Seasons Structured Wine Trail has definitely opened up a whole new chapter of wines in our little food world with the immense insight and knowledge that Peter Mitter, Region Manager-Trade Marketing of UB Group imparted in the session. Earlier the idea of wine was only restricted to homemade wines during Christmas with cakes and salted meat but now we are more than excited to discover wine in a whole new way.

There was a power point presentation which included a short video of the Four Seasons’ state of the art French styled Winery at Baramati, Maharashtra, with the vineyards around it. The winery is turning out to be a huge tourist attraction. Further eye opening information on wine itself was shared like the types of wine, e.g. still, sparkling, and fortified, types of grapes used for making different kind of wine and how to taste and pair wine with food.

Demystifying wine from the white to the red in a series of tasting sessions covering the sight, smell and taste interpretation and subsequently pairing them with the amazing starters that was served was truly an experience that we would not only relish, literally, but also  remember as a starting point to discover the world of wine. 

The yummy starters served at Conclave

The power point covered the wine appreciating guidelines and novice people like us thoroughly enjoyed going through the steps in the series of wine tasting. For beginners like us it was a great suggestion from Peter to begin from white wines and slowly graduate to the red ones. That way we were able to enjoy the gradual ascend and appreciate finer aspects of wine tasting.

There was a shockingly simple revelation to learn that the suggested room temperature to serve Red wine actually refers to the room temperate of the European climates which range between 14 to 18 degree Celsius and not the Indian room temperature which can go up to 40-45 degree Celsius. Similarly the optimum temperature to serve White and Rosé wine is at 8-12 degree Celsius. This is a common misconception in India which has largely affected the general dislike towards wines only because it was not served at the right temperature. It is synonymous to serving aerated drinks like Pepsi, Coca Cola or Thumps Up at Indian room temperatures.      

Sight, Smell and Taste are the three broad classifications. With each wine from the Four Seasons’ series we went through the steps to discover and appreciate wine.


Sauvignon Blanc

Sight- Pale Yellow Coloured, Clear and young wine.
Smell- Fruity with gooseberry tang, hints of green like
asparagus, capsicum
Taste-Mild Acidic, Dry
Food Pairing- goes very well with salads & seafood.

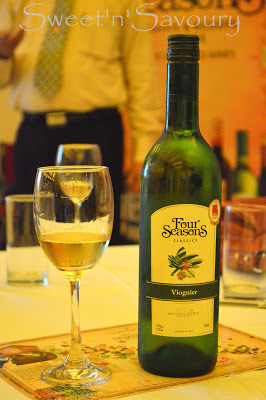
Viognier

Sight- Straw Coloured, Clear
Smell- Flowery, Fruity, peach & cinnamom aroma.
Taste- Mild Acidic, Dry.
Food Pairing- Poultry, Fish etc


Blush

Sight –Very brilliant rosy blush like colour
Smell- Floral, Bouquet
Taste- Fruity, off-dry wine with balancing acidity
Food Pairing- Mildly Spiced Indian and Asian food


Shiraz

Colour- Dark Red Still wine
Smell- Spicy, smoky
Taste- Well balanced, Fruity Acidic, pleasantly spicy
Food pairing- Goes very well with red meat, kebabs and strong flavoured food. Goes exceedingly well with Indian spiced food.


Barrique Reserve Cabernet Sauvignon

Sight- Deep Purple
Smell- Oak barrel, vanilla, black currant
Taste- Mild acidic, off dry, smooth and well-seasoned
Food Pairing- Red Meat, Roast, Ham, Strong flavoured  Cheese and Roasted Vegetables.


All the Four Seasons’ series of the white and the red wines were amazing.  But of course I was blown over with the Barrique Reserve Cabernet Sauvignon, Indian red wine matured in the oak barrels from France itself. The aroma of the oak and vanilla after the swirl of the glass was as smooth as the taste itself, well balanced, off sweet and mellow.

For Amrita, the  Rosé Wine-Blush was the pick with its brilliant rosy blush colour and a beautiful well balanced flowery flavour.  

I was particularly intrigued by the healthy aspects of wine drinking, of course on a moderate level, which is also endorsed by World Health Organization. 'Drinking in moderation' as suggested by WHO is a phrase that Four Seasons Wines stand by and educate. The WHO recommends 3 glasses(310ml) of wine for a male and 2 glasses(230ml) of wine for a female. 
Besides being an appetizer, it also helps reduce risk of heart disease and aging amongst other advantages. Wine is one of the very few alcoholic beverages, both mild and strong, that one can have even after dinner.

I reckon we have found more than one reason to transpose to wine from other drinks and sighting the health advantages that come with it, there shouldn’t be much room for any objection. Moreover, being a food lover, wine has opened up an enormous chapter in our lives the journey of which seems as magical and boundless as its legend and history.  

Check out the Four Season Facebook Page for more information.


Disclaimer: We are in No way promoting drinking alcohol. This is just a review and a write up of our personal experience. As adults, please make the right and responsible choice.

Vishal & Amrita